For the past six months, Jessica and Catarina have been working with the DAAP Library on housing their Teaching art collection, including prior acquisition and newly acquired items. This collection consists of different art prints on paper, print plates and manuscript parchment leaves in need of long-term housing. In addition to housing, this collection is used for teaching in a classroom setting and for exhibition.
Most of the collection only requires simple matting systems, but some require more intricate matting systems such as the copper plate along with its print, a project mentioned in a previous blog post entitled How many magnets is too many magnets!?.
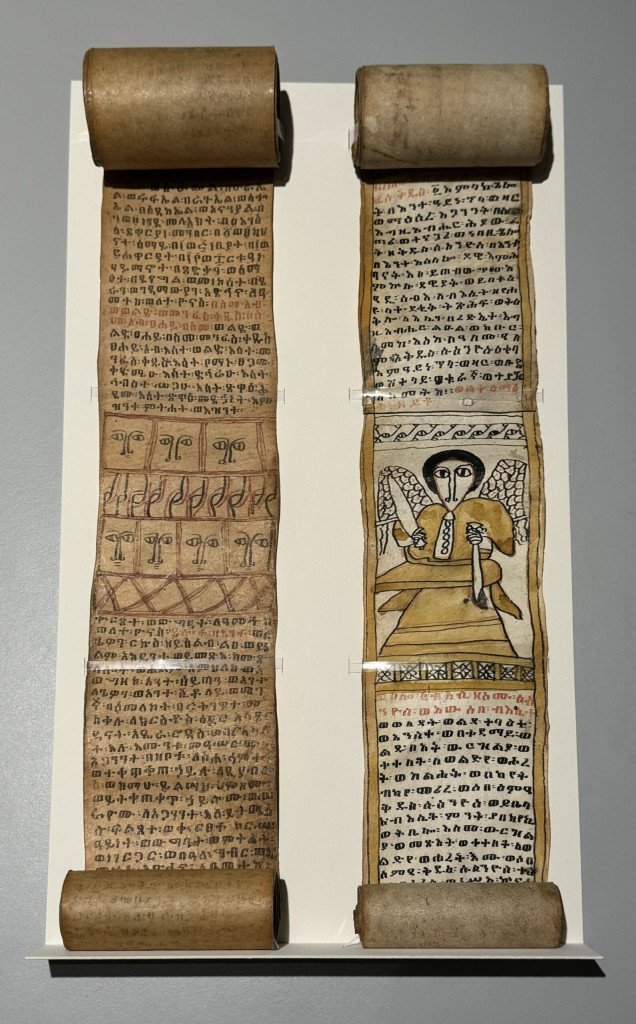
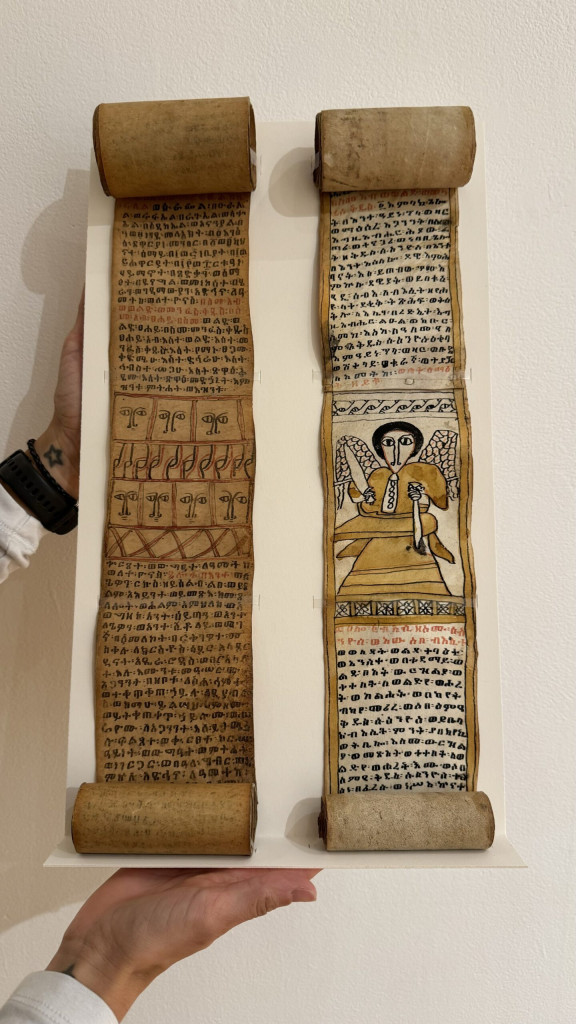
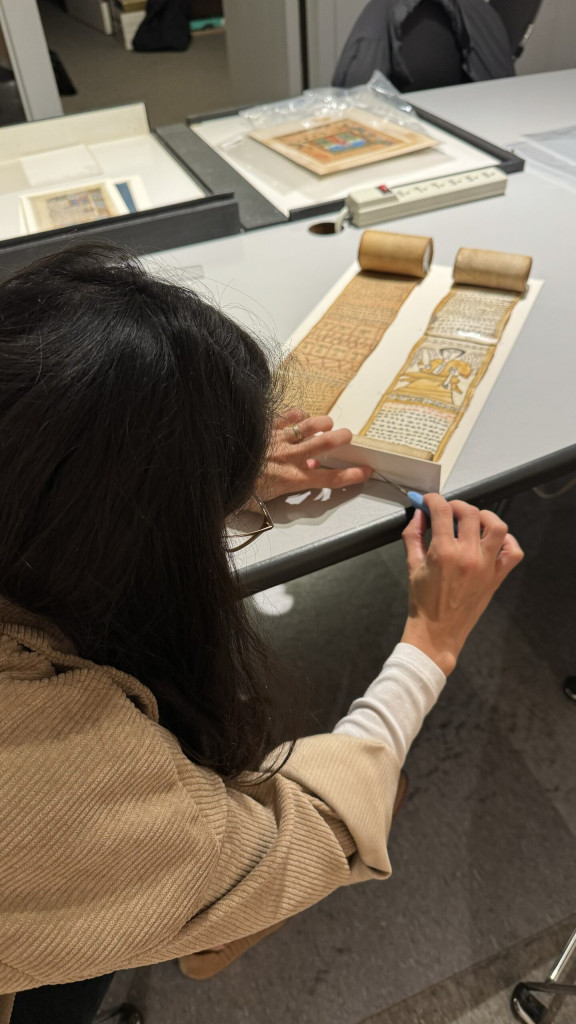
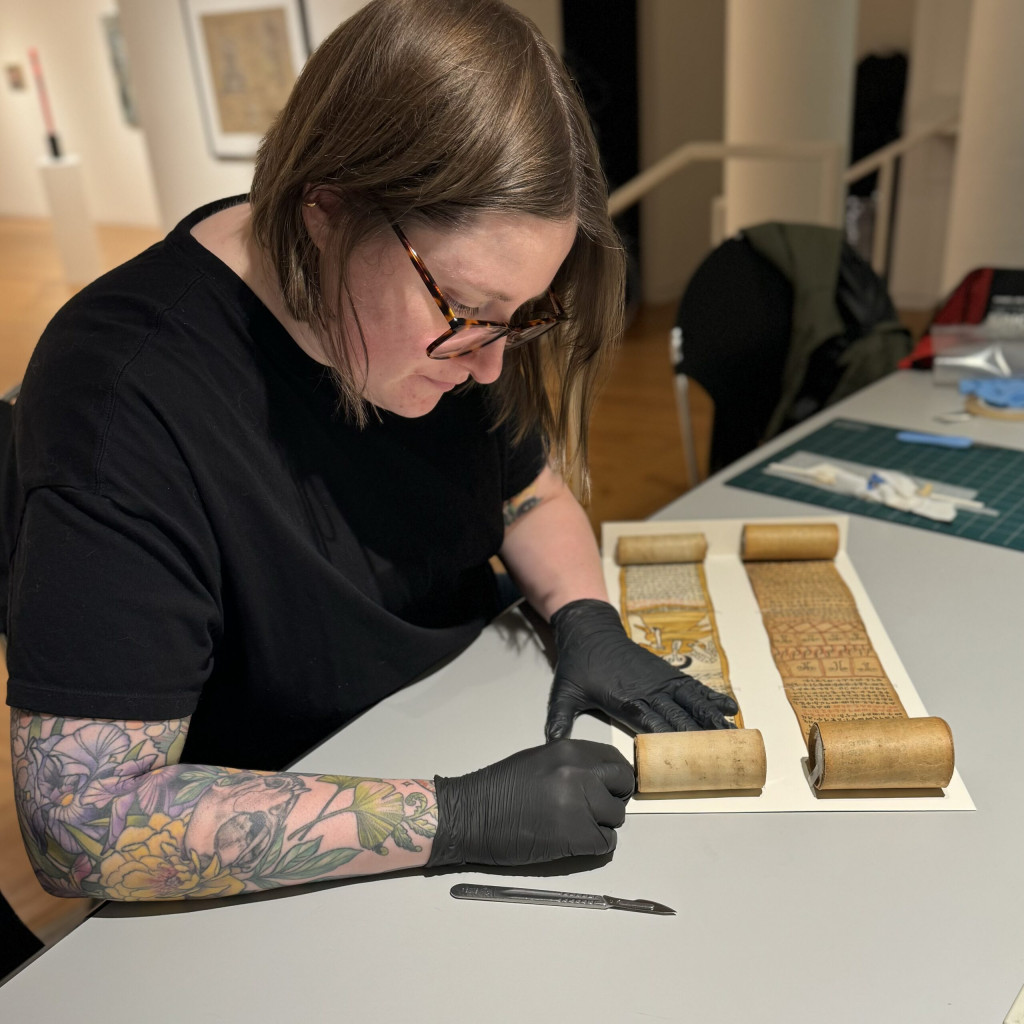
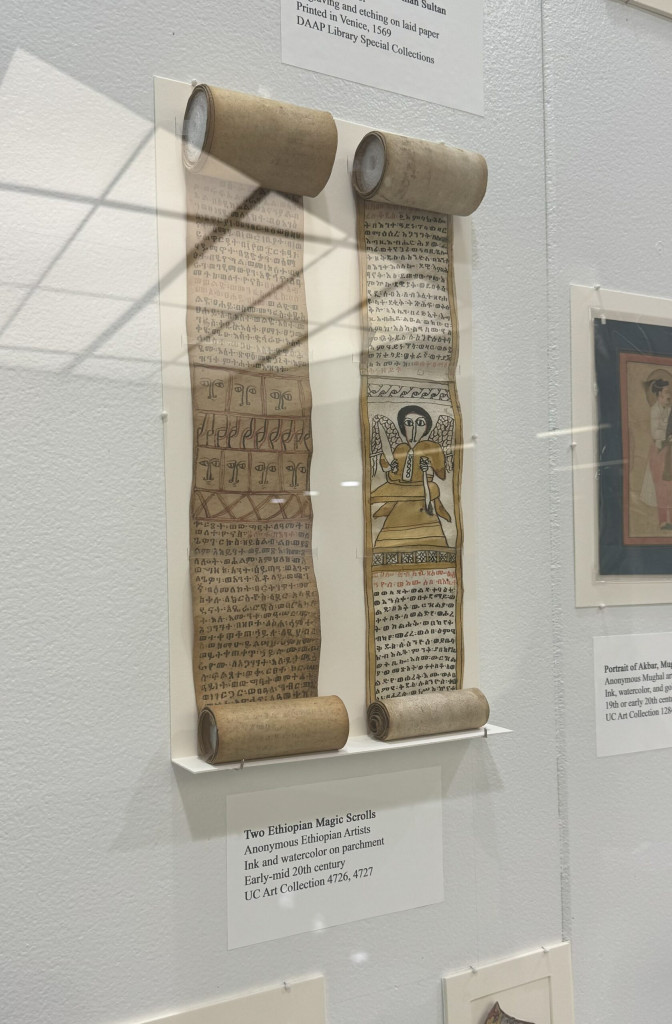
As some of the items of this collection were being prepared to go on exhibit, we had the opportunity to create mounts for other items, such as two parchment scrolls that were included in the exhibit. This was a fun project to work on, as it required us to create a support that would secure both scrolls, while providing an elegant solution for display.
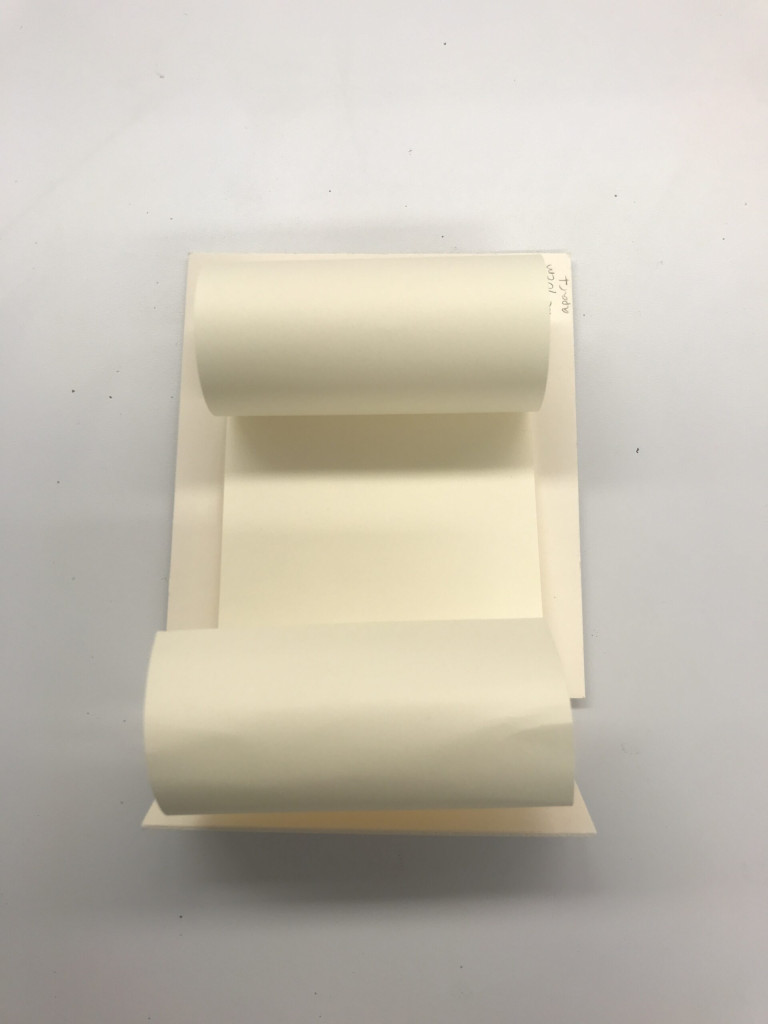
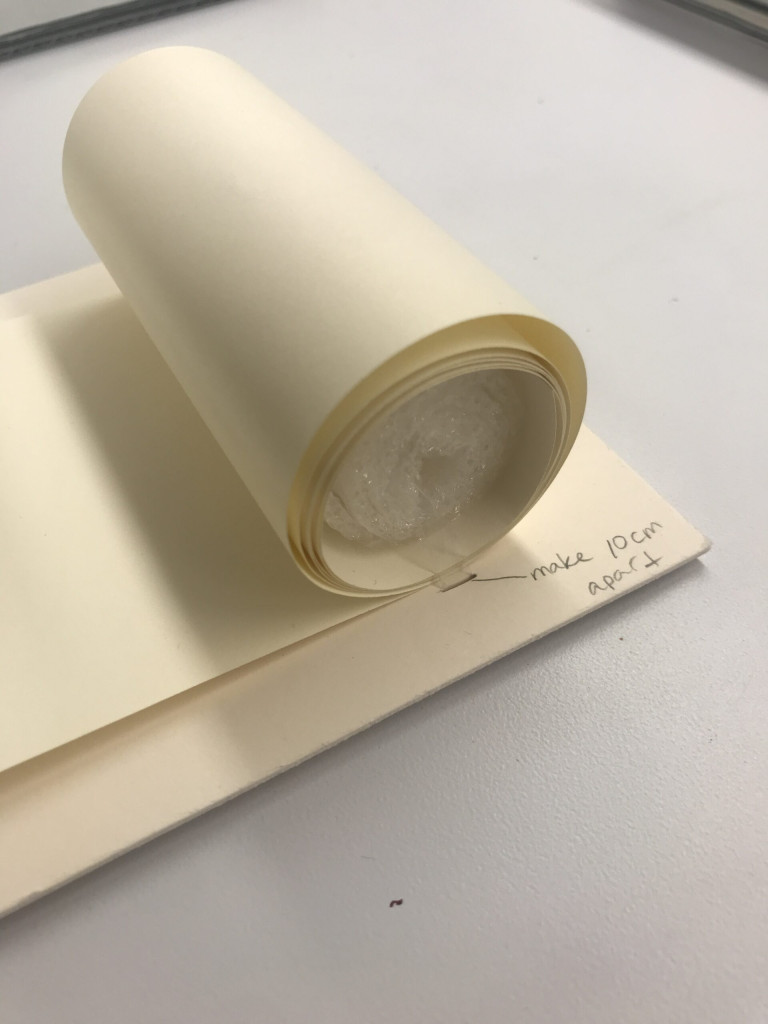
To start, Jessica created a very rough small model with mat board, polyethylene strapping, and paper (as we always do with anything new in the lab, we do love model making!!). The model provided us the visual example that we needed to create the mount for the two scrolls.
Small rough model created by JessicaSmall rough model created by Jessica
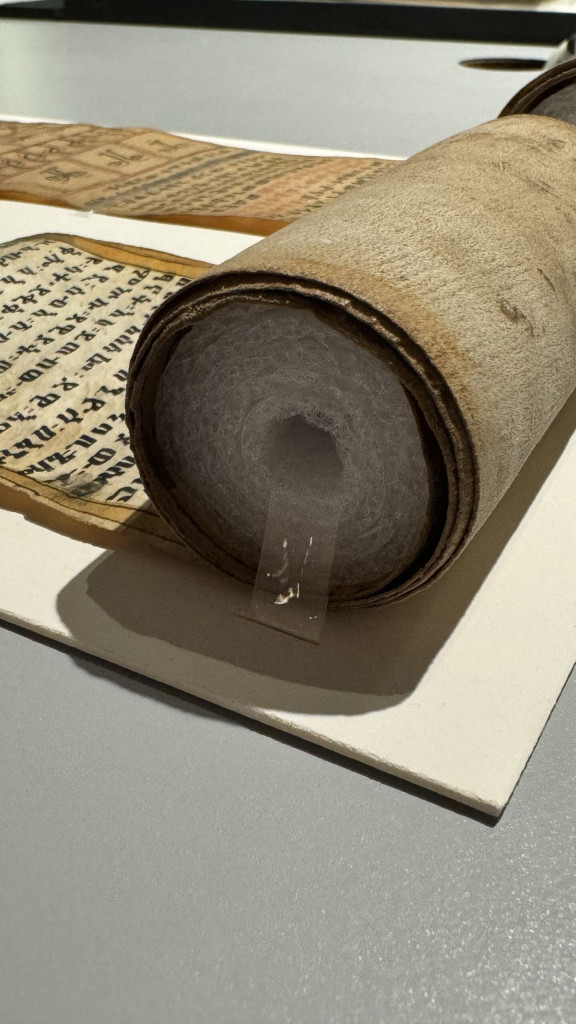
With the model in mind, we were able to engineer a good system that would provide support for the scrolls and could be used for display. The scrolls were supported with foam rolls on the inside for the rolled ends, and secured with polyethylene strapping that only touched the foam. The sections of the scrolls that were going to be displayed were also secured with polyethylene strapping that wrapped around the mat board support through slits in the board. At the bottom, the mat board extended outwards creating a small shelf to support the end of the scroll.
Scrolls mounted and ready for exhibition.Scrolls mounted and ready for exhibition.
A small “shelf” of mat board supports the bottom of the scrolls.
Catarina adjusting the strapping on the mount.
A small “shelf” of mat board supports the bottom of the scrolls.
A small “shelf” of mat board supports the bottom of the scrolls.
The foam rolls support the inside of the scrolls and are secured with polyethylene strapping.
Jessica securing the foam roll that supports the scroll.
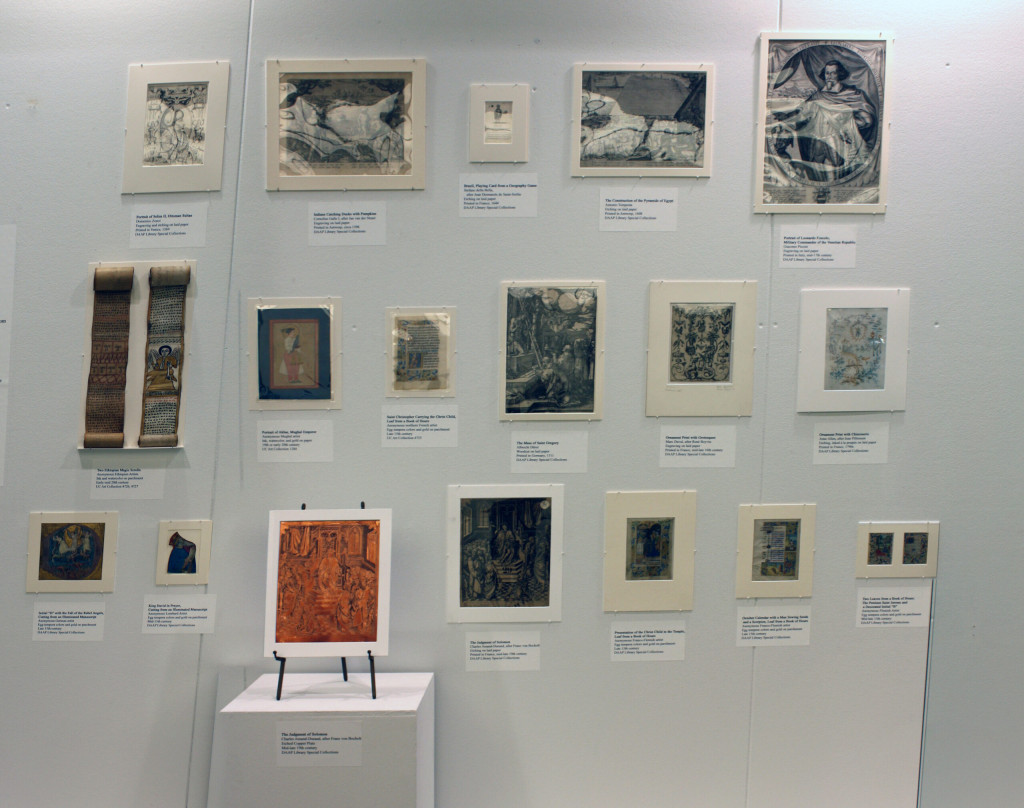
As a result of all the mounting and matting we did for the Teaching Art collection and for the scrolls, each item is currently on display at the DAAP Library entrance case:
Current display at the DAAP Library featuring the Teaching Art Collection.A close-up of the scroll mounted on exhibition.
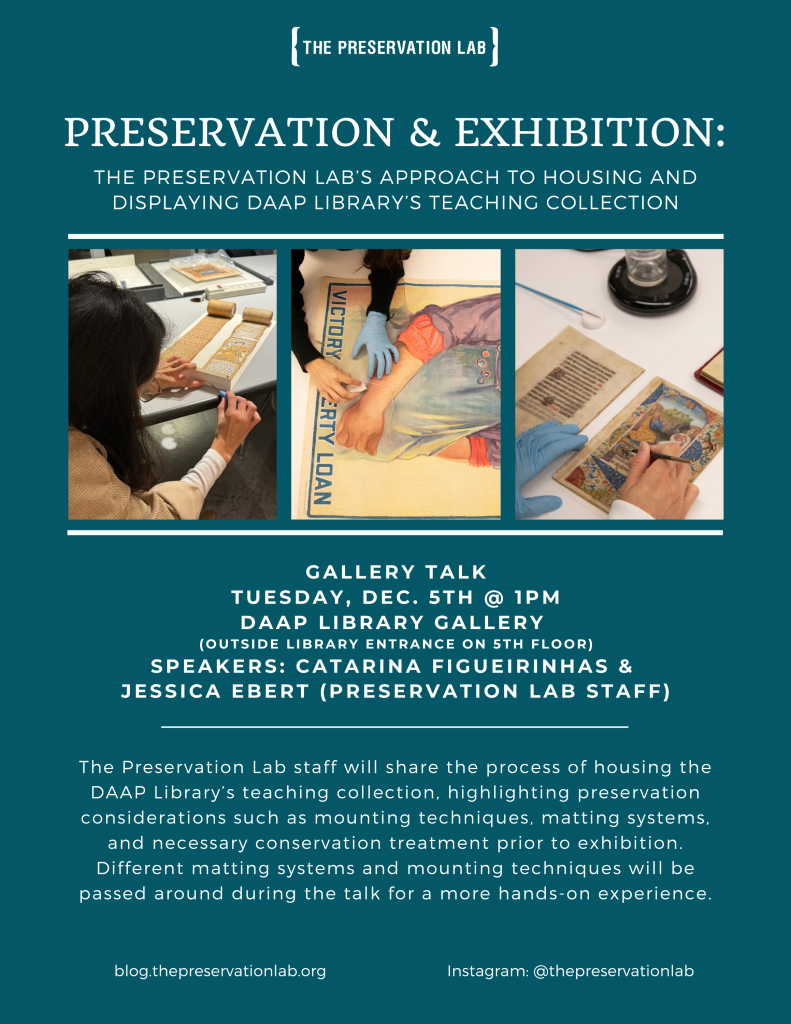
If you are interested in learning more about our preservation considerations for exhibition of this collection, Catarina and Jessica will be giving a short gallery talk on Tuesday, December 5th at 1pm, at the DAAP Library entrance on the 5th floor.
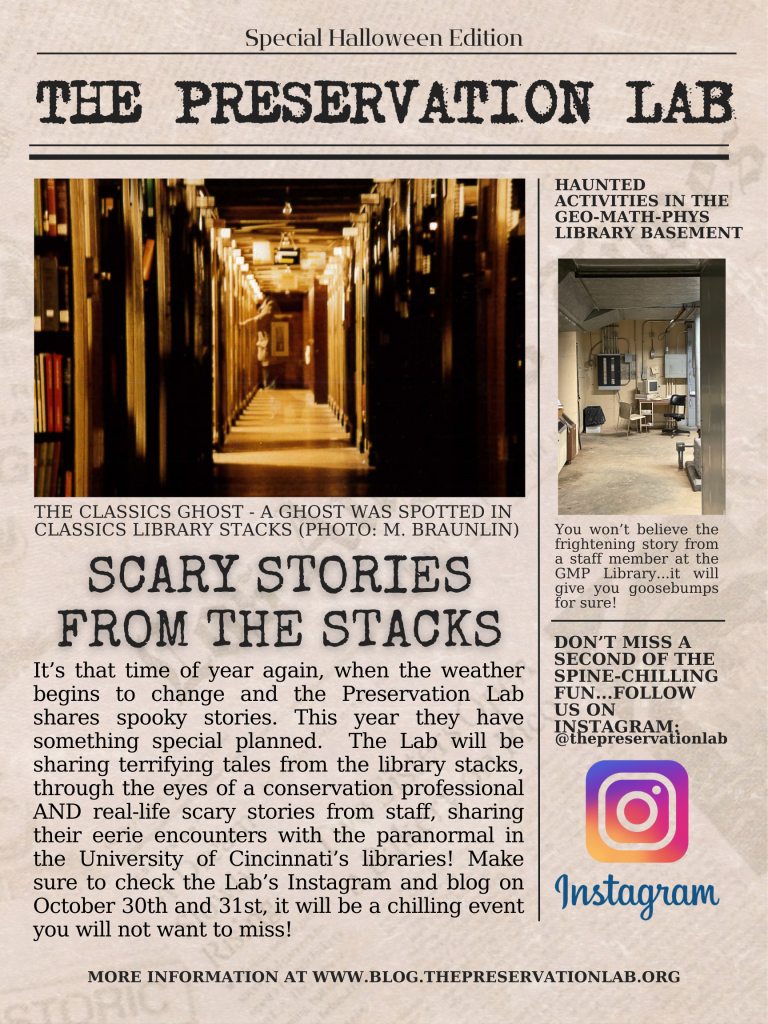
Every year the Preservation Lab celebrates Halloween with some fun, spooky and scary content, and this year is no different. However, this year we decided to reach out to our UC Libraries colleagues to hear about their encounters with the unknown, with the paranormal, and share with us any of those stories.
We received a few submissions that were downright spooky, creepy, and just unexplainable. So prepare yourself! Go ahead and settle in, grab yourself a hot chocolate, and cozy blanket and enjoy!! Hopefully you can sleep after this..
General spooky remarks from Mike Braunlin (Classics Library)
“Ghosts – Local lore is that the Blegen building [which is presently home to the Classics, CCM and ARB libraries] has some of them. In the Archives and Rare Books Department on the 8th floor, an apparition has been seen over the years. I read once that the Classics Department had its offices in that space years ago, and that the entity might be one of the professors of that time. I can add nothing to this story, but for years I became very uneasy whenever I had to visit our rare books in ARB and I am not usually bothered by such things. In later years, what used to invariably scare me when I retrieved a rare book was the life size photographic image of former UC president Nancy Zimpher that was placed in ARB’s stacks. They never moved it (something I would have done regularly), so I knew exactly where I would walk past it; but every time I did, it terrified me anew. But the image is now gone, and as I am also entering an age where I may soon number ghosts as my companions, I no longer fear those stacks. ”
The Ghost of Blegen Library by Kevin Miller
Published in Folkstream – volume 3, issue 3, December 1980 [courtesy of Mike Braunlin]
Cincinnati is a city steeped in tradition and folklore. Drawing upon a population of Eastern settlers, European immigrants, and Appalachian migrants, the Queen City has a varied heritage of tales and legends. Some of these, murder legends and ghost stories, have been around for the life of the city. But folklore is always being created and at least one ghost story is recent in origin: the ghost of Blegen Library.
Located at the south end of the University of Cincinnati campus, the Blegen Library is a large, rectangular structure built in 1930. Formerly known as the Main Library and then as the Old Library, the building was rededicated last year in honor of Carl Blegen, an early Classics professor at UC In the cavernous foyer, sculptures and bronze panels depict the heritage of learning while the chandeliers exhibit proverbs in bronze silhouettes, proverbs in Egyptian hieroglyphics, Hebrew, Chinese, Latin, and Japanese which extol the virtues of education. Printers marks, the trademarks of famous publishers in the history of the printed word, decorate the high walls and stairwells. Blegen Library has a scholarly demeanor, but is at the same time a stuffy, forbidding place.
I remember my years as a graduate student at UC, trying to negotiate the confusing stairwells, the maze of book stacks and small rooms. Some of the book stacks were located ‘underground and in the summertime, the dankness and humidity would assault me like a warm sponge. I often expected to come upon one of those career graduate students which infest every library, hiding in his carrell, his hair turned white and eyes pink from years of little sunlight, turning to me with a small, tubercular cough.
Image provided by Mike Braunlin
Atop the library is the Rare Book Room, a secluded area set off from offices, classrooms, and reading rooms. It is a dark room kept at a constant cool temperature and even humidity to preserve the volumes. Little drafts of air waft around theological tomes and travel accounts, in between shelves of poetry and stacks of folios. In 1976, while l was a students at UC, a student worker was shelving books in the Rare Book Room, alone in the quiet gloom, Suddenly she felt a chilling presence and turned to see a man in the stacks beside her, a rather innocuous and shadowy man who had instantly appeared.
Terrified and breathless, she rushed downstairs leaving her work unfinished. Soon her tale of a ghost quickly spread across campus and I heard about it for the first time. Since then, the story of what the student saw has circulated around Cincinnati.
An informal ghost investigation was conducted for her by a UC professor but the spectre did not reappear. Some versions have it that the man was wearing a gray suit and glasses, others that he was short and smoked a pipe, Some folks believe it was the ghost of a former Classics professor who suffered an untimely and tragic death. His office had once been in the room where the rare books are now housed, and it happened to be near the spot where the ghost was encountered. Be that as it may, the student forever refused to return alone to the Rare Book Room for as long as she was in the library’s employ.
Since I’ve come back to UC as an archivist in the Special Collections Department, which houses the Rare Book Room, I’m often asked by friends and acquaintances about the ghost and in turn I listen to what they have heard. Folklore is a dynamic process, always being generated and always changing. Legends are created all the time and spread by word of mouth. Whether there truly was a ghost of Blegen Library or not, its story is becoming a part of Cincinnati folklore, an example of the creative process in folklore.
Today, there are no offices or reading rooms in Blegen Library. The building is being renovated and the sounds of welding torches and drills have for a time replaced the echoes of students’ footsteps on marble stairs. The bronze panels and chandeliers and printers marks will survive the renovation. Perhaps the ghost will too, patiently awaiting another visitor.
The Haunted Basement under the Geo-Math-Phys Library by Anonymous
View from the elevator
“There’s an urban legend here at GMP that long ago, a maintenance man accidentally died while trying to fix the service elevator. Now he haunts the GMP library and particularly can be spotted in the basement underneath GMP. One day I was teaching one of my coworkers how to use the service elevator and we decided to explore the basement since neither of us had been down there before. When we reached that floor, it was completely pitch black before we turned the lights on, meaning no one else was likely down there. As we walked in, we turned the corner and saw a very old work-station. At that station was an office swivel chair that was slightly turning all on its own. When it stopped, the seat pointed directly at us (almost as if someone wanted us to sit in it). We were both freaked out and decided to leave before exploring more. I have been down there a few times since then and luckily haven’t seen any more activity.”
View of the work-station around the cornerTHE desk!
The Haunted Stairwell by Mike Braunlin
“Over the years, however, student assistants have told me they are uncomfortable working on the fourth floor of our Classics stacks. No one has ever reported to me anything extraordinary, but some have told me that something there made them fearful. Some students would go to great lengths to avoid working in stacks 4 and several downright refused to go there. It is most curious that the stacks photo with the shadowy figure was taken on the fourth stack level in the area where students have reported eerie sensations.
I only experienced one unusual incident and I offer the bare telling of it; I put forth no conclusions…
Ca. 45 years ago, when I was younger, energetic, and dedicated, an inability to stay asleep often led me to go to the office early – I often came to work in Classics around 5 AM mornings. I also didn’t have to sign in and out, as now on Flex, so I could get away with that kind of thing. One winter morning (some would call it late-middle of the night) I had entered the north stairwell of Blegen from the 4th floor to walk down to level 2, where the Classics Library was in those days. I was about halfway down the stairwell, which was in darkness, but for the moonlight shining in the windows, when the entire stairwell (all levels) erupted with the noise of dozens of people talking and laughing all together.
Image from Mike BraunlinImage from Mike Braunlin
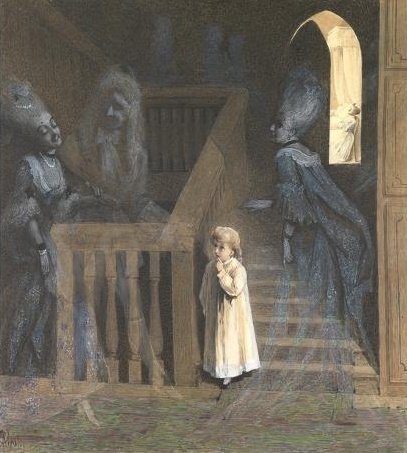
Illustration entitled “The Party on the Stairs” by British painter Adelaide Claxton from 1875
Imagine, if you will, a cocktail party going on in the stairwell, full of people, all talking and laughing at once – all around me. Except there was no one there. I stood there in the darkness, desperately tightening my sphincter muscles and taking in the unreality of this, until I bolted up the stairs, out the front door, and ran to the Majestic Apartments on McMillan, where 2 of our student assistants lived, Claire Sponsler and Susan Stites. I banged on the door and when they, full of sleep and surprise, let me in, I explained what happened, and lay on their couch until 8 AM, then I went back to work. Nearly scared the crap out of me, hence my sphincter reference several lines up, but I am glad for the experience. Also glad, because, 45 years on, Susan and I have been married for 33 years…”
Per our annual Halloween tradition, we have some spooky happenings planned next week. This year we have ventured into the stacks to bring you some spooky stories, so make sure to check the Lab’s blog and Instagram on October 30th and 31st, if you dare!
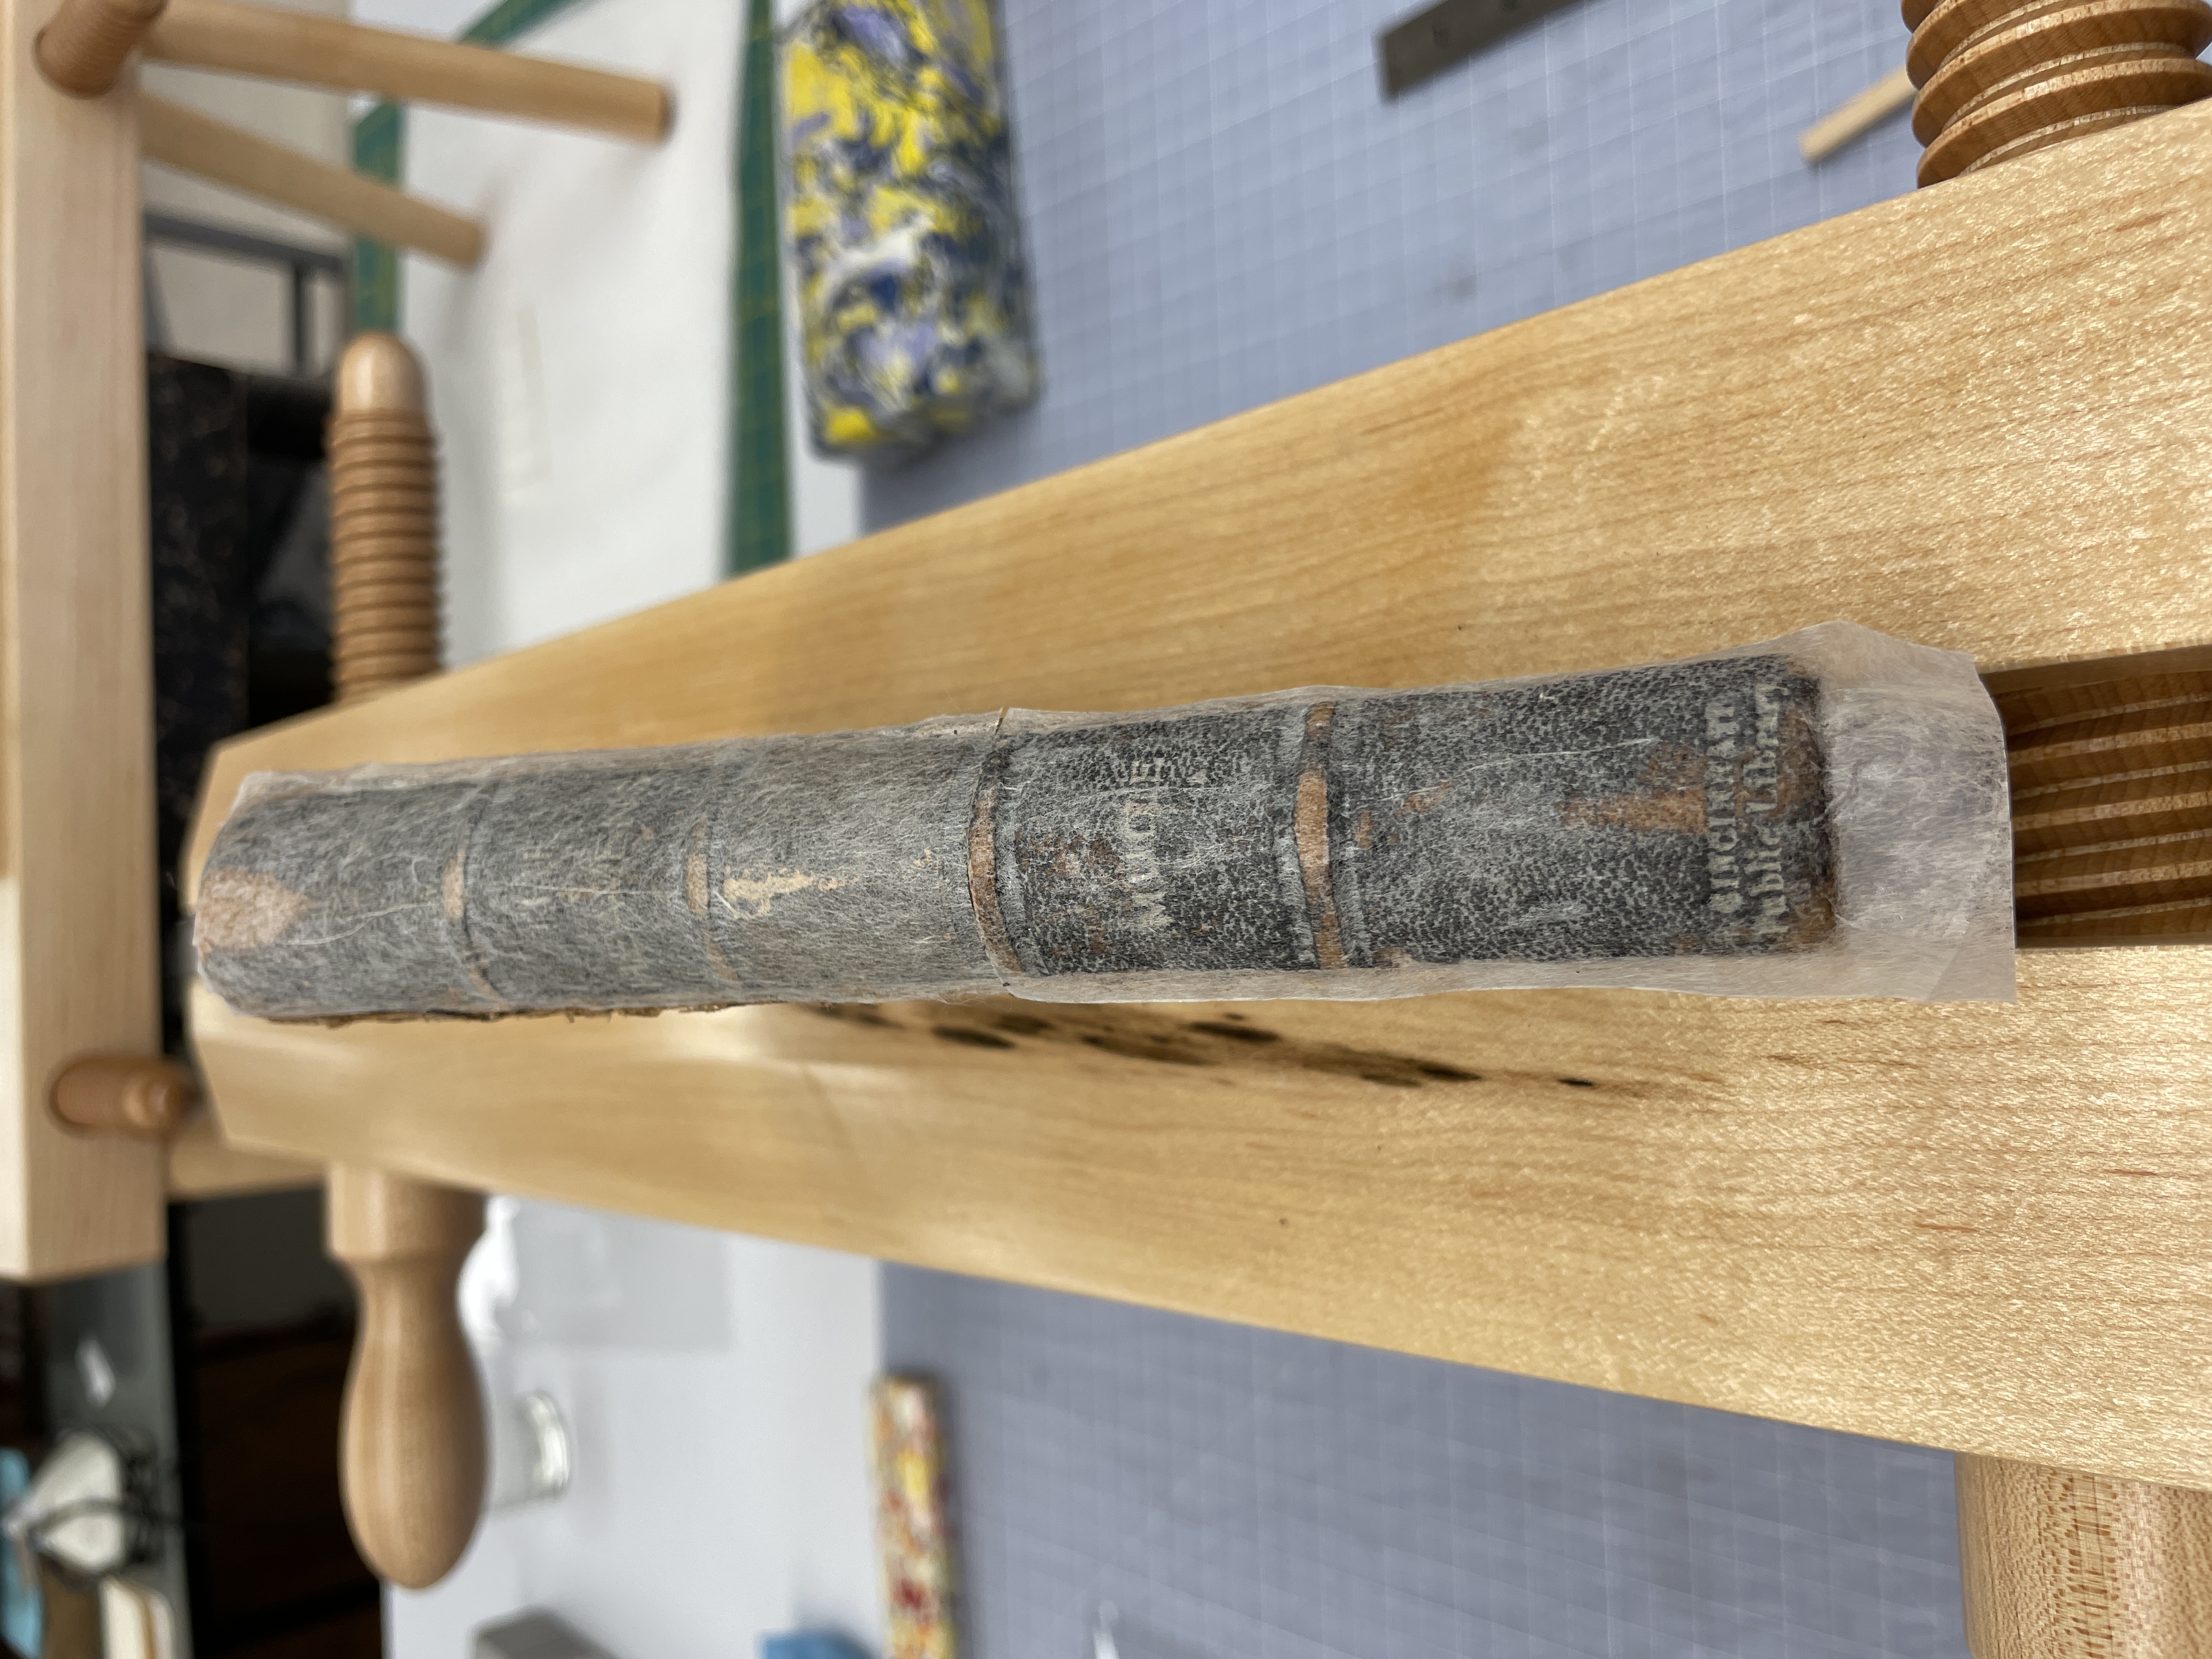
Recently Jessica and I started working on a series of special collection items from UC Libraries’ DAAP Library. These were recent acquisitions specifically bought to be used as a teaching collection within the DAAP Library. Most items are small prints and single manuscript leaves that need to be matted for exhibition and prepared for handling during class. We have been working on these in small batches since it is a much larger collection that keeps growing.
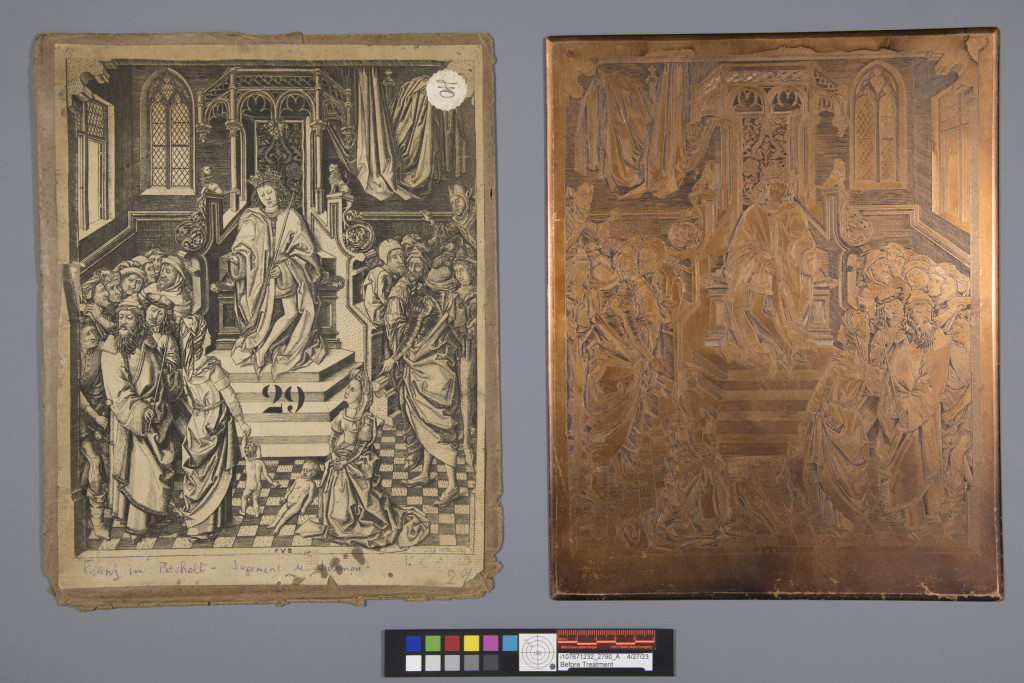
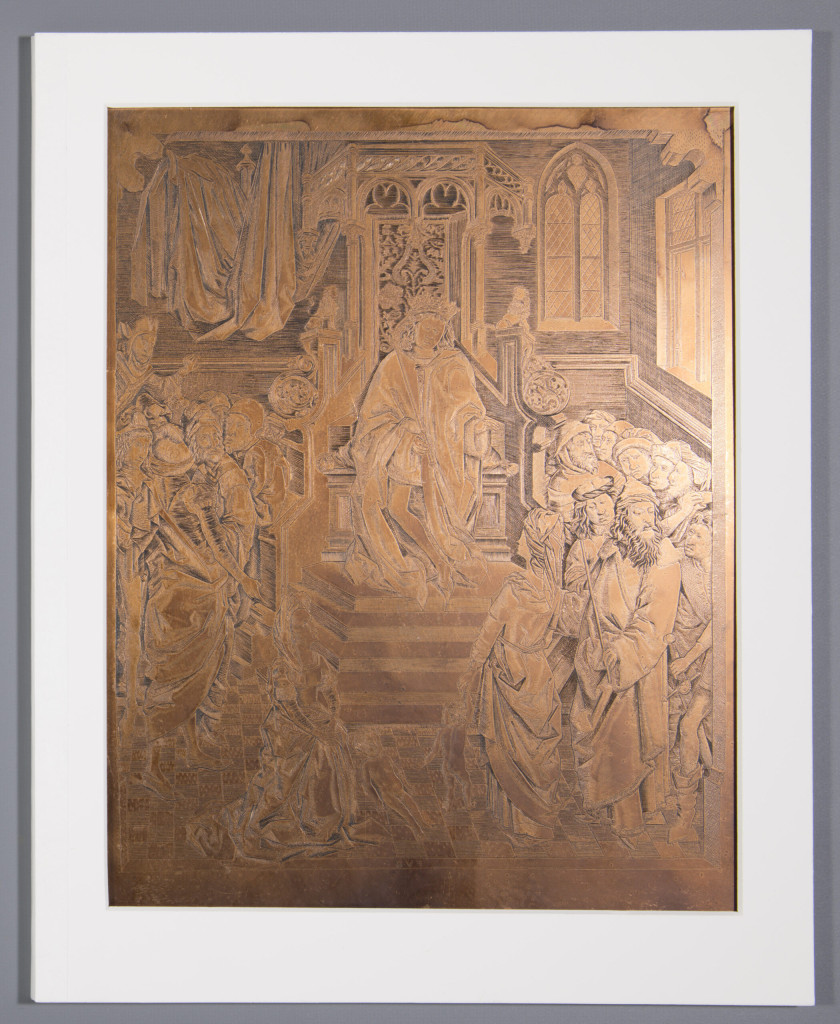
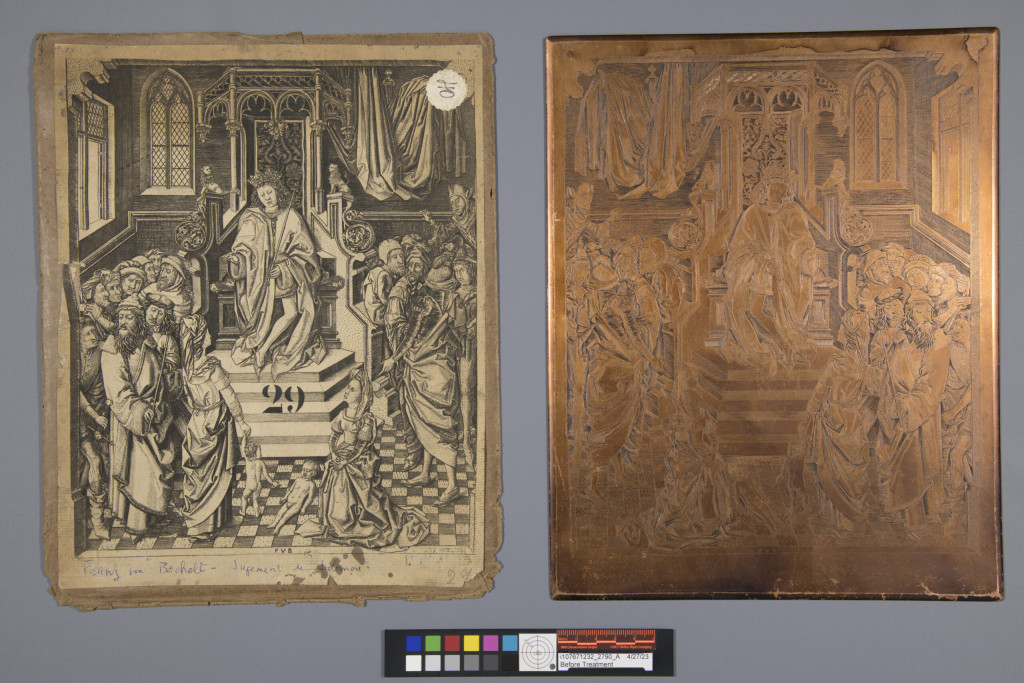
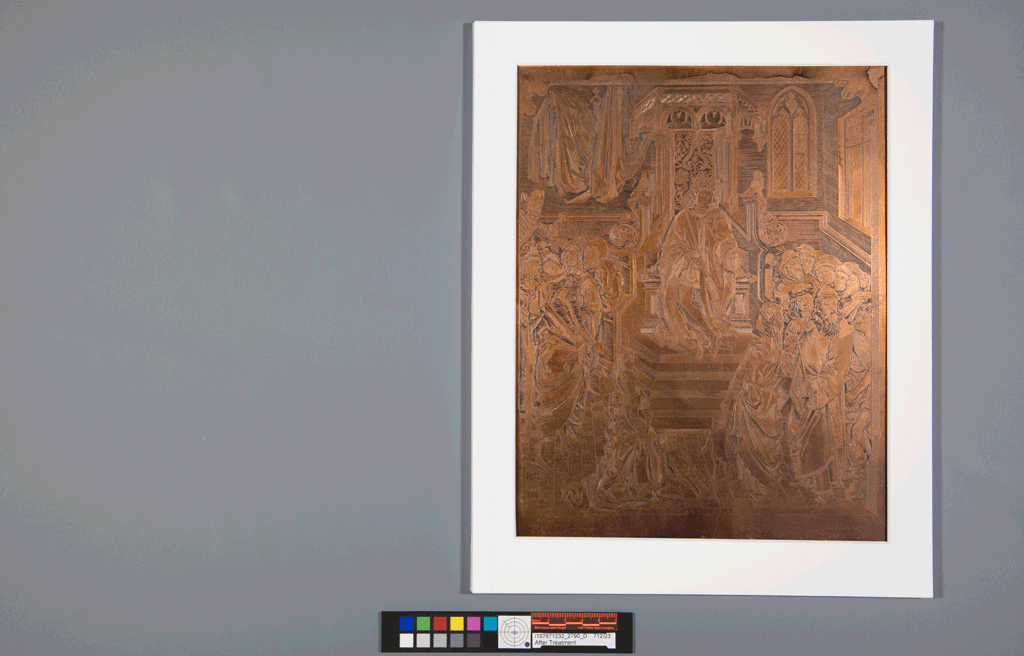
Most of the items we have received so far have been very straightforward matting projects, however we encountered one that was puzzling and fun to work on. We received this item: a proof print accompanied by its very heavy, copper engraving plate. The print was adhered to a paper brown envelope with no information and the copper plate was also unhoused.
Proof print (left) and engraving plate (right) before treatment and housing.
The curator of the collection wanted both items to be housed together and housed in a way that would allow students to touch the items, and also be able to use them for exhibits. We decided that both items would be matted individually, and then housed together in a thin corrugated clamshell box. The most challenging part would be to create a matting system that was strong enough to secure the very heavy copper plate and elegant enough to be used for exhibition.
The print itself received minor treatment, with the backing envelope being removed and the print housed in a polyester L-sleeve mounted with photo corners.
Print housed in a polyester L-sleeve and matted with photo corners.
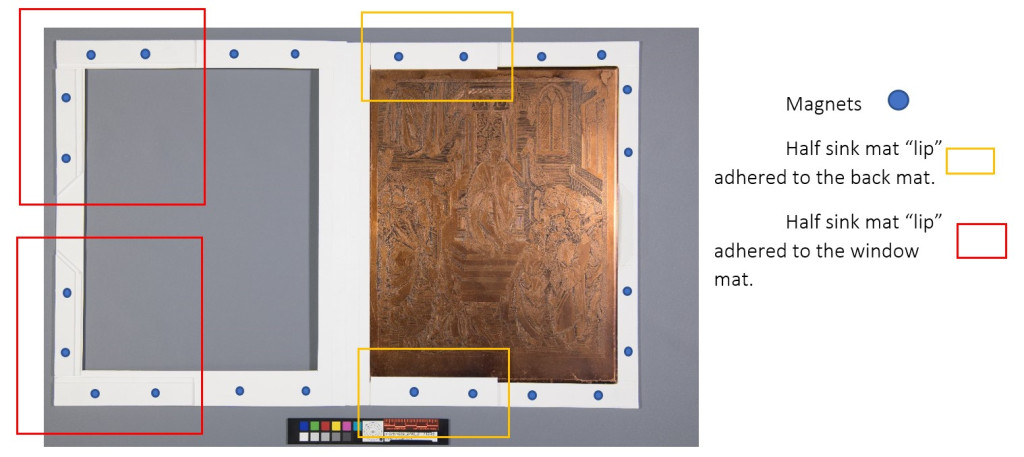
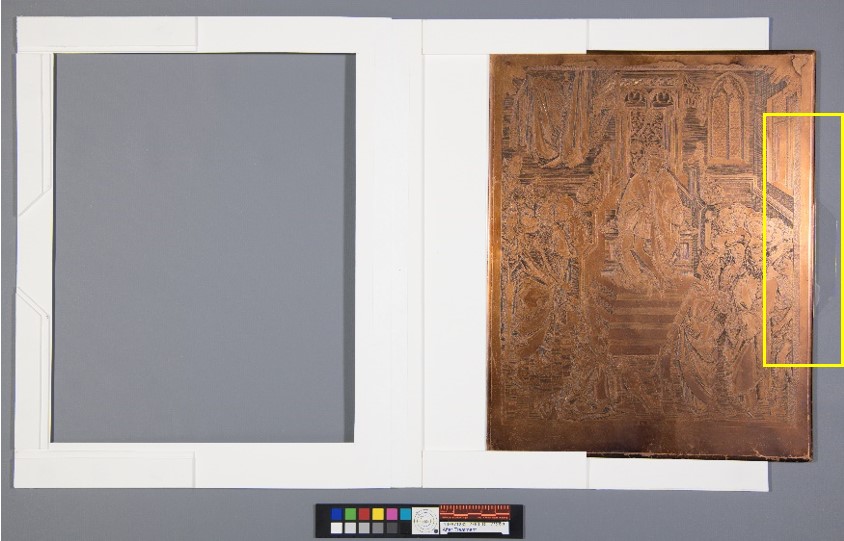
With the engraving plate, I needed to figure out how to create a matting system that was strong enough to hold the copper plate in place, especially if used for an exhibit where it may be propped at a slight angle. After considering some options, I created a sink mat that would secure the plate halfway, and then the rest of the sink mat would be adhered to the window mat so the copper plate, resting on a polyester tray, could be pulled out of the mat easily. How would I keep the matting system closed? ….with magnets, lots of magnets! For this project I used 24 rare earth magnets.
Copper engraving plate housed in a specialty sink mat with magnetic closures.Matting system for the copper plate – a sink mat, half attached to the back mat and half attached to the window mat, all secured closed with magnets.Copper plate slightly removed from the matting system by the polyester film tray.
This was a fun project to work on. After using 24 magnets and breaking a few in the process, the copper plate was securely housed in the sink mat, while also able to be propped up for exhibition and handled for teaching.
Before treatmentAfter treatmentThe matting system in action!
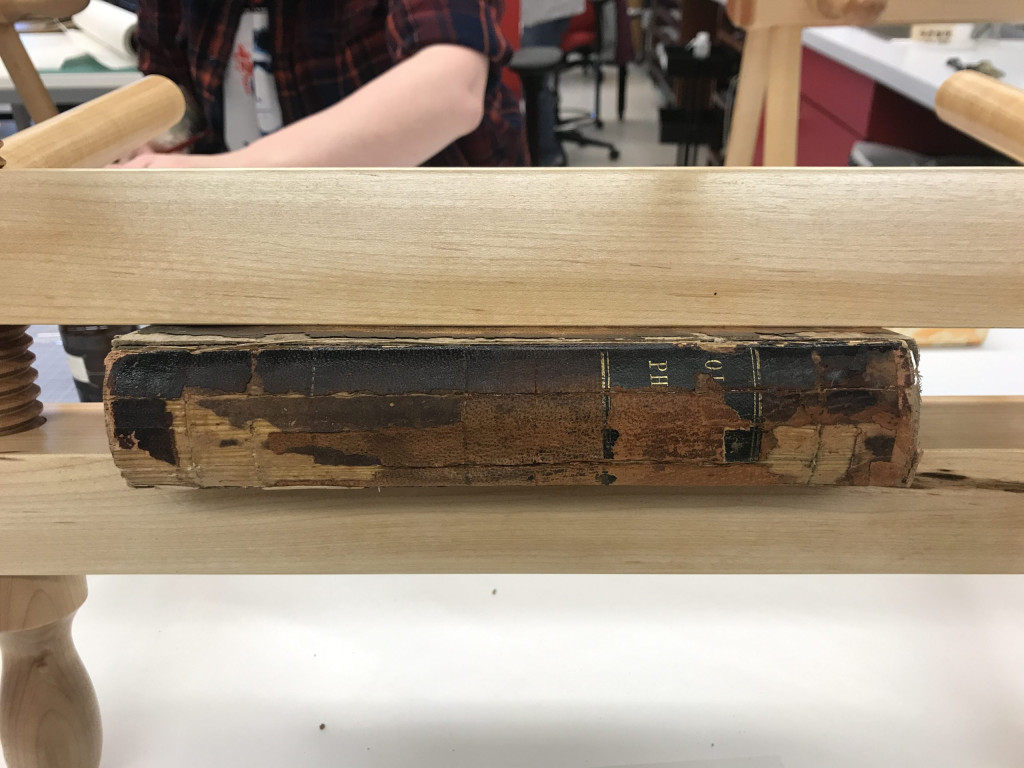
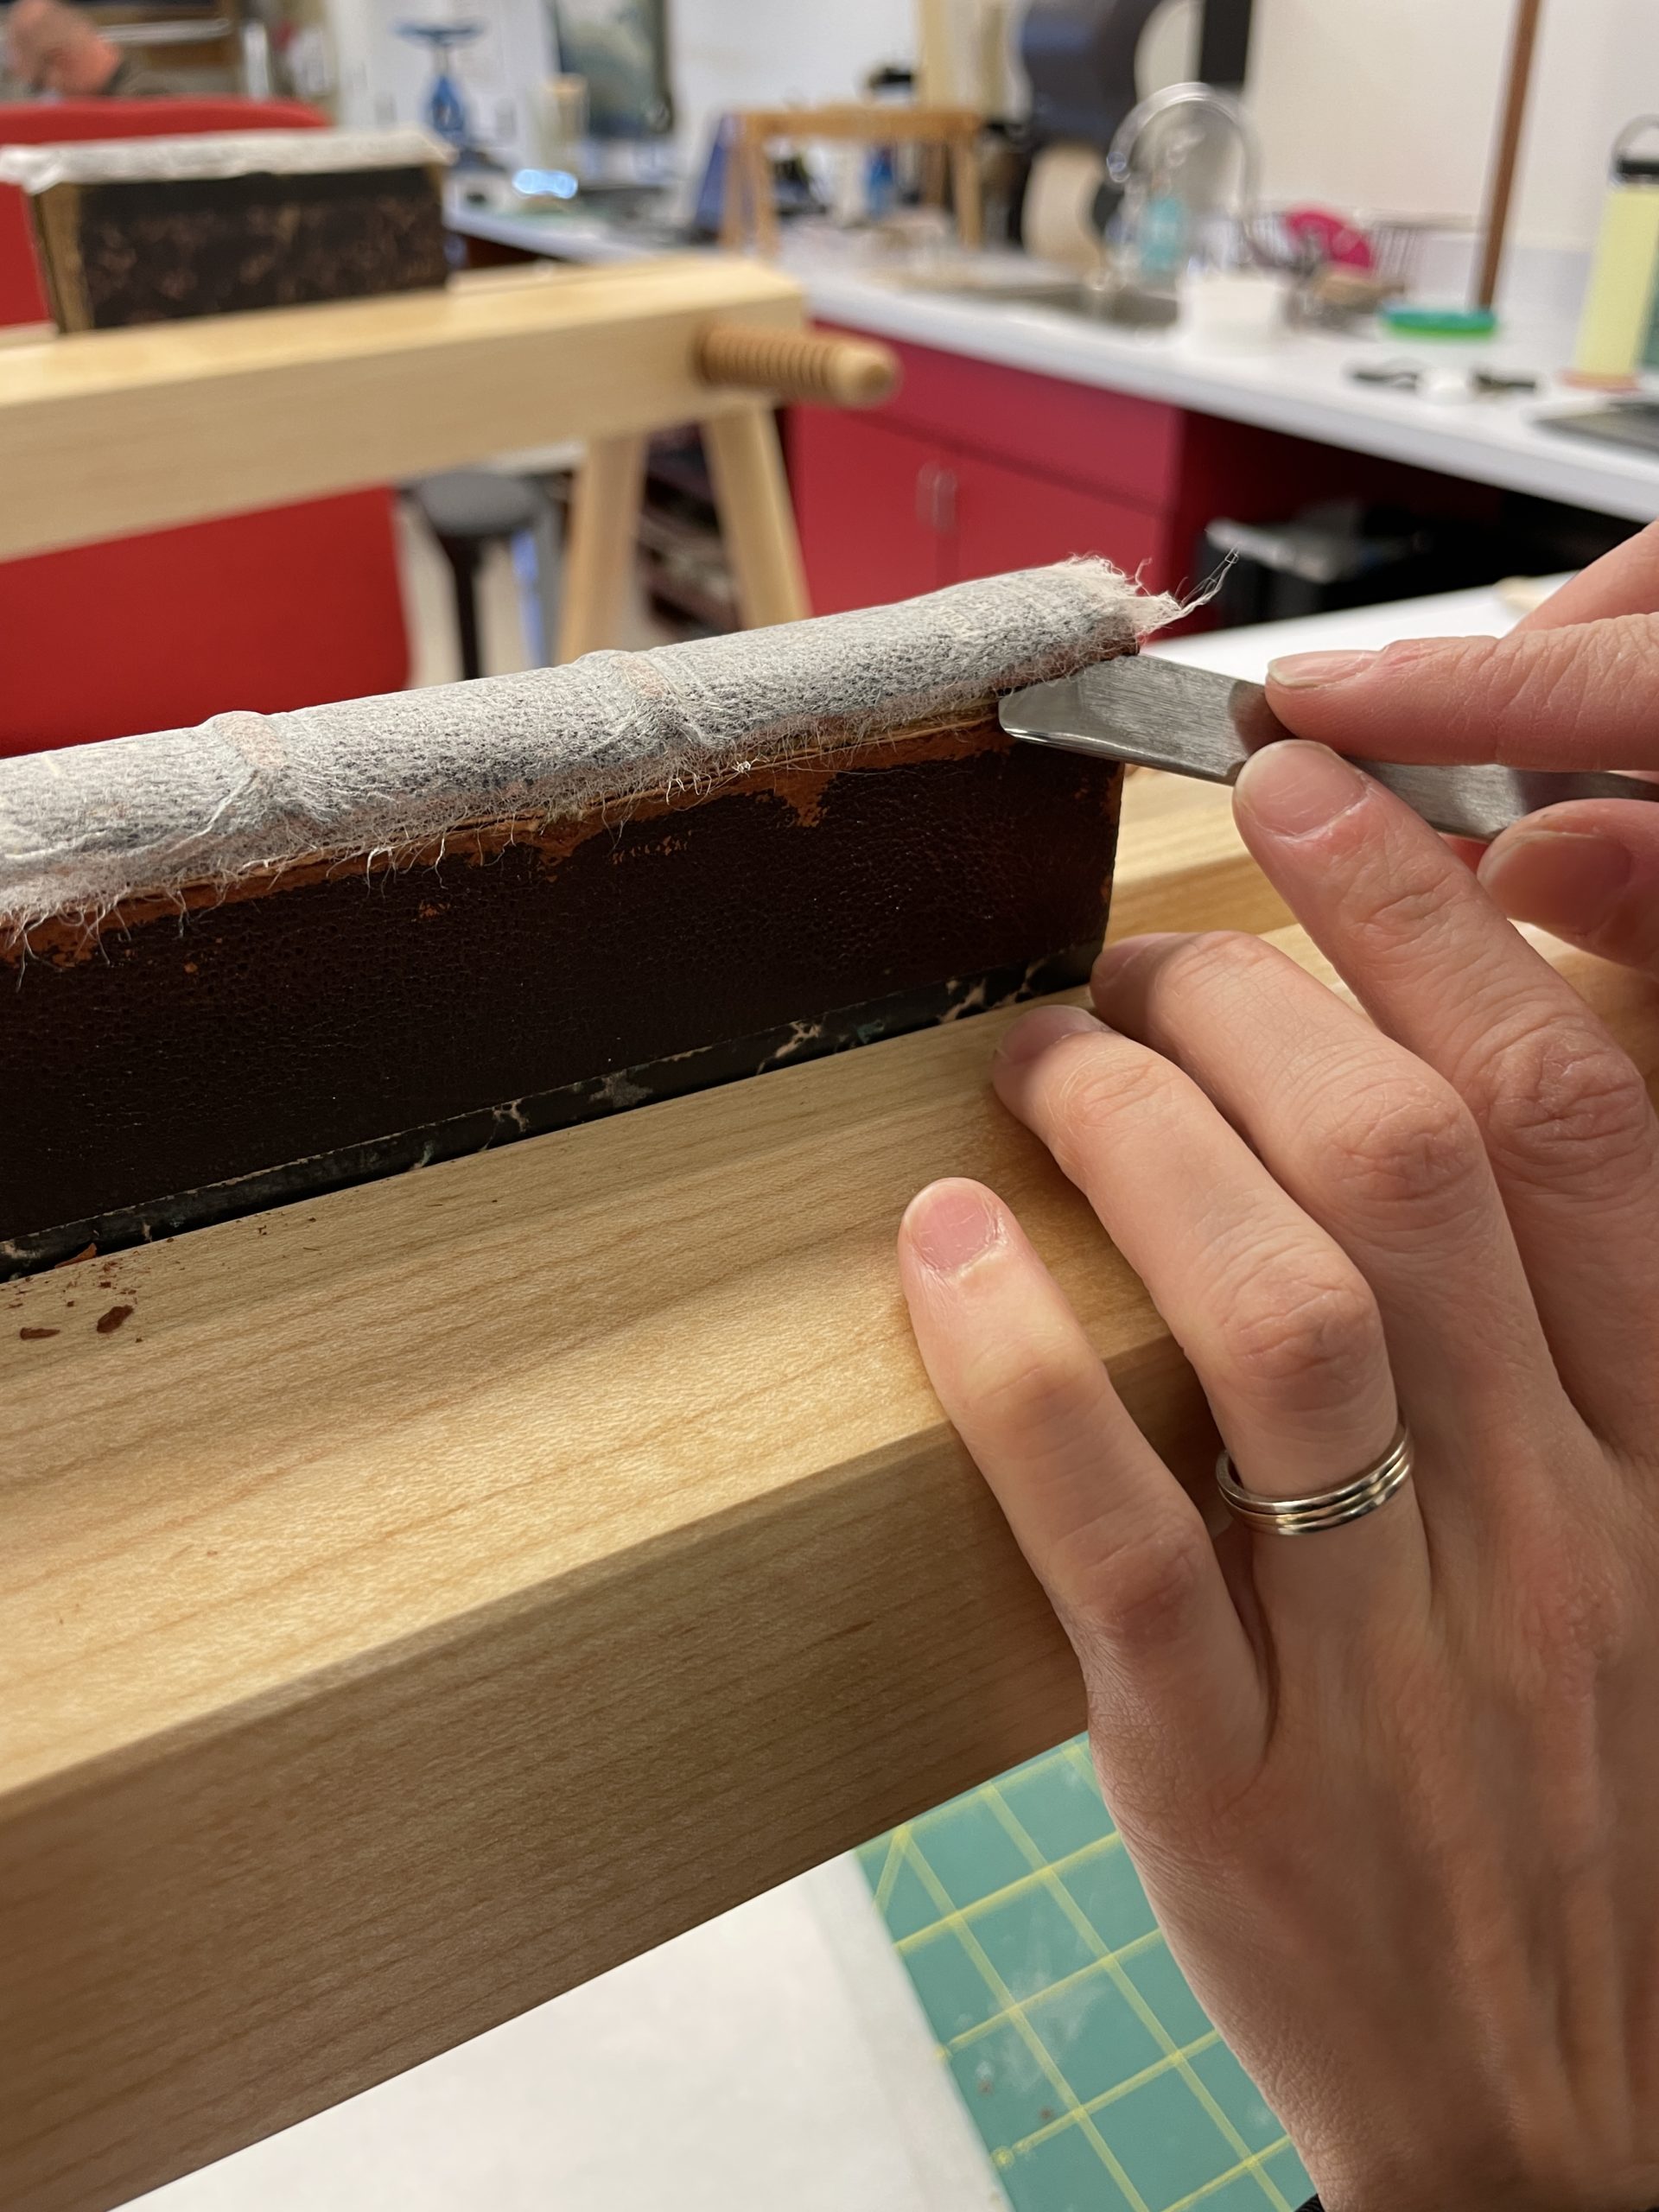
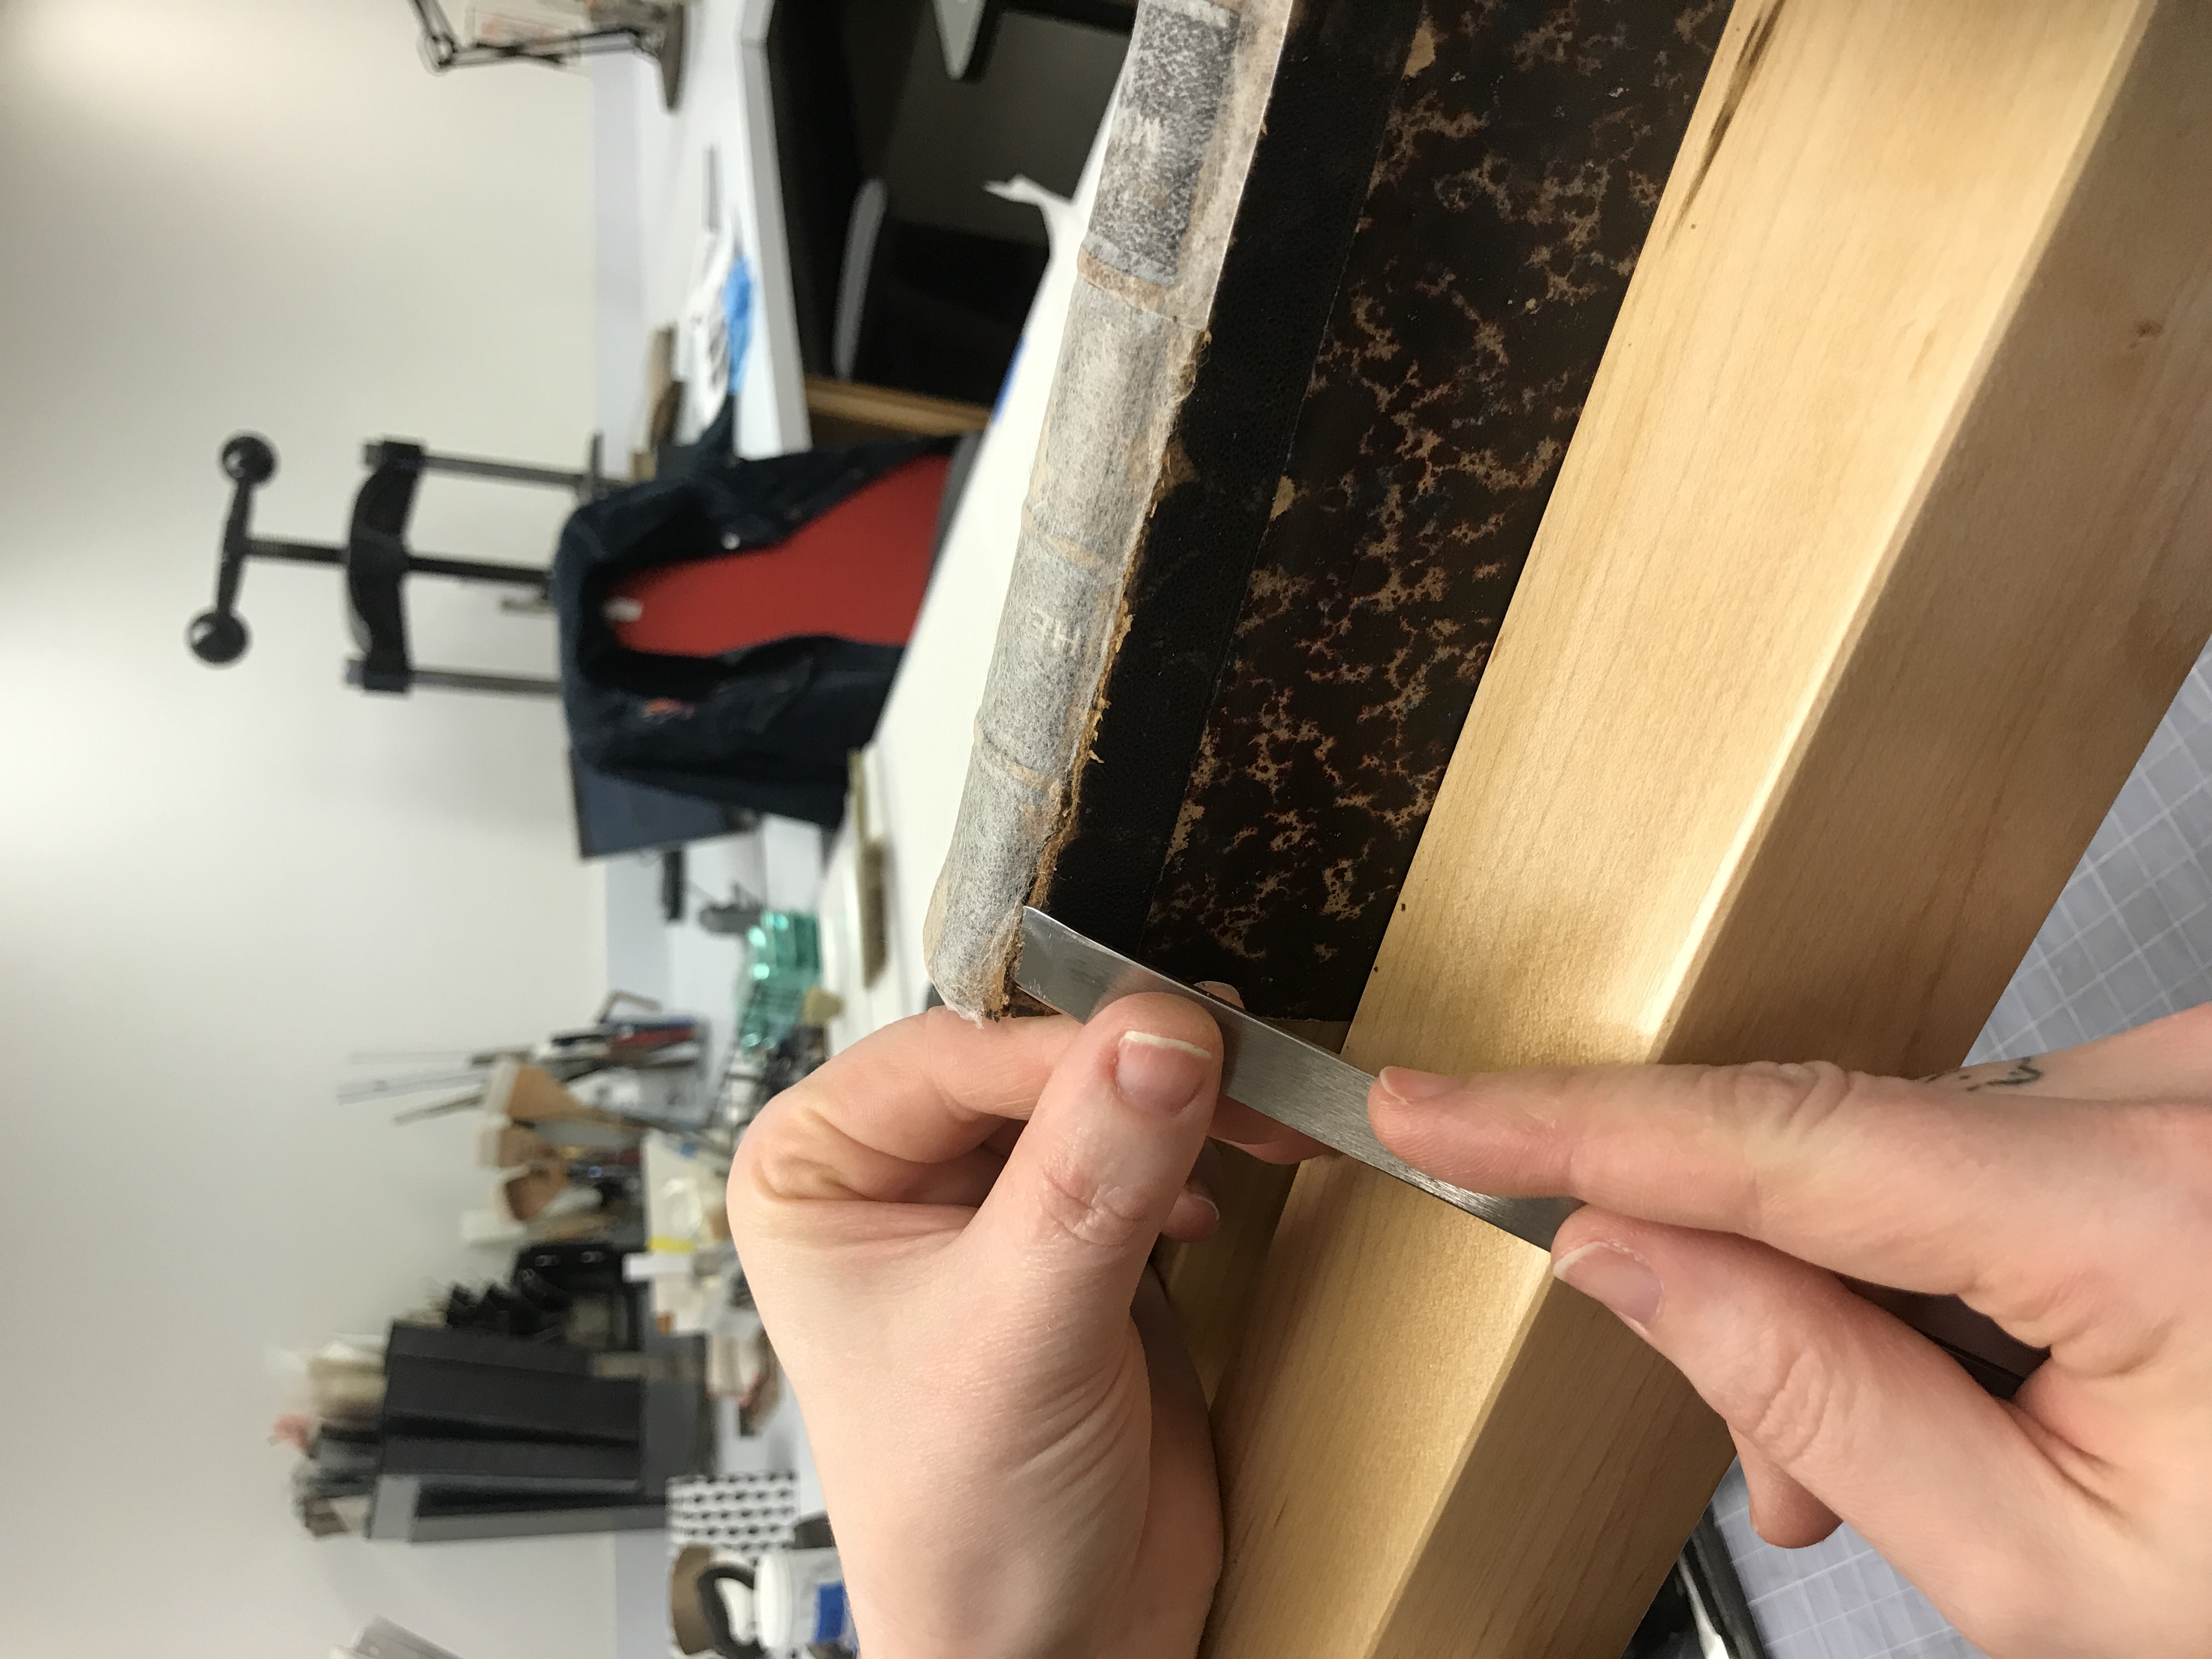
Back in October of 2022, The Preservation Lab had the pleasure of hosting Book Conservator, Jeff Peachey, for a week-long workshop on Conservation of Leather Bindings. One of the topics that was mentioned, but not discuss in depth, was leather facing.
No one in the lab had ever faced leather before, so Sr. Conservation Specialist, Jessica Ebert, and I decided to conduct some tests to understand the process, the best materials, and tools. With the research available, Jessica and I focused primarily on two sources, Conservation of Leather and Related Materials by Marion Kite and Roy Thomson and an article written by James Reid-Cunningham entitled Leather Rebacking, for the Seminar in Standards of Excellence in Hand Bookbinding, The Guild of Book Workers, 2013.
The primary reasons for testing out this technique was the fact that there were leather books from UC’s Archives and Rare Books Library here in the Lab for treatment and they could potentially be good candidates for leather facing.
Let the tests begin!!
Both Jessica and I chose two different withdrawn leather books to test on:
A tight back leather book
A leather book with false raised bands and a hollow tube
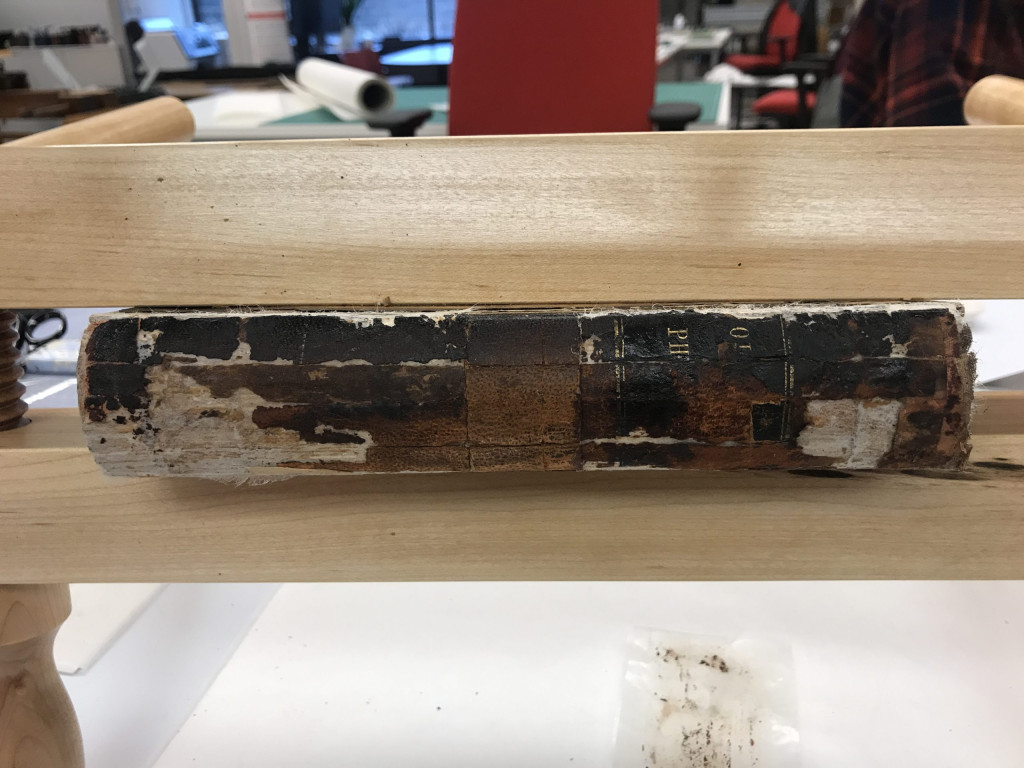
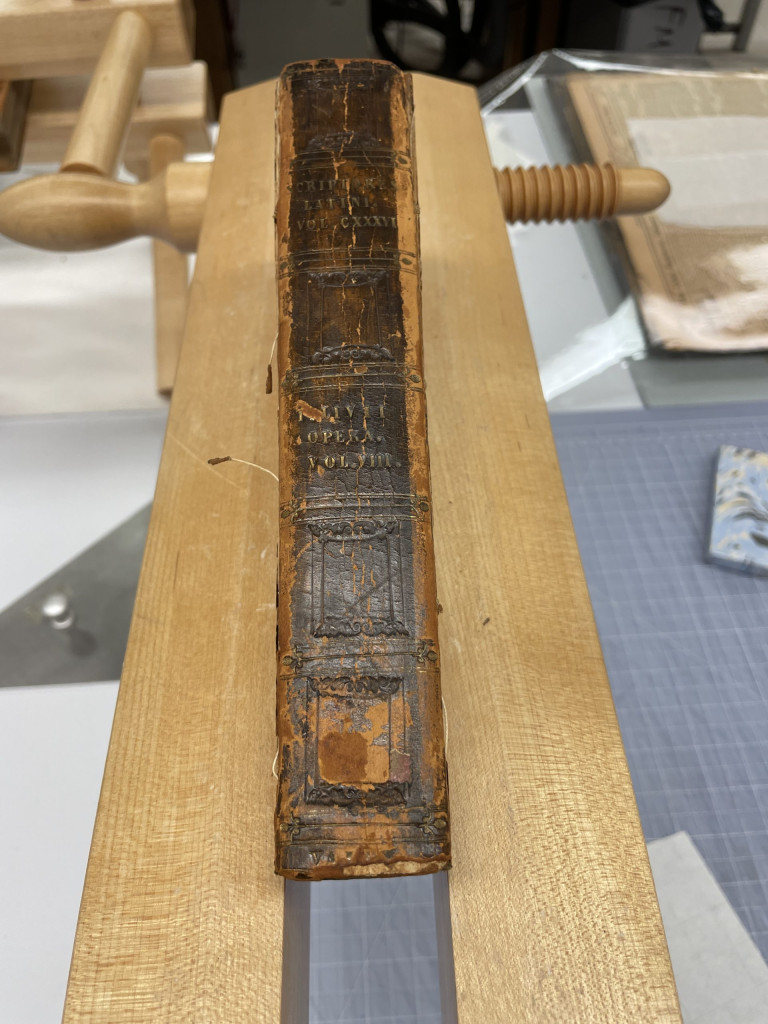
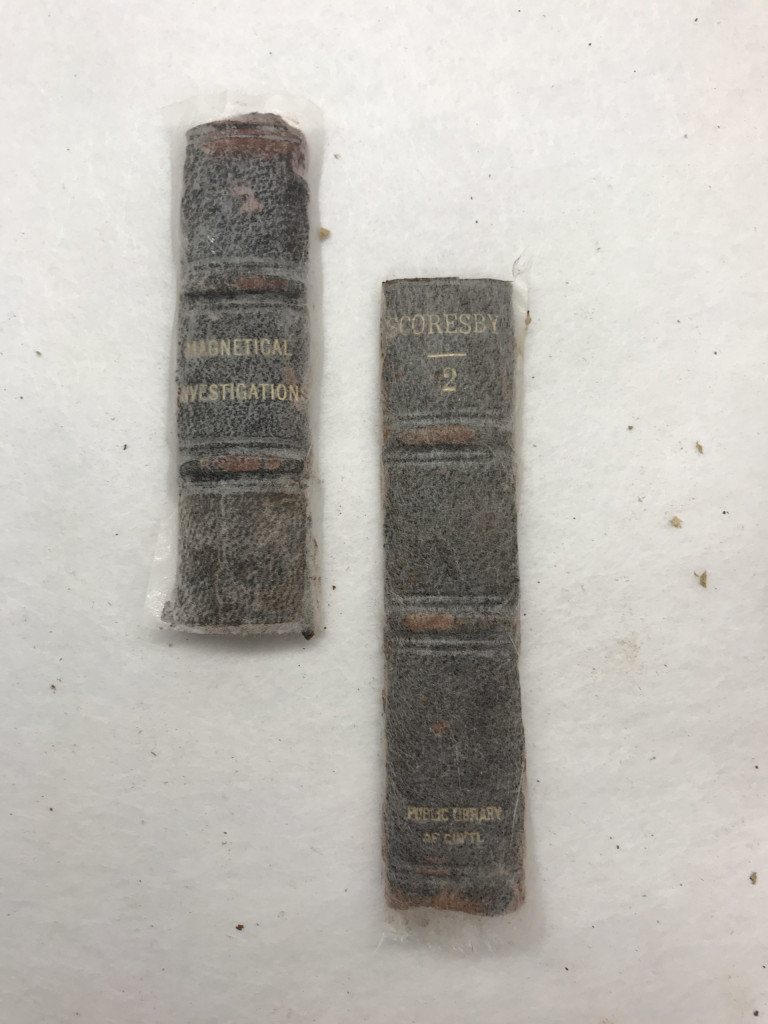
Catarina’s test model (tight back) before facing.Catarina’s test book model (tight back) after facing.Jessica’s test book model (tight back) before facing.Jessica’s test book model (tight back) after facing.Catarina’s test model (hollow tube with false raised bands) before facing.Catarina’s test model after the leather facing.Jessica’s test model (hollow tube with false raised bands) before facing.Jessica’s test model after the leather facing treatment.
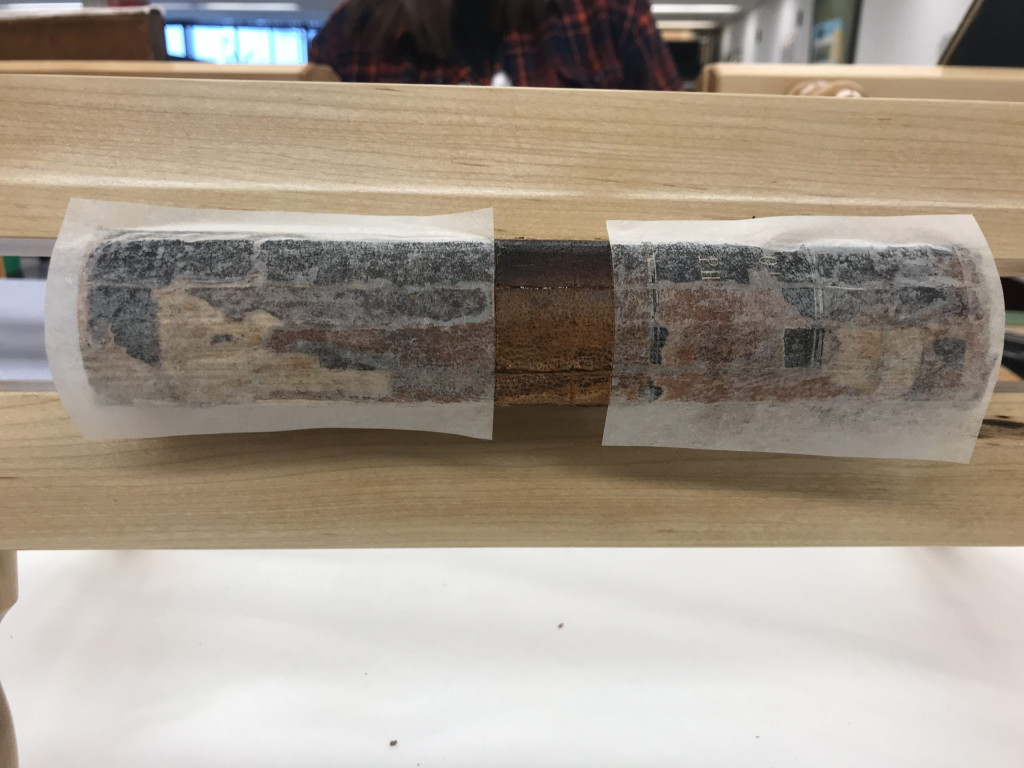
The first step was to consolidate the leather on all the withdrawn books we were using as models. The leather was consolidated with 3% Klucel G in isopropanol. Since there were different methods shown in the available resources regarding leather facing, we decided to use two different methods for facing: facing with Japanese tissue adhered with Klucel G and facing with a Crompton heat-set tissue activated with ethanol. Trying out these two different methods would help us to understand which one of these materials would work best and cause less damage/staining to the leather.
Catarina’s Test Models
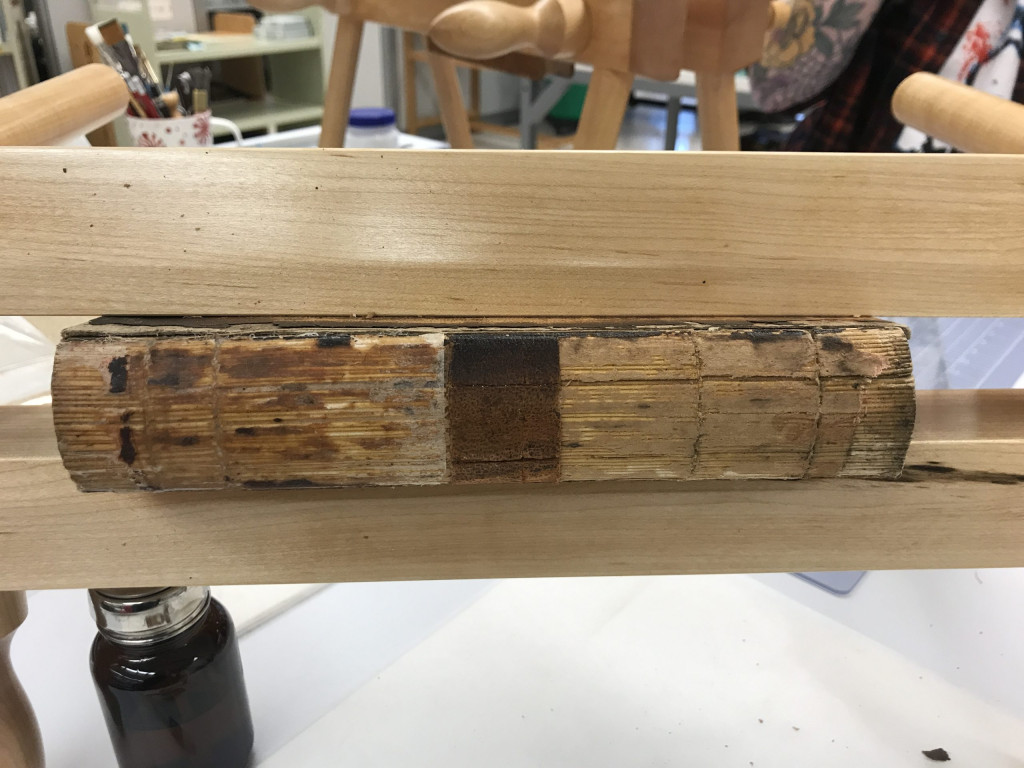
After having consolidated the leather, the spine was “divided” in two sections, top and bottom, with a small portion of the spine in between. The reason the spine wasn’t fully faced was because I wanted to see if there were any changes in the leather after being faced, removed, and reattached.
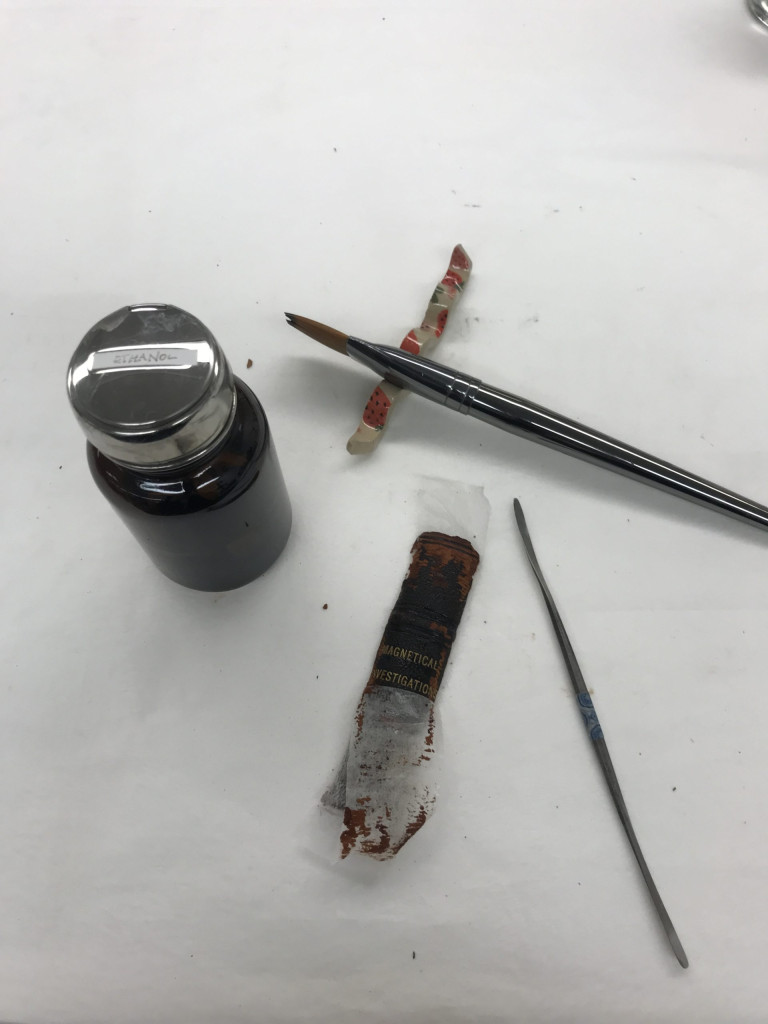
Leather consolidated with 3% Klucel G in isopropanol. For this model, since the leather was so degraded, it wasn’t possible to get the Japanese tissue to adhere with klucel G. Therefore, only the Crompton heat-set tissue was used.
For this book, the leather was very degraded, and I couldn’t get the Japanese tissue to adhere to the leather spine with Klucel G. As a result, for this model I only used the Crompton heat-set tissue method.
The adhesive on the heat-set tissue was activated by brushing on a thin layer of ethanol. Once it was activated, the heat-set tissue was placed on the spine, and with a tamping brush pressed on the leather. Using a lifting knife, I was able to remove the leather spine, leaving the middle portion still adhered to the text block for comparison.
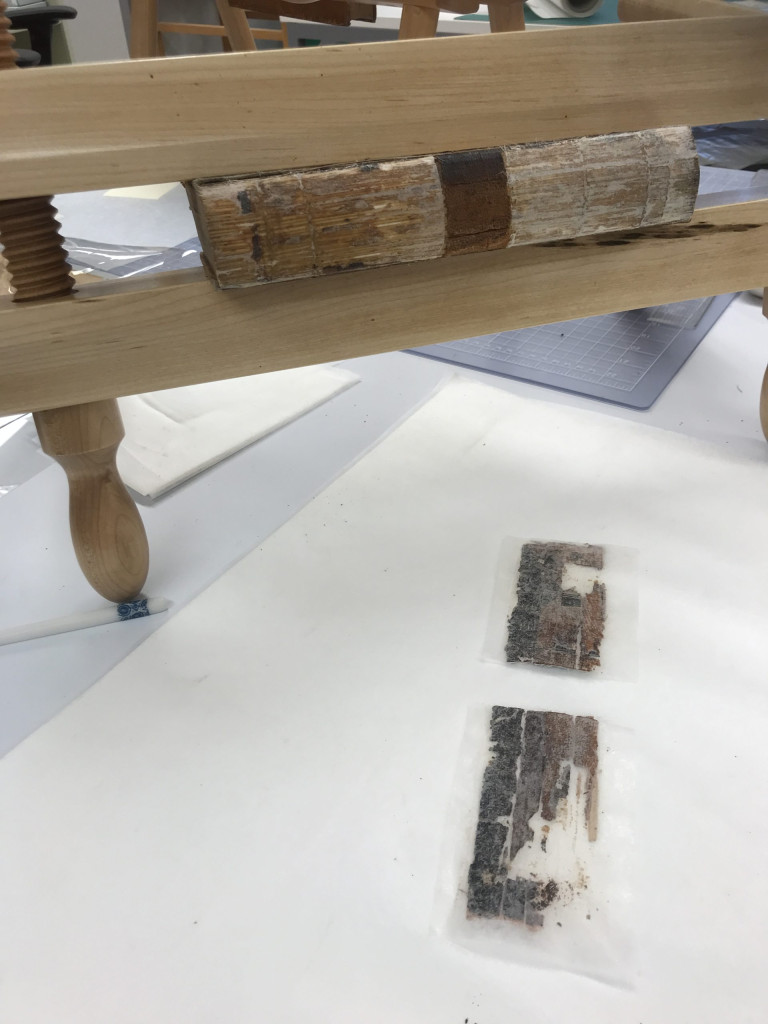
Two portions of the spine fully removed.Leather spine removed, and two portions of the spine faced.
Once the leather spine was removed, I relined the text block spine with a reversible layer of Japanese tissue and wheat starch paste. The two portions of the leather spine were lined from the back with Japanese kozo fiber tissue and wheat starch paste.
At this point, there were two different ways to follow, I could adhere the faced spines to the text block and then remove the heat-set tissue, or I could remove to heat-set tissue first and then adhere the leather spine to the text block. I decided to first remove the heat-set tissue by activating the adhesive again with ethanol and gently removing it with a Caselli spatula. Once the heat-set tissue was fully removed and the leather was dry, I reattached each portion of the leather spine to the text block with wheat starch paste.
Two portions of the leather spine adhered to the text block spine.
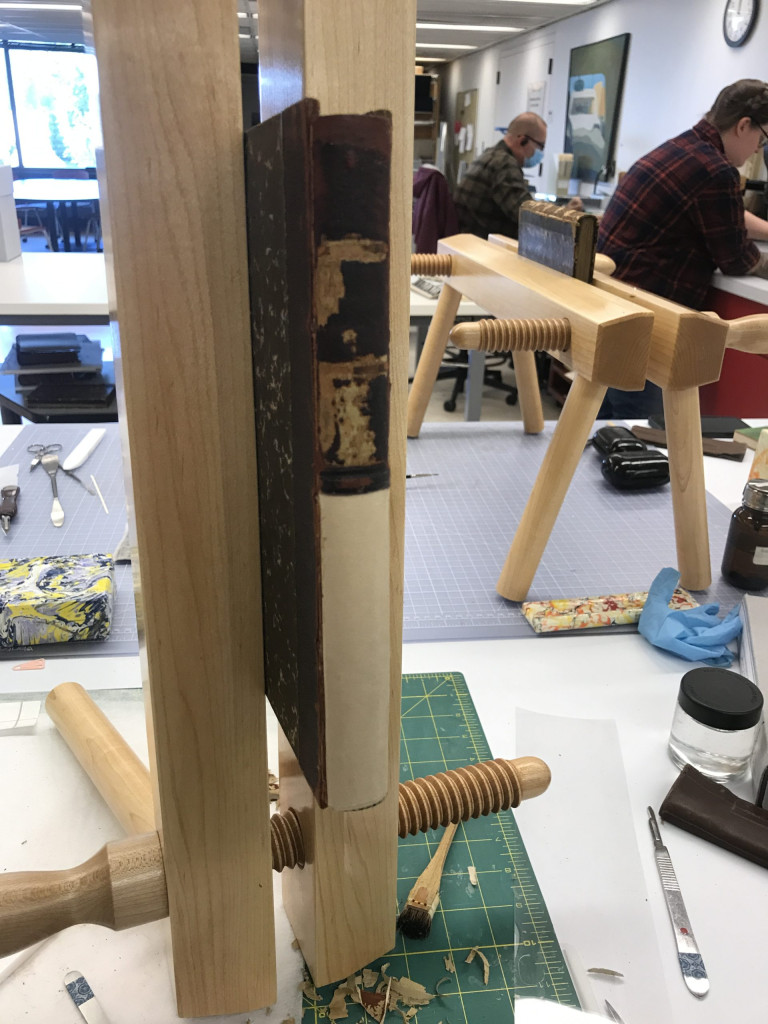
For the leather book with false raised bands and hollow tube, the process was very similar. However, for this model I was able to try out both the Japanese tissue adhered with Klucel G as a facing method and the Crompton heat-set tissue.
Test book model with false raised bands and hollow tube.
The spine was “divided” in two sections: top portion was faced with Crompton heat-set tissue activated with ethanol and the bottom portion of the spine was faced with Japanese kozo fiber tissue adhered with Klucel G.
Using a Peachey lifting knife, I was able to remove both portions of the spine. On the top portion of the spine, I ended up not removing the previous hollow tube, but removed it completely on the bottom portion of the spine.
Leather spine was removed. The hollow tube was not removed on the top portion of the spine and removed completely on the bottom portion of the spine.Two sections of the leather spine faced with different methods.
Once the two portions of the spine were removed, a new hollow tube was created to adhered to the bottom portion of the text block spine. The hollow tube was mode of Griffin Mill Broadsheet 60 gm/115 gm paper. The new hollow tube was adhered with wheat starch paste.
Again, I decided to remove the facing tissue before adhering the leather spine back on. With ethanol, I was able to remove the facing tissue from both pieces of the spine. As seen in the pictures below, while removing the Crompton heat-set tissue there was some loss of the leather along the edges and where the leather was most degraded already.
New hollow tube adhere to the bottom section of the spine.
Removing the Crompton heat-set tissue with a Caselli spatula and ethanol.
Removing the Crompton heat-set tissue with a Caselli spatula and ethanol.
Each spine piece was lined on the verso with a Tengujo tissue and wheat starch paste. This provided some support to the fragile leather spines. The two pieces of the spine were then adhered back on with wheat starch paste.
Leather spine after being faced, removed, and reattached.
Leather spine after being faced, removed, and reattached.
Jessica’s Test Models
Here are a few of Jessica’s test models (she has a better eye for taking good photographs throughout the process).
Tight back leather binding before facing.
Spine faced with Japanese tissue adhered with Klucel G and with Crompton heat-set tissue.
Mid process, spine fully detached.
Two sections of the spine faced with different materials.
Tight back test model after facing.
Final Thoughts…
This was a great project that Jessica and I worked together. It was useful to test out different methods using different types of books with leathers in various stages of deterioration. We learned that Japanese tissue may not be able to be used as a facing material when coated with Klucel G, since in one of the tests I did, it did not adhere to the leather. This could lead to further testing, perhaps working with a Klucel G of a different concentration since we only used a 3% concentration for these tests. In addition, depending on how degraded the leather is, using a Crompton heat-set tissue may not be an ideal good solution for every item as it created some damage on the surface layer of the leather spine of our of the test books. Finally, at least in one of my models, the leather became darker than it was originally. There is still more testing and practice to do before we use this technique on a collection item, but this was a great place to start.
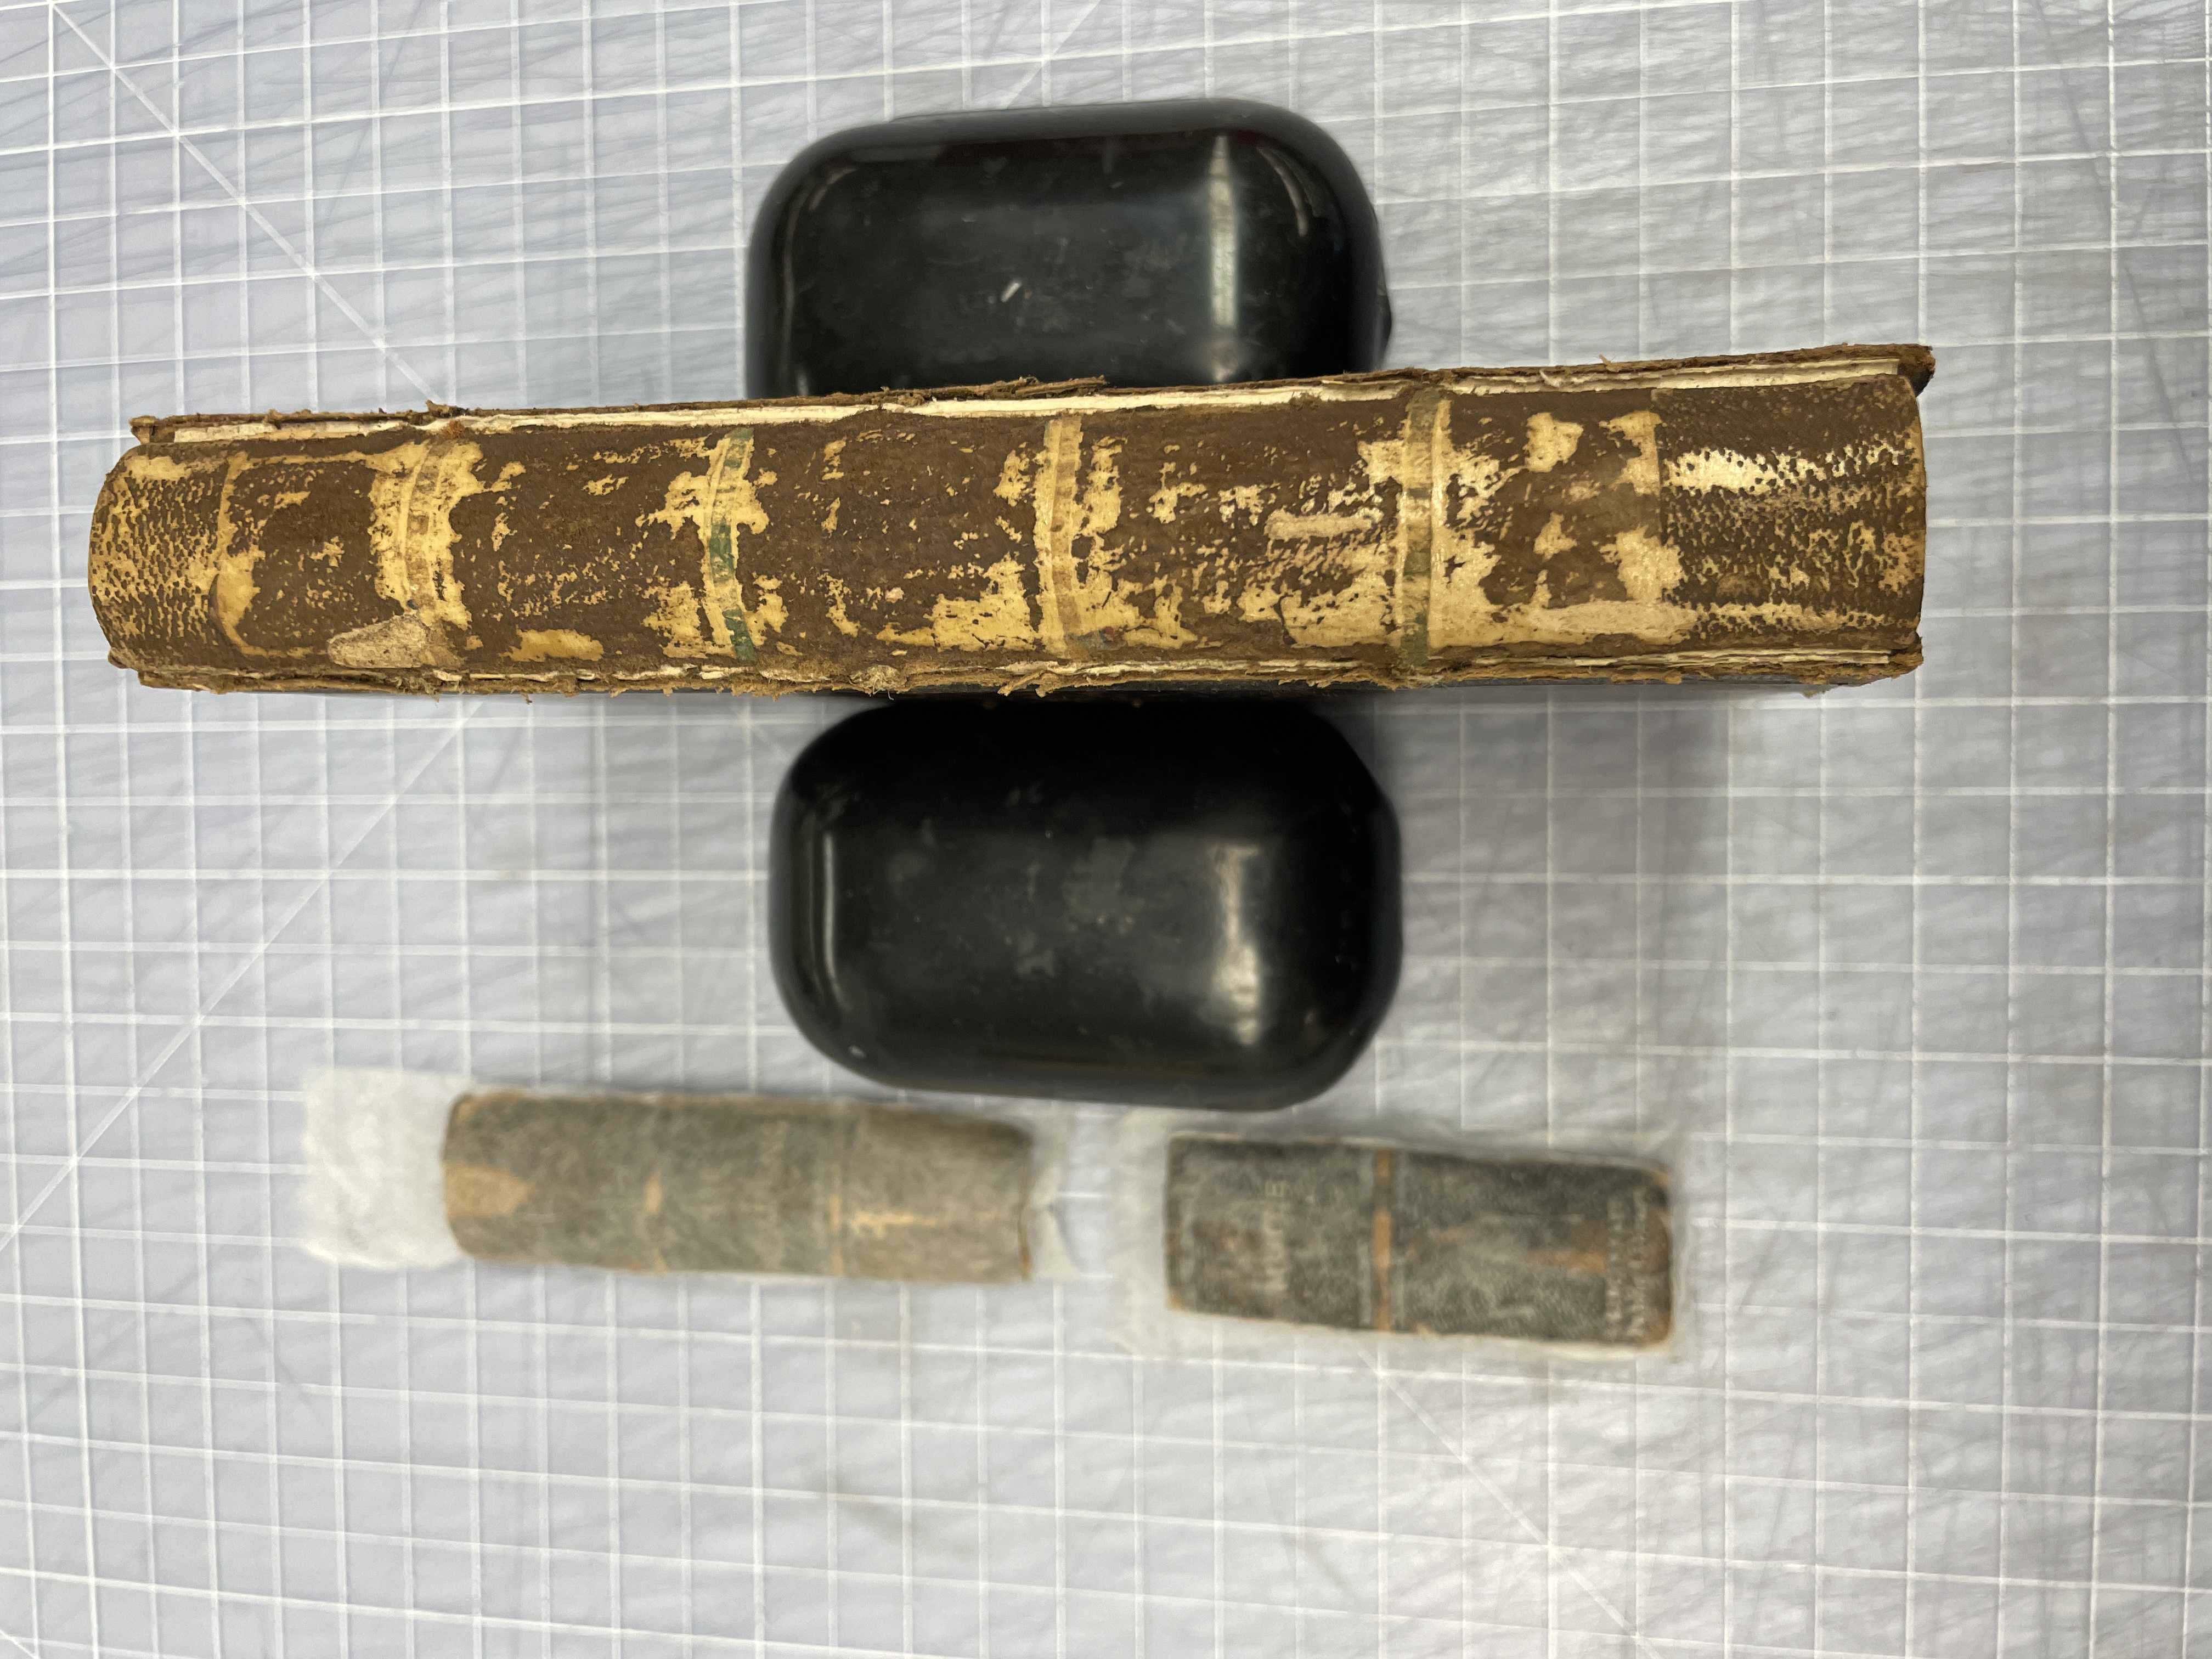
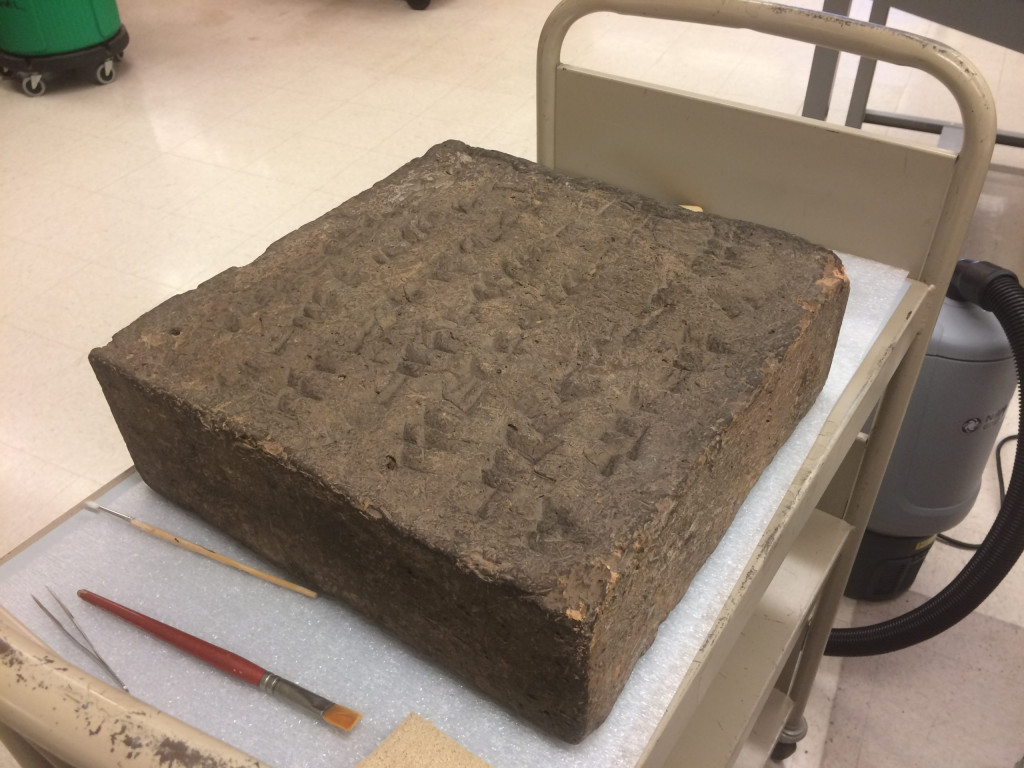
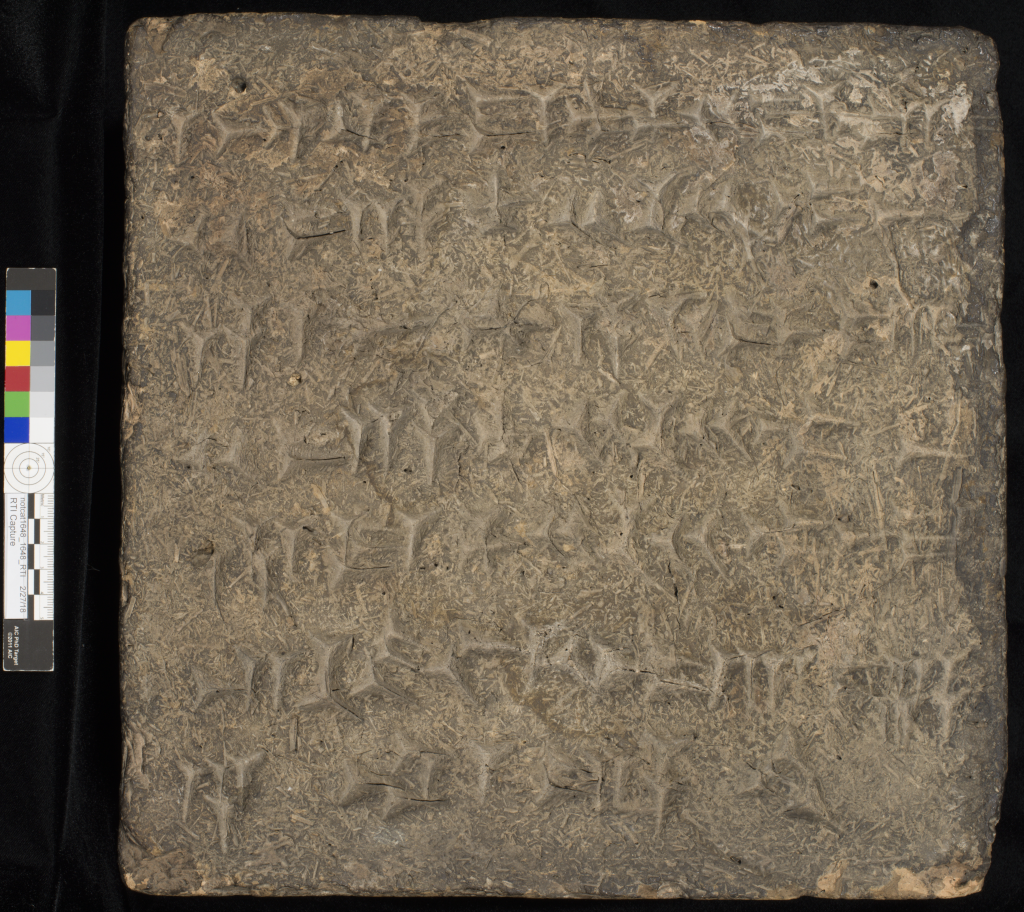
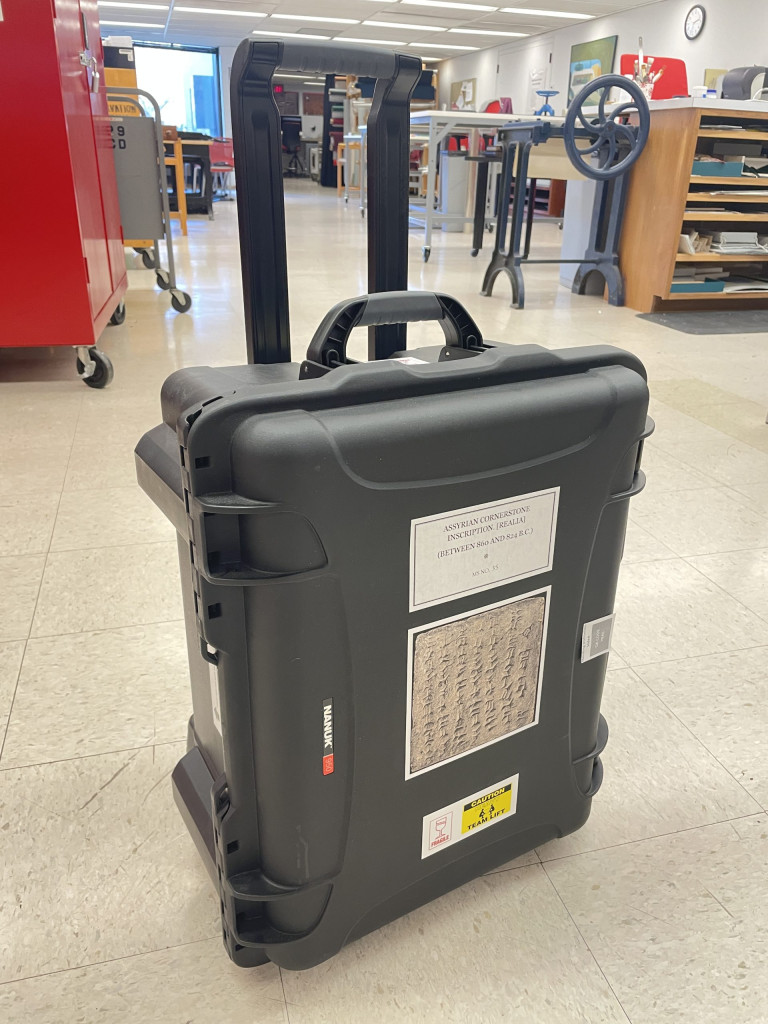
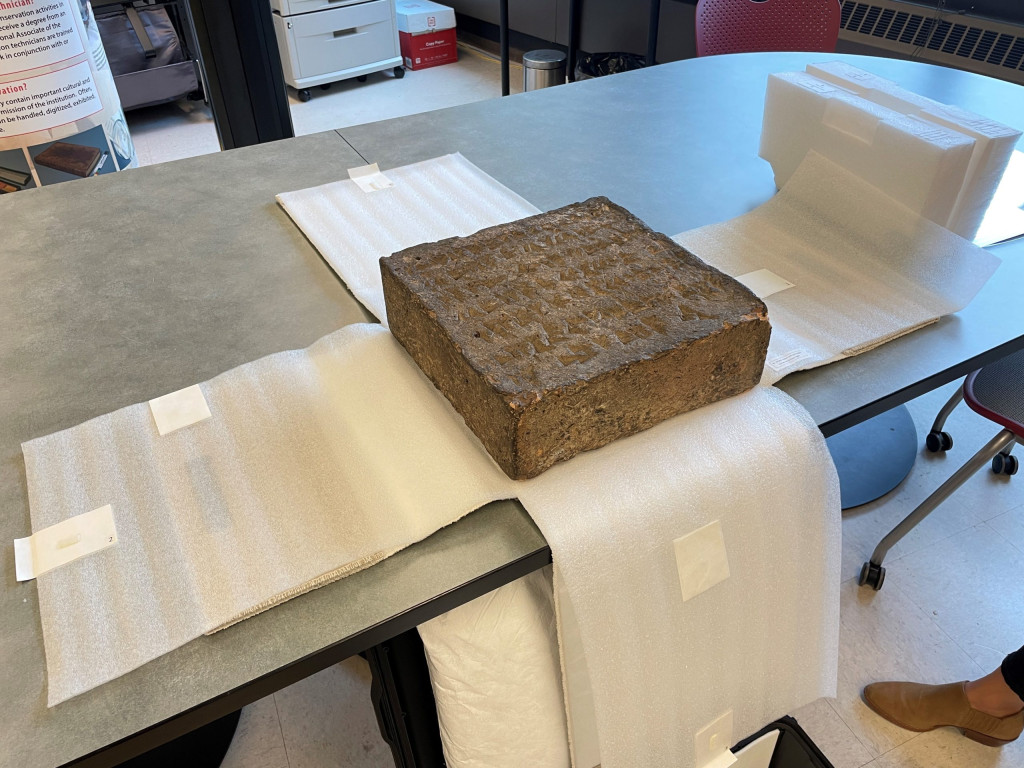
The University of Cincinnati’s Archives and Rare Books Library owns a few cuneiform tablets that date around the 1st century BCE. Most are small enough to fit within the palm of your hand. However, the clay tablet in question measures 14 inches (W) by 14 inches (T) x 4.5 inches (D) and weighs roughly 40-50 lbs.
Assyrian cornerstone during surface cleaning
More accurately, it is thought to be an Assyrian cornerstone that dates between 860 and 824 BCE. It is described in the catalog record to be from the ruins of Calah (near Ninevah) on the Tigris River. It is likely the cornerstone of a temple or palace erected by Salmanser III, king of Assyria. The provenance of how the University acquired the tablet is uncertain.
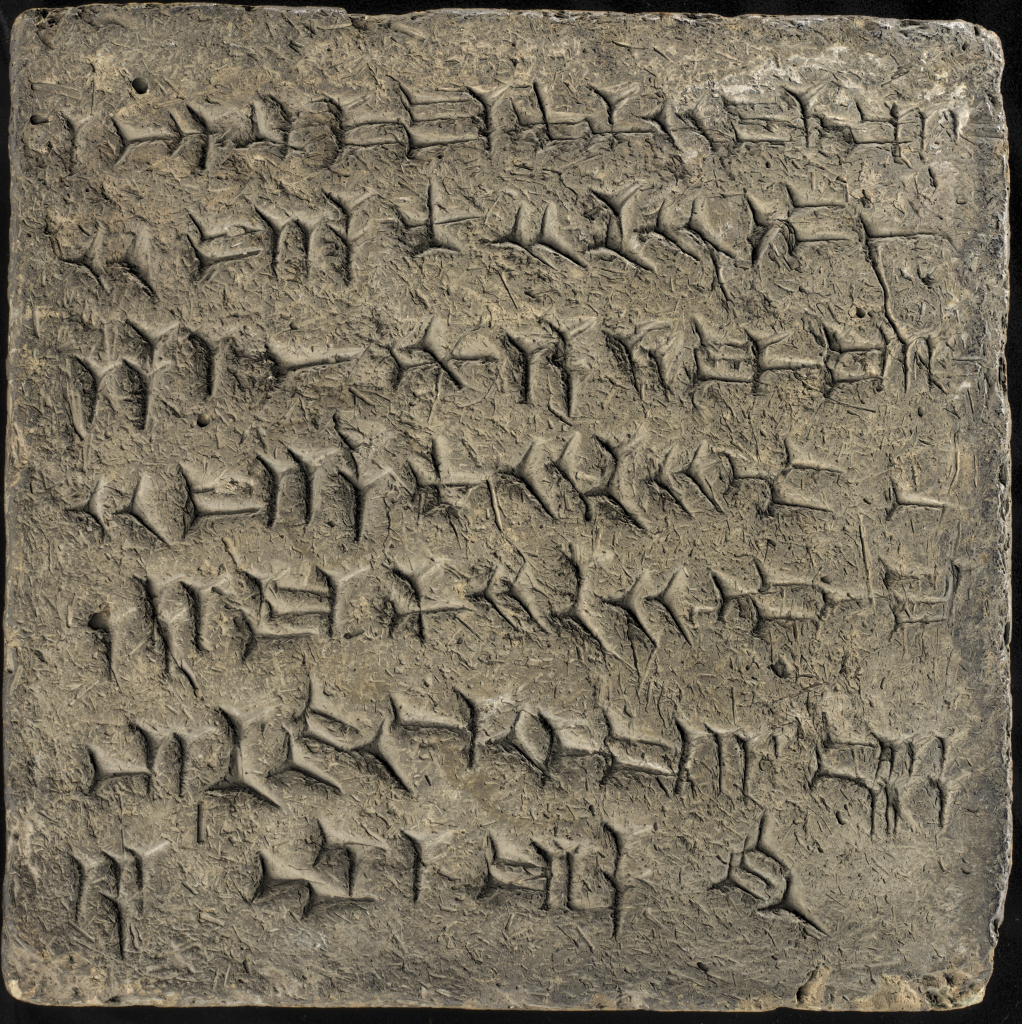
A translation of the cuneiform writing reads, ““Salmaneser, the great king, the mighty king, king of the universe, king of Assyria, son of Asurnaserpal, the great king, the mighty king, the king of Assyria, son of Tukulbi-Ninib, king of the universe, king of Assyria, and indeed builder of the temple-tower of the city of Calah.”
Front, Raking Illumination with Reflectance Transformation Imaging (RTI) by Jessica Ebert
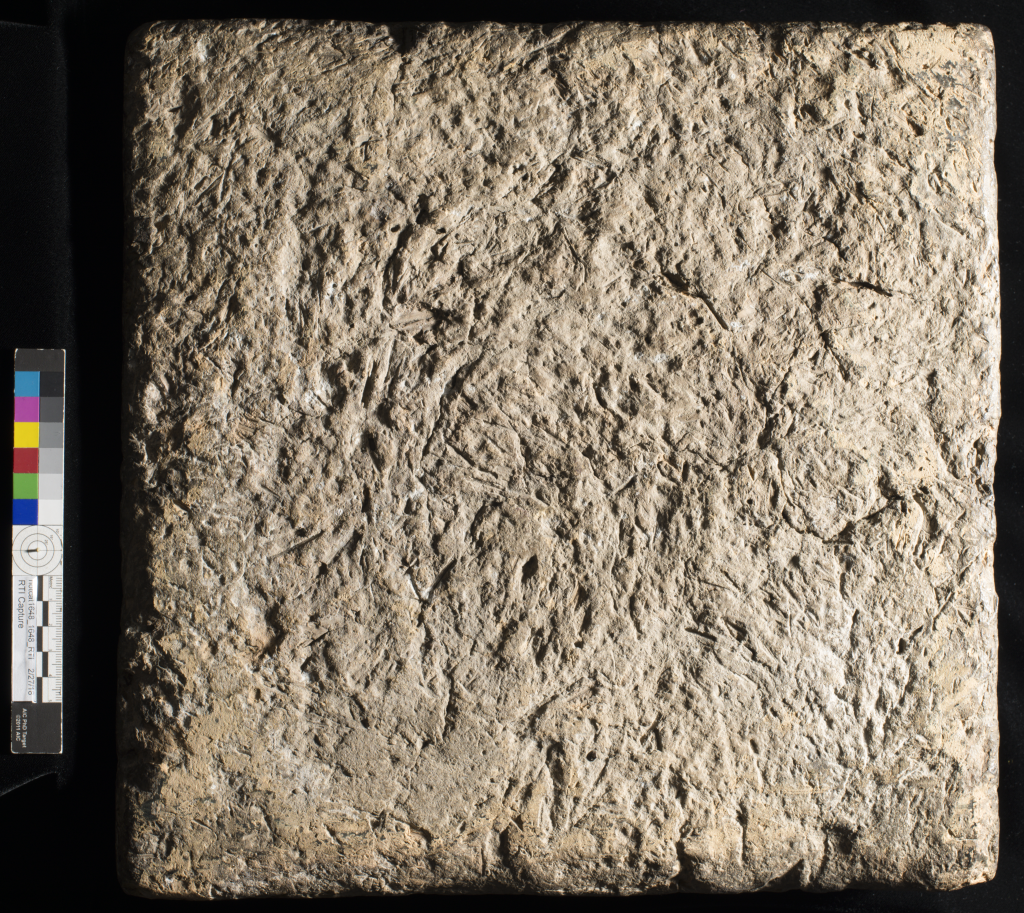
Front, Normal Illumination by Jessica Ebert
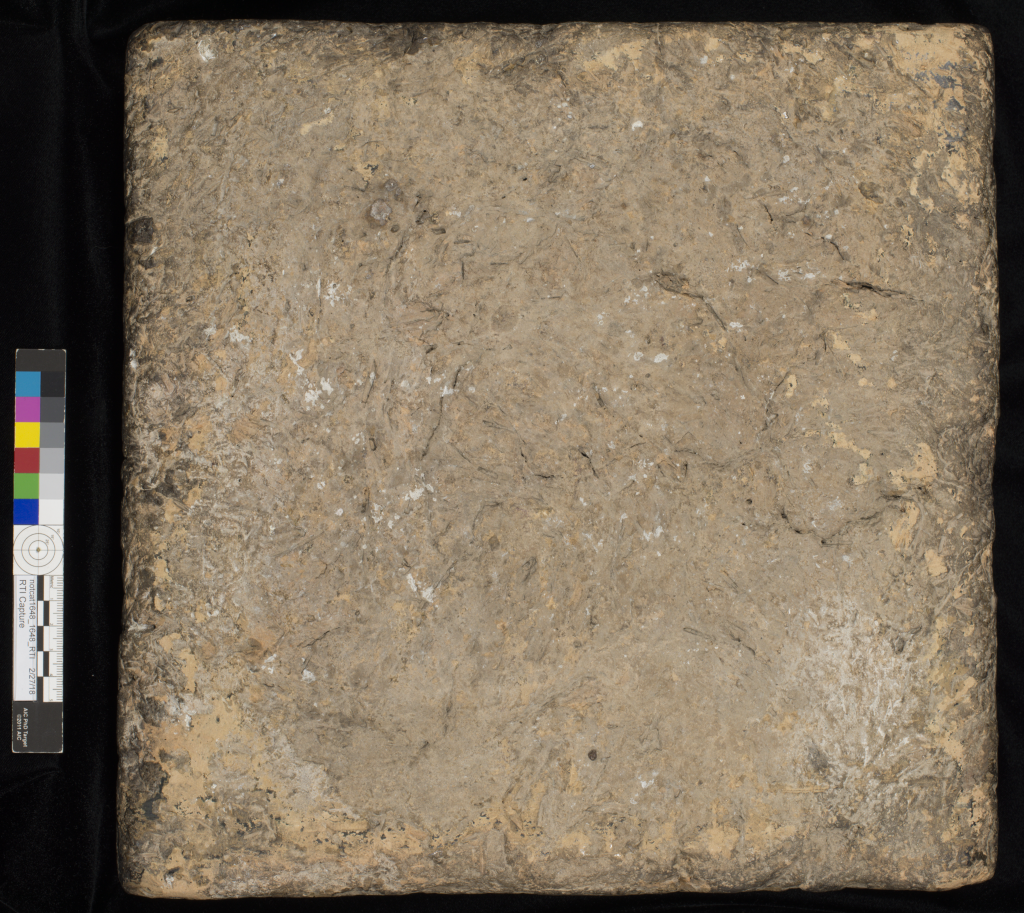
Back, Raking Illumination by Jessica Ebert
Back, Normal Illumination by Jessica Ebert
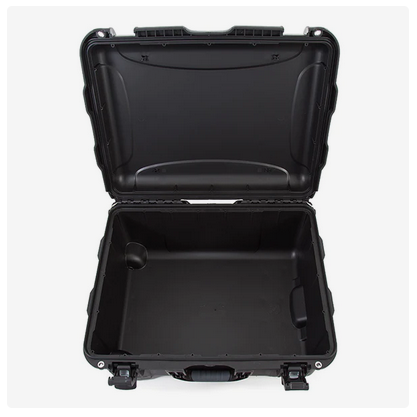
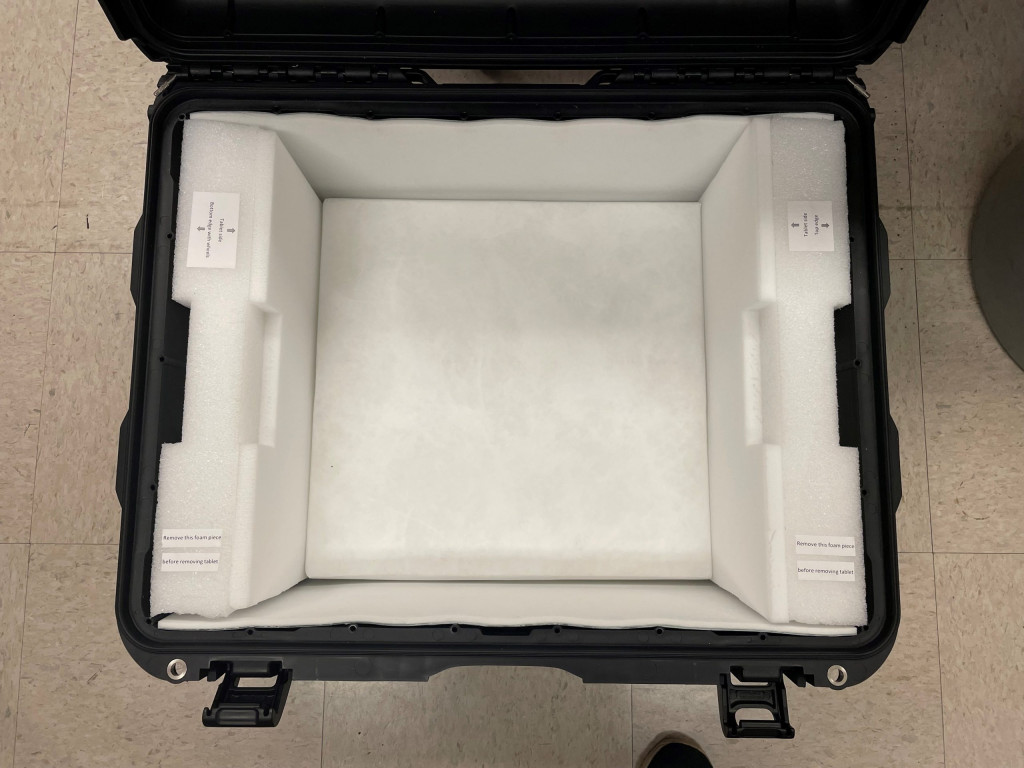
After surface cleaning and digitizing the cornerstone, finding suitable storage for an Assyrian cornerstone tablet seemed like a straightforward task in the beginning. I thought, “Let’s get it off the floor, house it, and protect it from dust!” No problem, right?
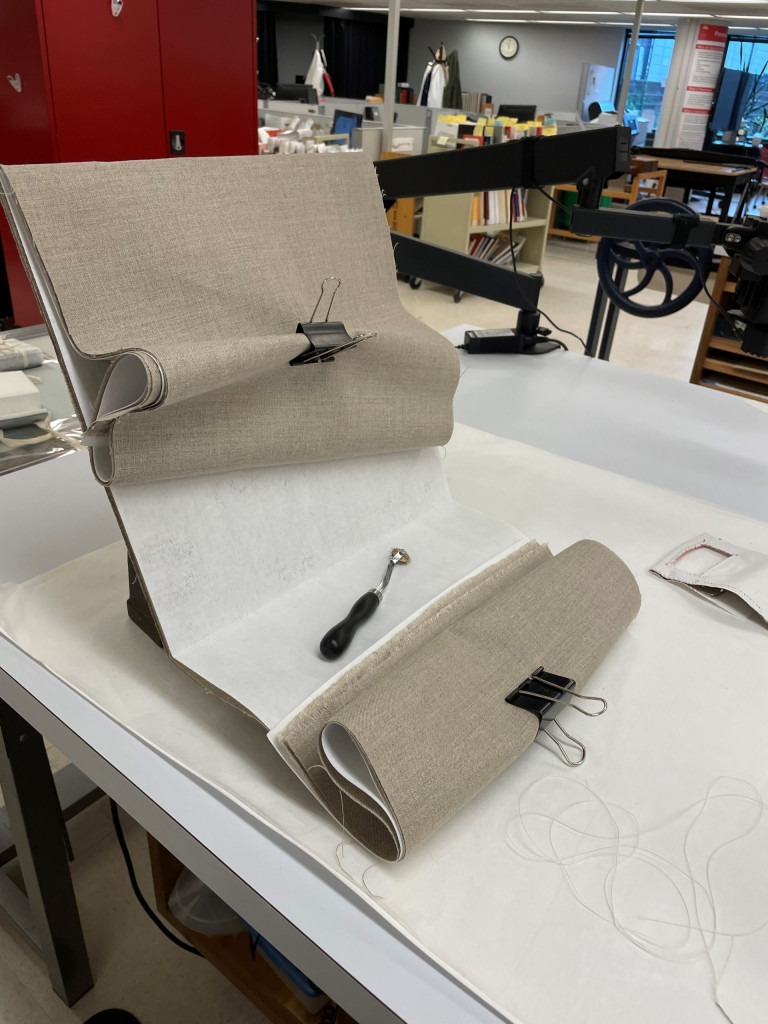
But once we got the item back in the lab, the weight of the object combined with its fragility proved more of a challenge after Chris, Holly and I began thinking about how the object would be retrieved from storage and how it would be handled. Rather than being stored in specialty shelving (such as items might be in a museum), this item was a library item. We needed to fit the tablet amongst archival book shelving. We were also faced with the prospect of transporting the cornerstone up and down a flight of stairs from the secure rare book storage. There is no easy elevator access! And finally, once it was put in an enclosure, how would a librarian get it out to show researchers and students?
We decided on an industrial case with wheels that could be transported and stored anywhere. I knew I wanted a device with handles to pull the object in and out of the case, but immediately decided against the idea of ratchet straps. The threat of fracturing would be too great if the ratchet straps were over-tightened.
After careful thought (and the creation of mock up solutions!) the following custom design was created in five stages:
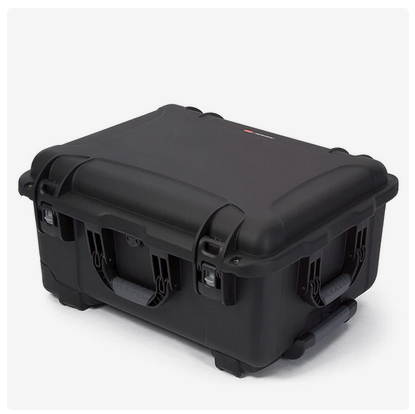
1. A waterproof, shock-proof rolling Nanuk 950 case (similar to a Pelican case) was purchased.
Nanuk case openNanuk case closedLabeled Nanuk case
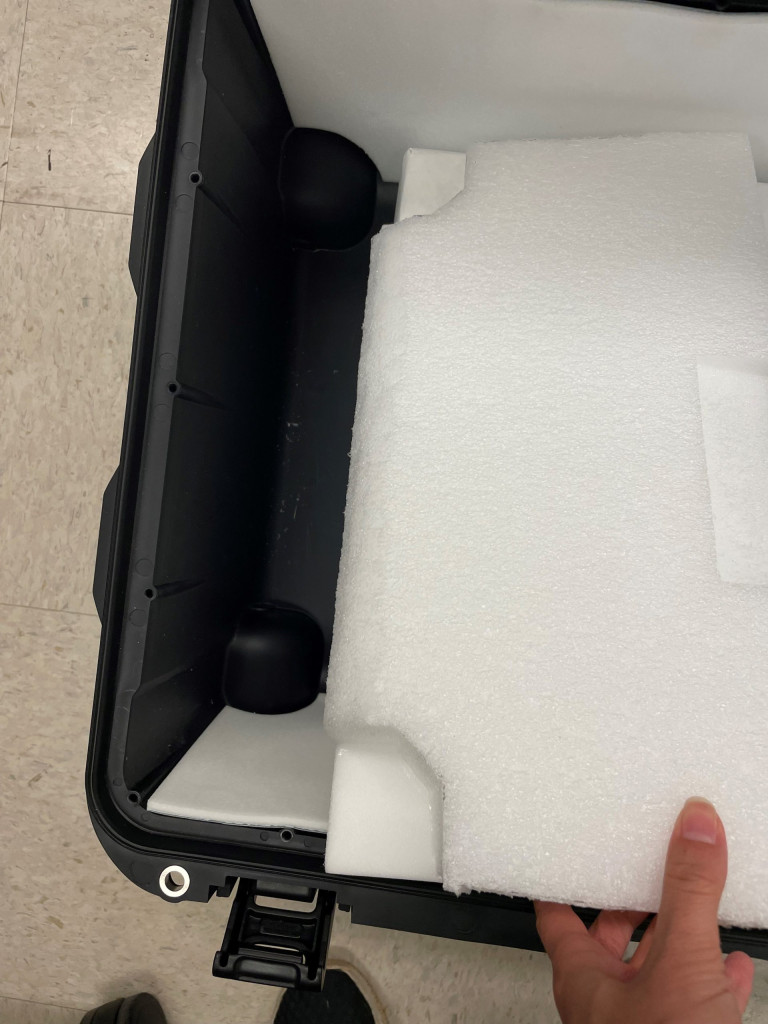
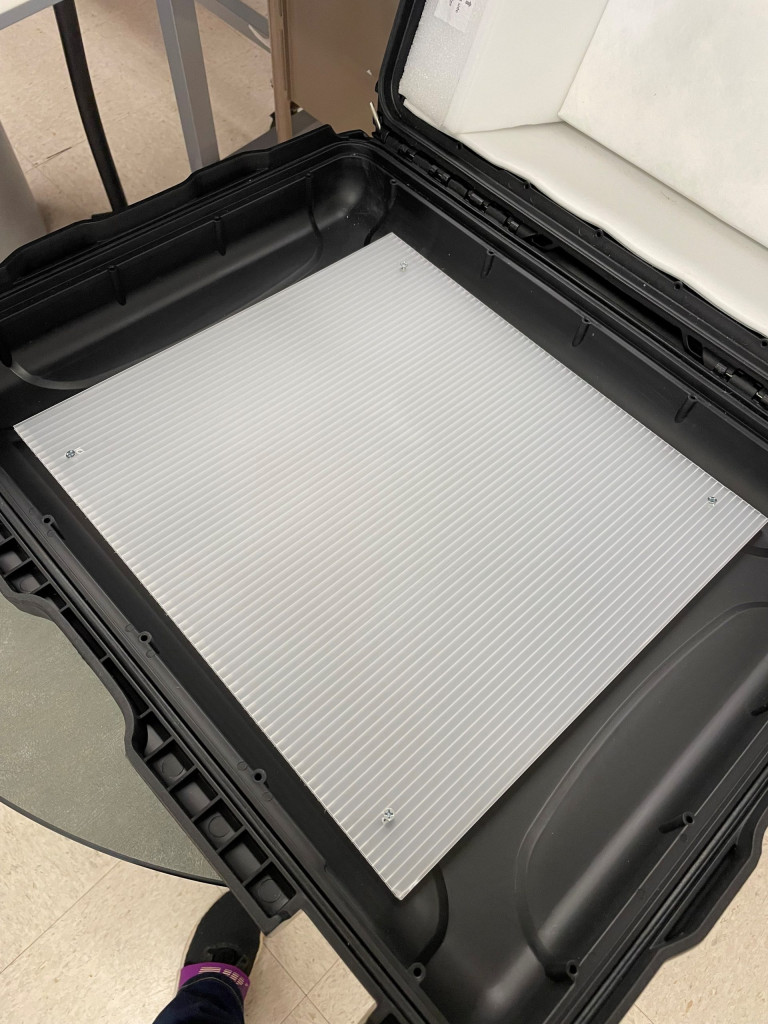
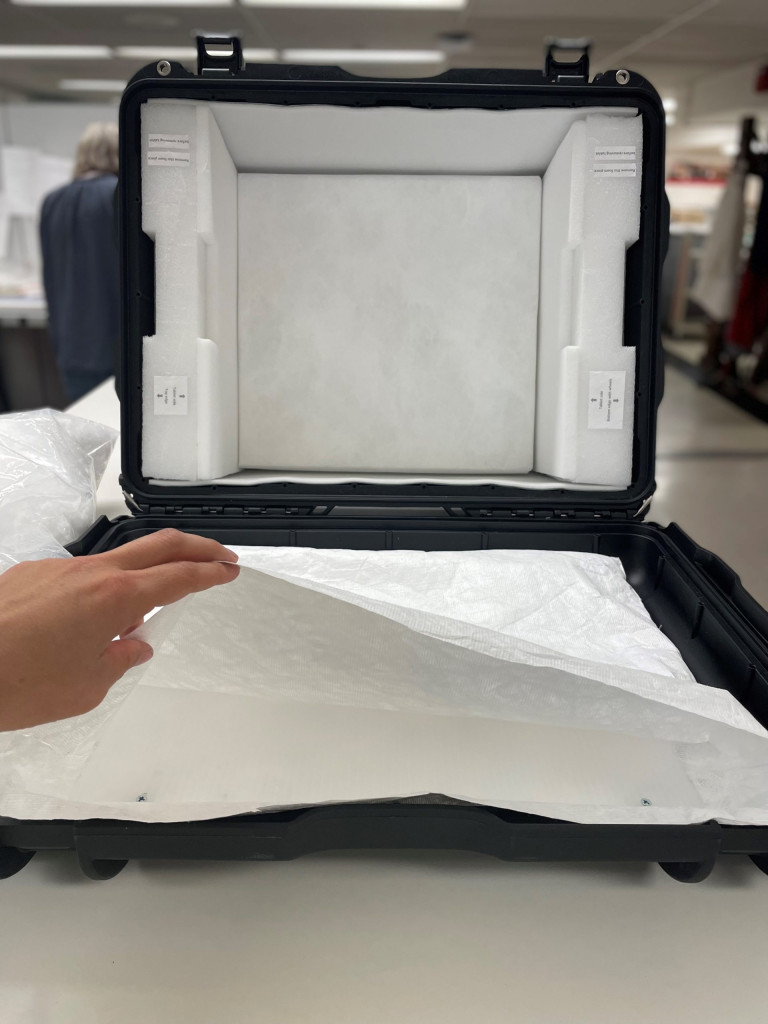
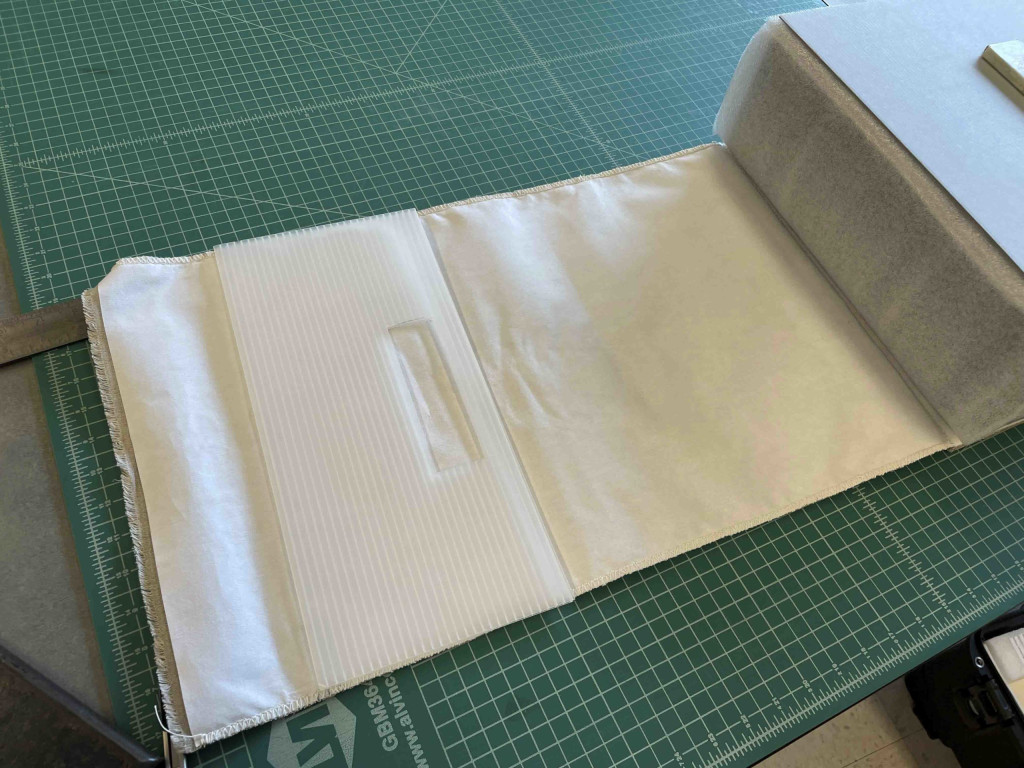
2. The interior was customized with foam and supports.
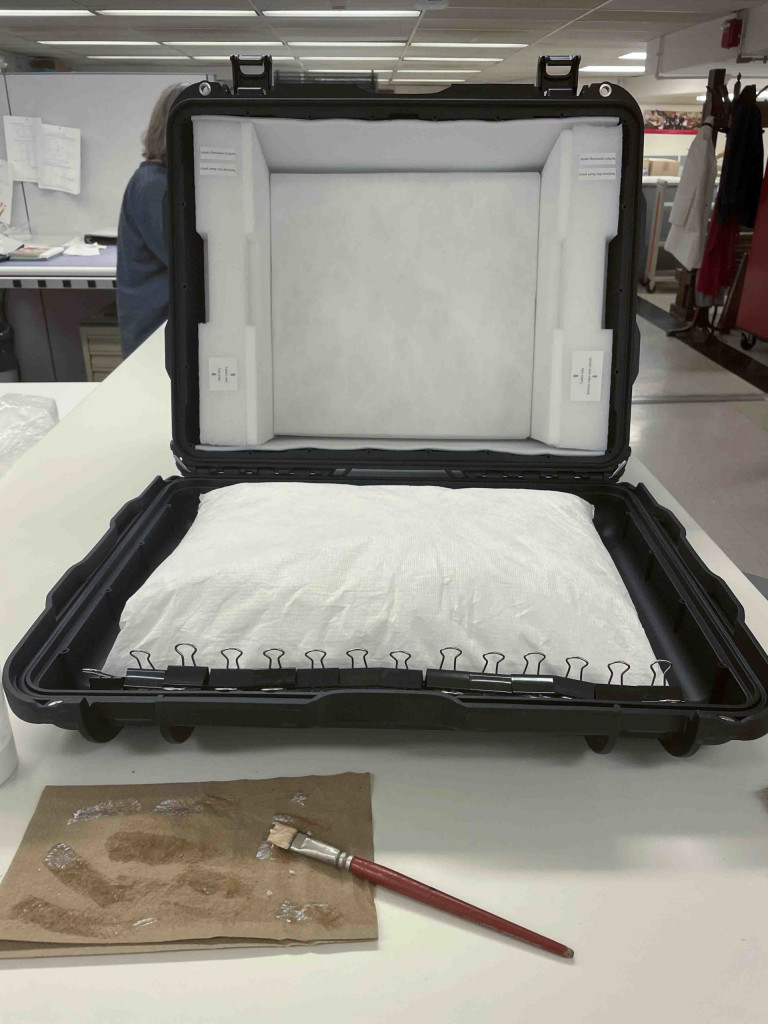
3. The lid was fashioned with a Tyvek pillow screwed to the top with an interior Coroplast sheet.
Marking screw holesCoroplast screwed to lid inside pillowcaseSealing pillow filled with polyester
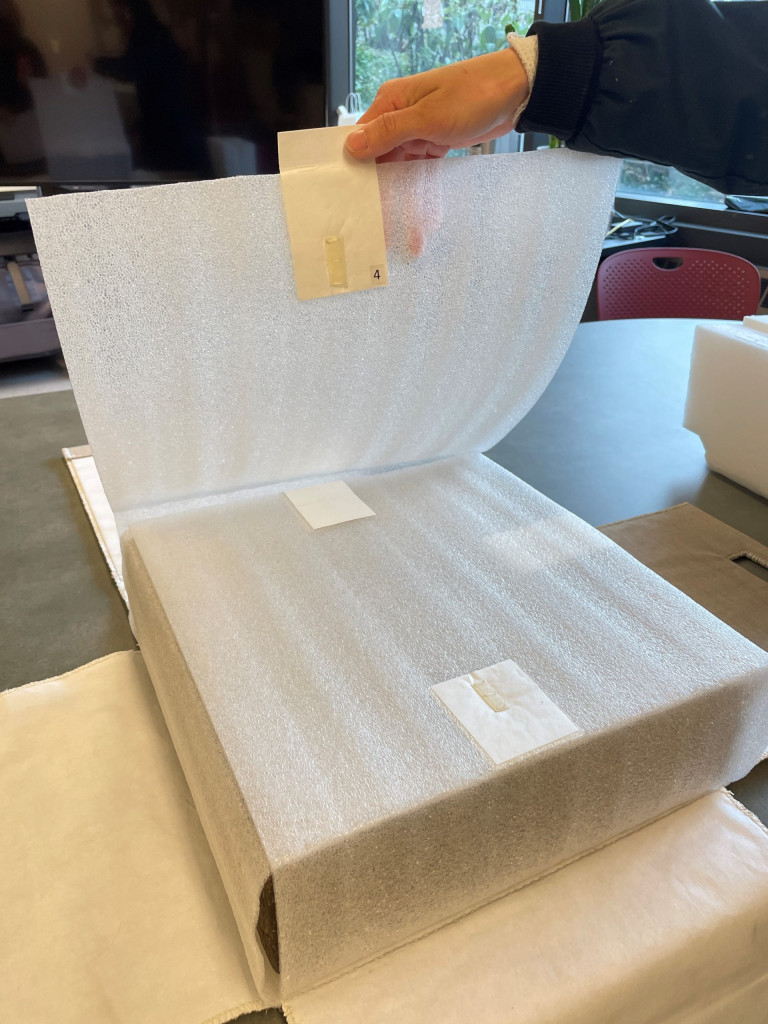
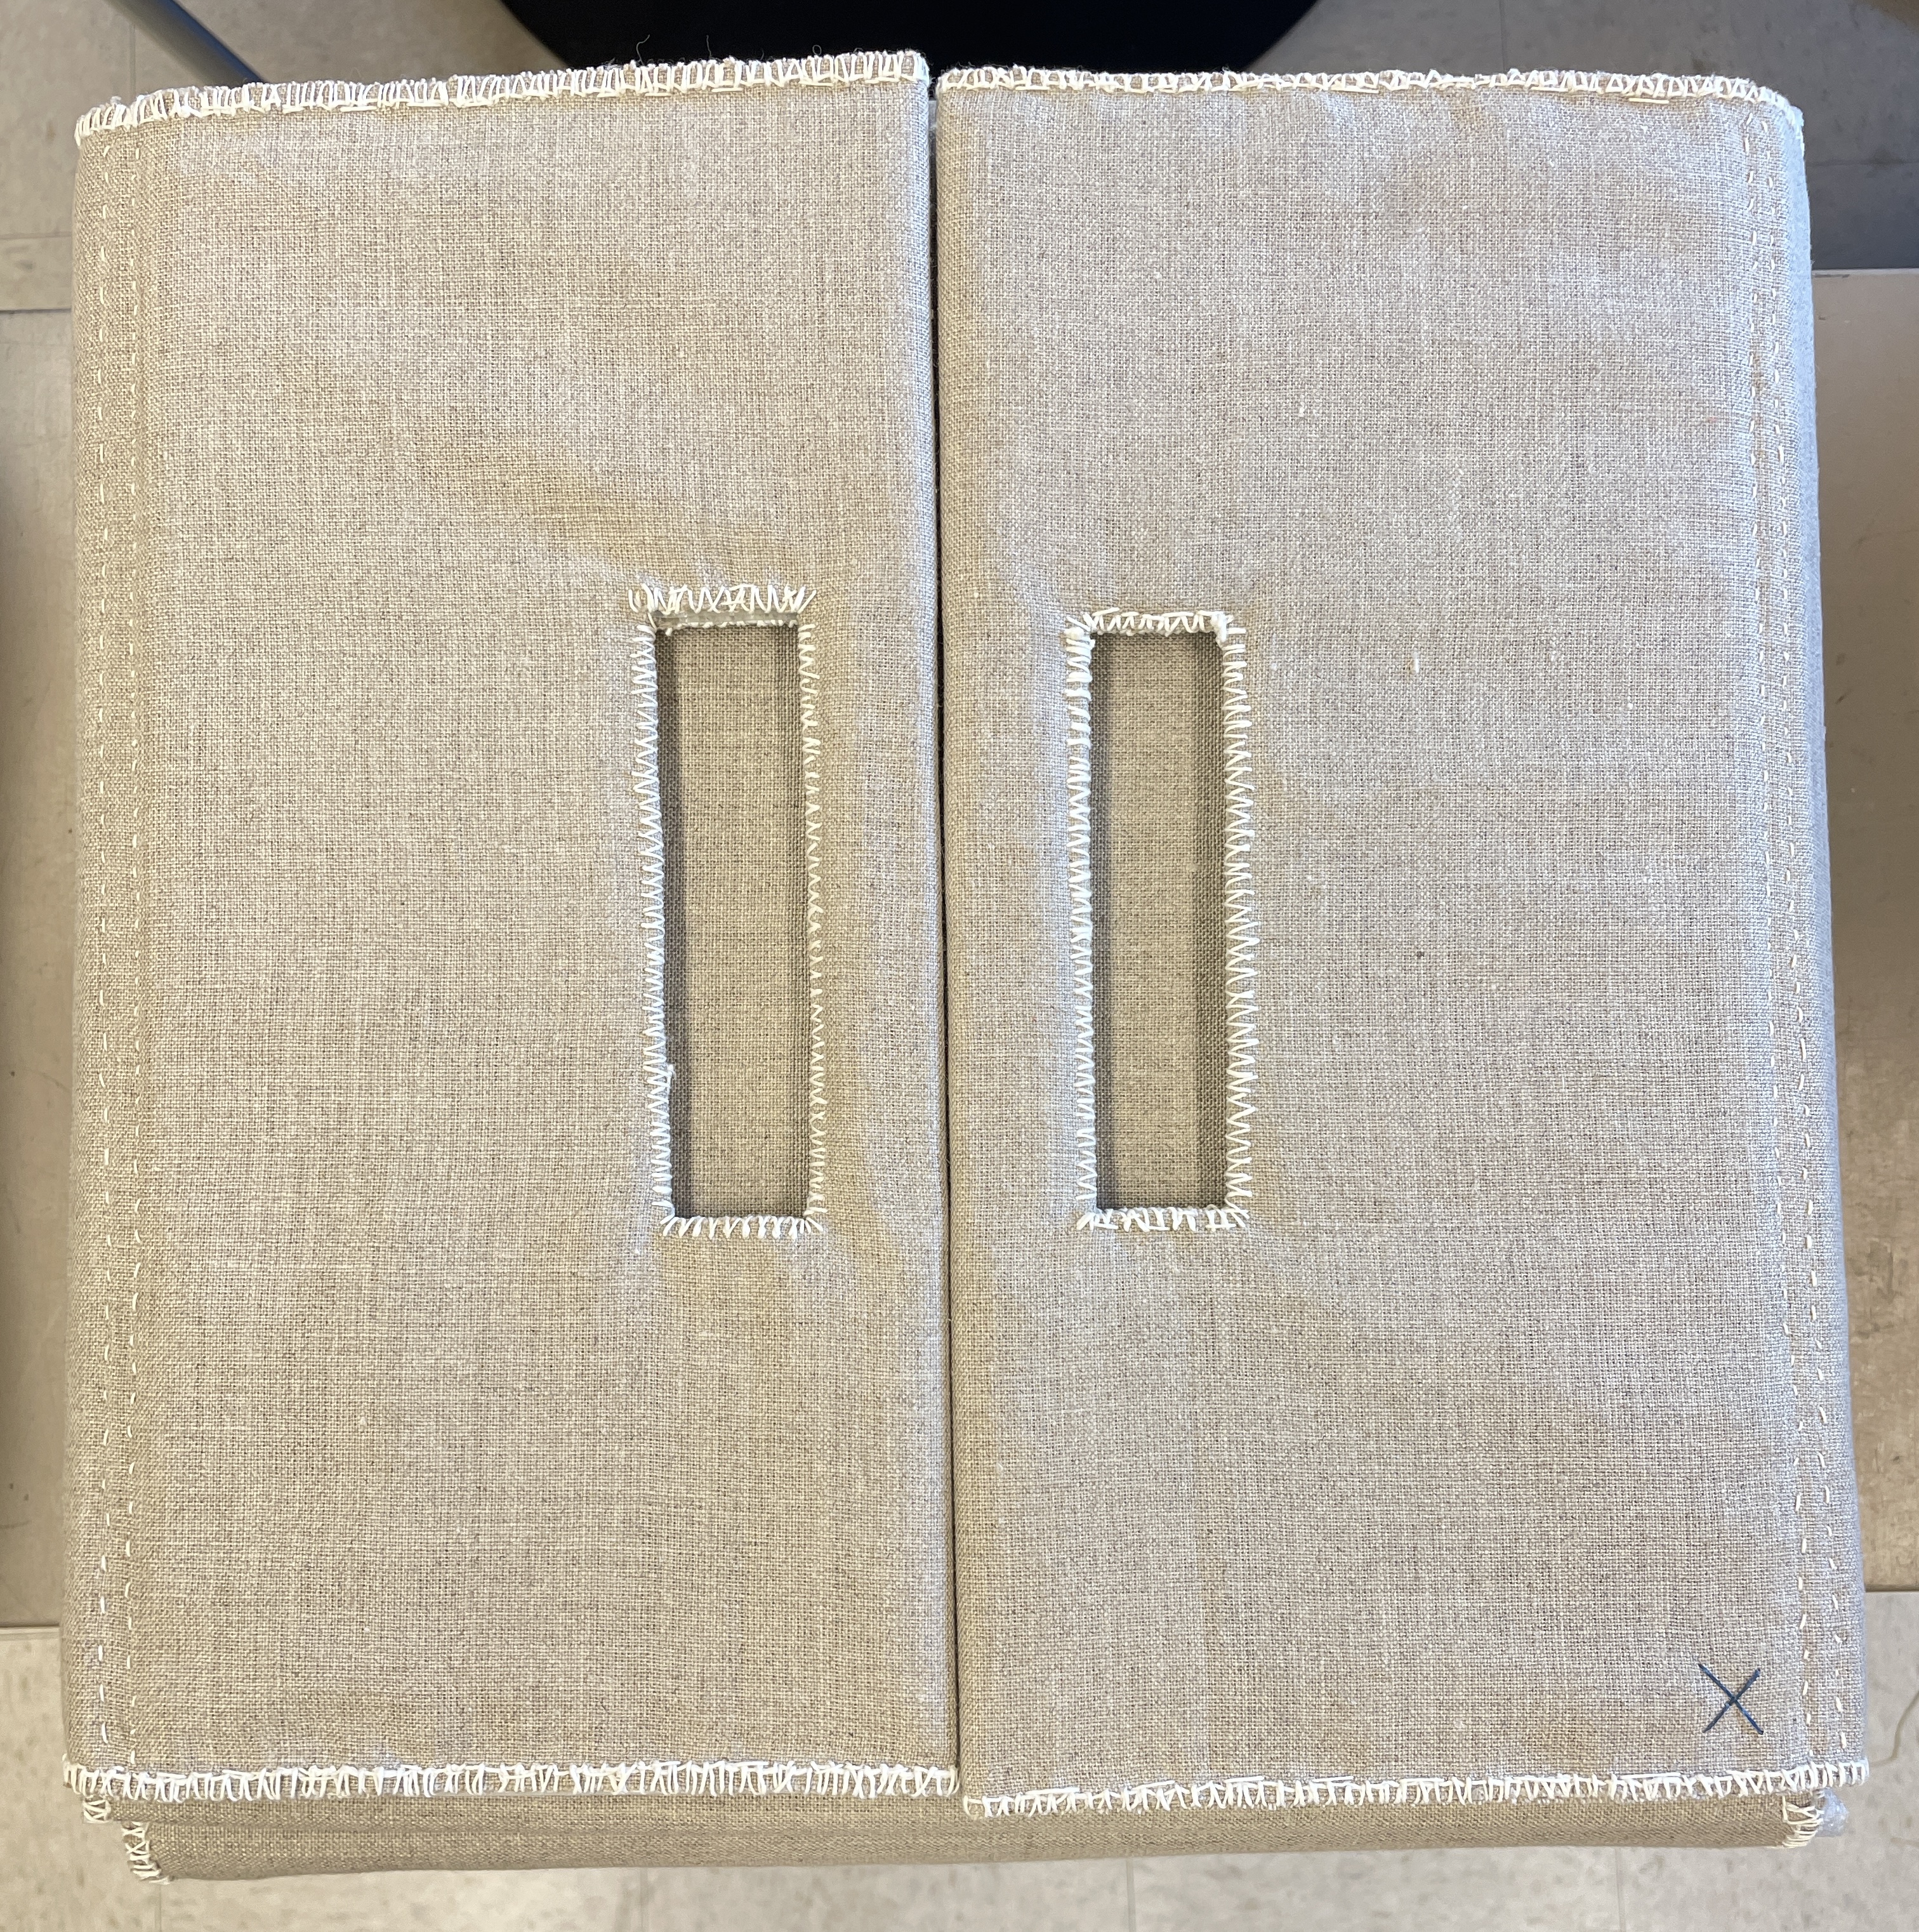
4. The cornerstone was wrapped around all sides in a foam sheet with four flaps.
Foam flaps secured with VelcroUnfolded flas
5. A cloth wrapper with custom handles was sewn to support the tablet during insertion into and retrieval from the case.
Sewing cloth wrapperDuring creation of handlesCompleted wrapper
In addition, life-size surrogate photographs were printed by Jessica Ebert and stored in a polyester sleeve within the case. These images may prove even more useful during exhibition or teaching than seeing the actual tablet as they were captured with raking light that beautifully highlights the cuneiform writing. They could even be used as an alternative to handling the heavy tablet.
To help guide future librarians on how to handle the cuneiform tablet in the future, handling instructions were provided, a handling video was created, and a QR code of the video was pasted onto the case. Check out the video below.
I was appreciative to have been able to hearken back to my object’s conservation experience working at the Musical Instrument Museum. My prior experience helped guide me to dust the tablet and store surface cleaning samples, however, this was a project that took me out of my library conservation comfort zone. The knowledge required to house such an object (and the amount of textile sewing used to create the cloth wrapper!) gave me even more appreciation for the work objects and textile conservators do to preserve our oversized and heavy materials – especially when transporting and taking them on and off display!
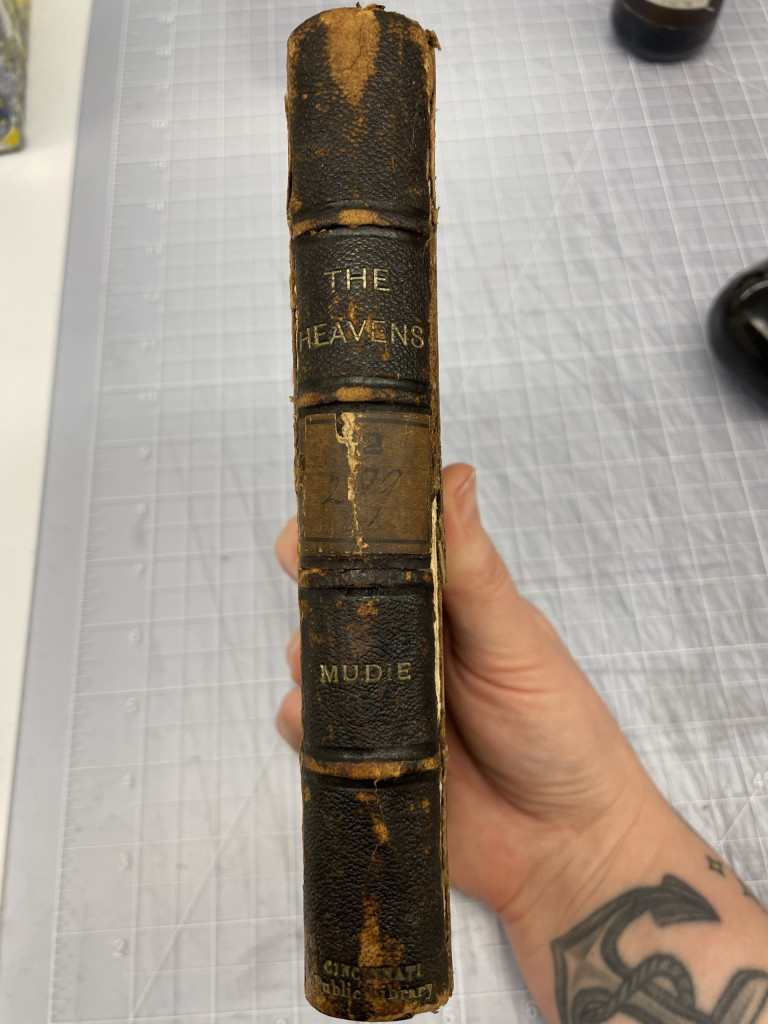
Ashleigh Ferguson Schieszer [CHPL] – Rare book and paper conservator
At the end of October we were lucky enough to have Jeff Peachey come to the Lab for a week-long workshop on Leather Conservation. We covered sewing extensions, joint tacketing, board splitting and cotton hinges, leather rebacks, and knife sharpening. In the weeks following the workshop we shared highlights from the workshop on our Instagram…
Leather rebacks, including board slitting, inserting a cloth hinge, lifting the original leather, dyeing the new leather, and paring and attaching the reback.
Finally, conservation ASMR…Jeff Peachey style! Make sure the sound is on for this one…
We had the best time with Jeff. He is such a knowledgable and approachable instructor, and we learned so much from him. Thanks for coming to the Preservation Lab, Jeff!