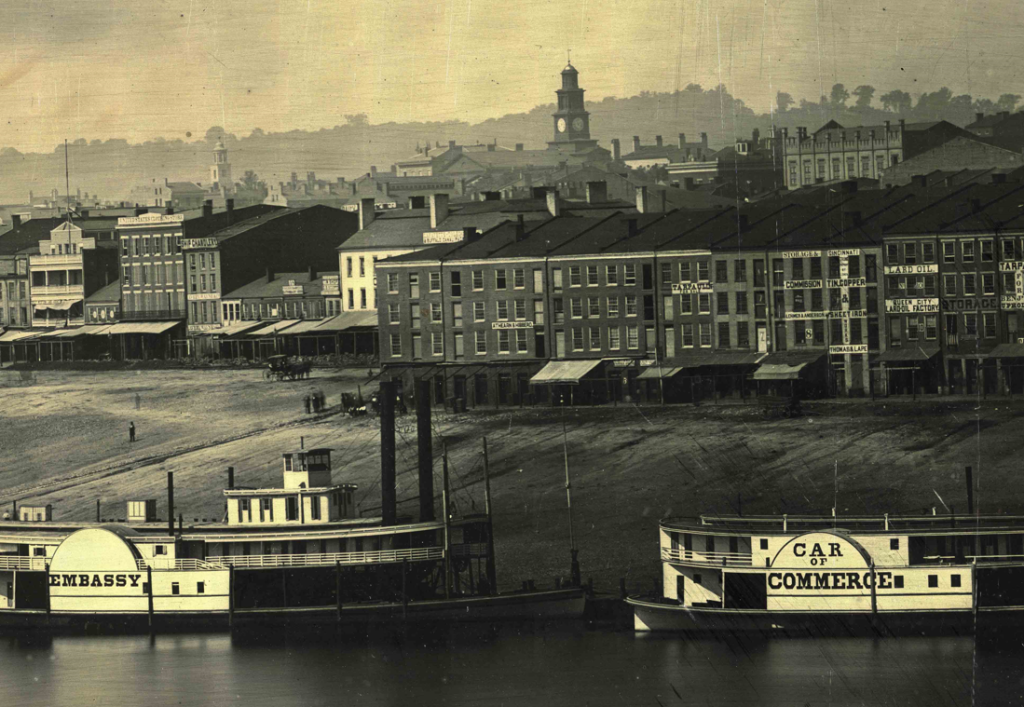
As conservation professionals at the Preservation Lab, we get to see and work with our fair share of historic, rare, and just plain interesting artifacts. I recently had the pleasure of becoming familiar with an item that is all 3 of these, and just so happens to be one of The Cincinnati & Hamilton County Public Library’s (CHPL) most prized possessions: the Fontayne and Porter 1848 Cincinnati Panorama Daguerreotype.
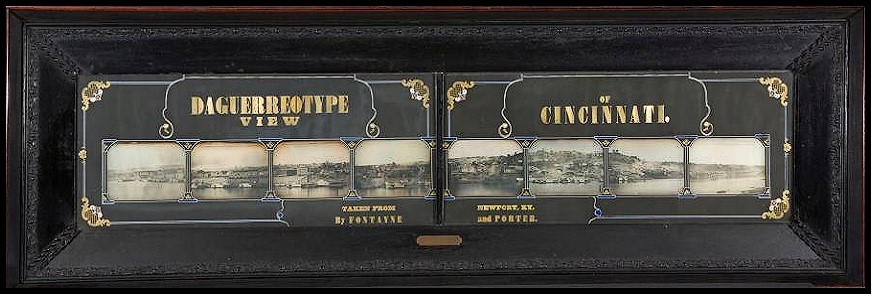
Cincinnati Daguerreotype Panorama by C. Fontayne and W. Porter, 1848
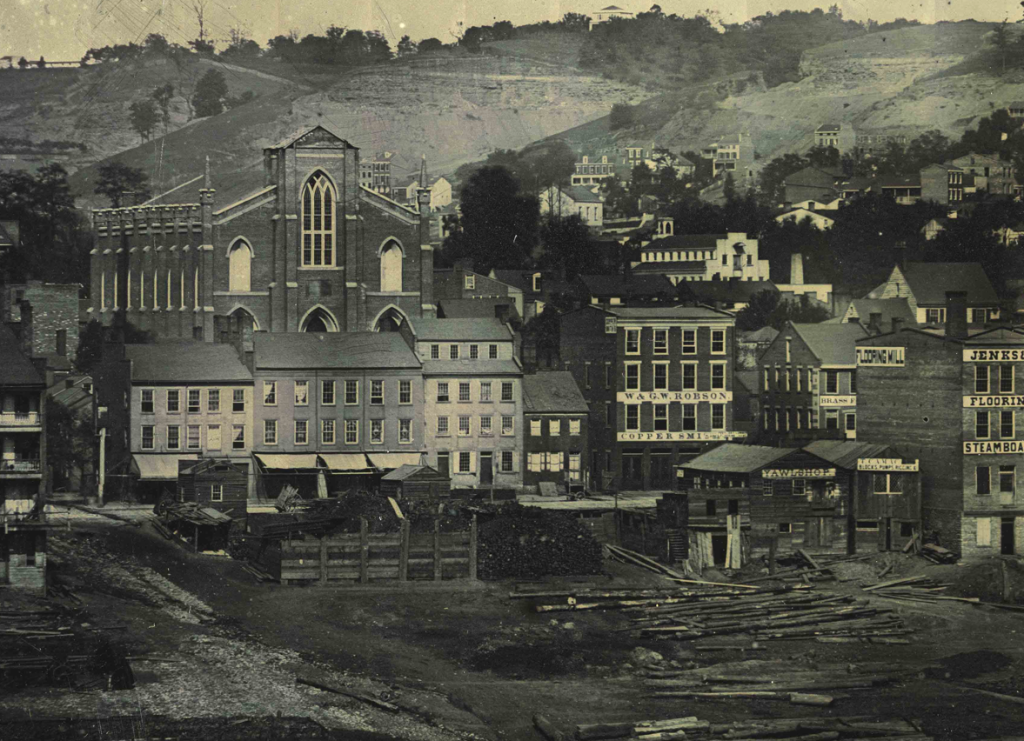
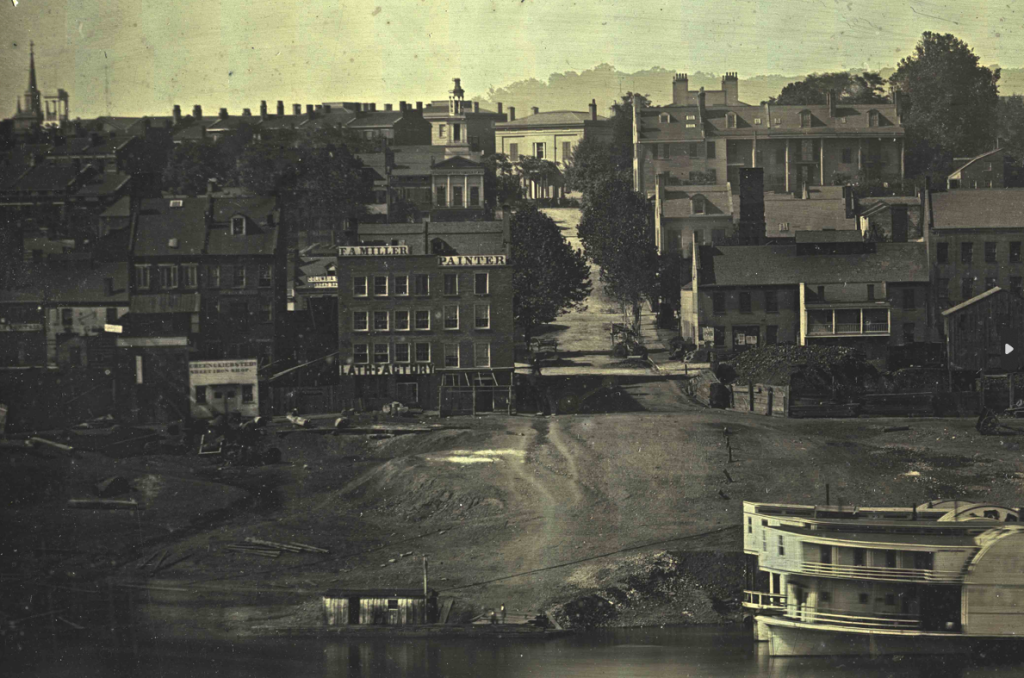
For those who are unfamiliar, a daguerreotype is the very first photographic process, utilizing iodine-sensitized silver plates and mercury vapors, often offering stunning detail and resolution. Currently on display in the downtown Main Library’s Cincinnati Room, the Cincinnati Panorama is no exception, and is considered one of the most detailed and vivid examples of daguerreotype photography currently in existence.
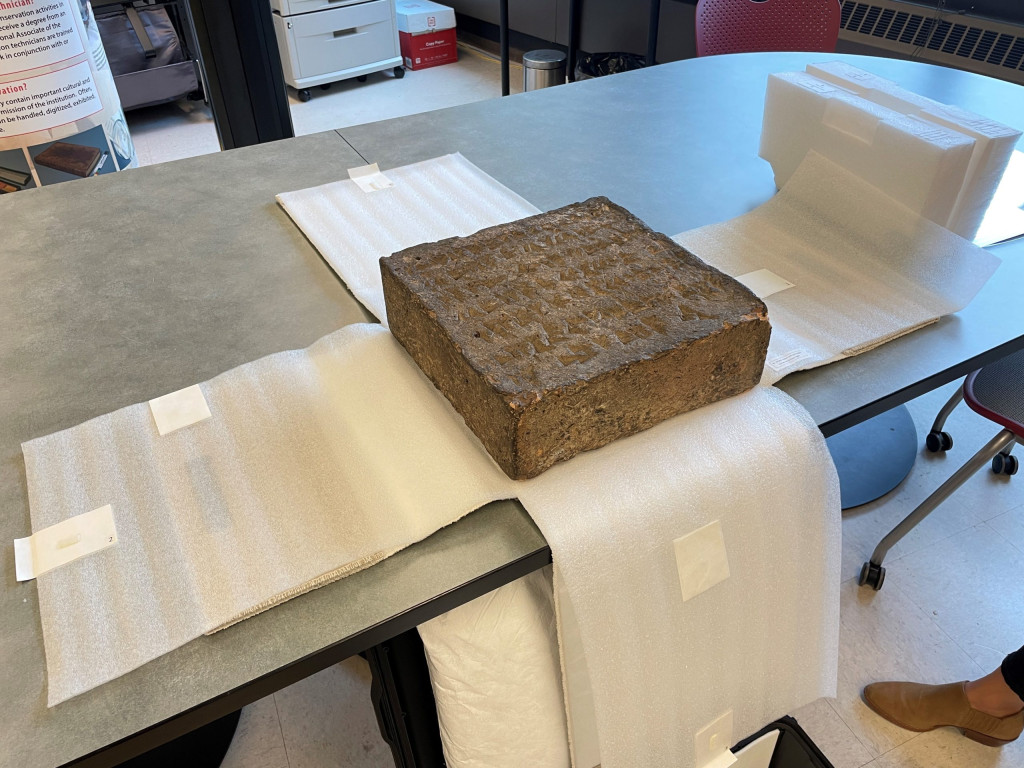
Daguerreotype photography is not without its challenges, however. Most significant of these (at least which concerns us in the conservation field) is that daguerreotypes are extremely delicate. They scratch easily and can degrade with simple exposure to oxygen, atmospheric pollutants, and moisture. These attributes bring up a difficult question: how does one display an item like this, while also ensuring its preservation for generations to come?
Enter Ralph Wiegandt. Wiegandt is a Photograph Research Conservator who designed and installed the 1848 Cincinnati Panorama’s enclosure and display case in 2008. He routinely has performed on-site follow-up consultations in 2012, ’14, ’16, and most recently this past June with Genealogy and Local History and Preservation Lab staff. My fellow lab mate, Hyacinth, and I had the good fortune to also meet with Wiegandt on this recent visit to attend a presentation on his uniquely designed enclosure. Although the primary purpose of the visit was to discuss the enclosure, Ralph shared no shortage of information about daguerreotype plates, the photographers (Fontayne and Porter), the conditions surrounding the panorama, and much more.
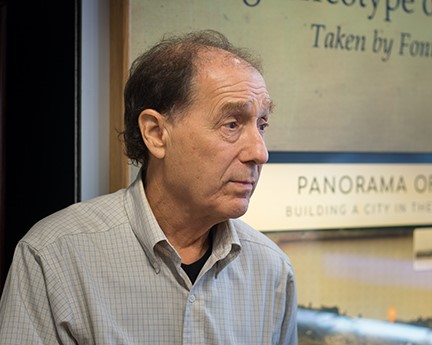
Ralph Wiegandt, photo by Hyacinth Tucker
It was clear from speaking with Wiegandt that this project was one he was deeply passionate about, referring to it as “a seminal object in my career.” He spoke with excitement about the unique attributes the Cincinnati Panorama showcases, chief among them: the stunning detail and clarity. According to Wiegandt, this image is so detailed that it can be magnified up to 30x before experiencing any resolution loss. This allowed for intense digital imaging to be performed during the initial conservation of the daguerreotype in 2008. In this process, digital photos were taken from different degrees of closeness to the original image and then stitched together, creating one large interactive digital display, viewable here.
Wiegandt informed us that the 1848 Cincinnati Panorama was not the first attempt at such a picture. Just several months prior, W.S. Porter had taken another daguerreotype panorama of the Fairmount Water Works in Philadelphia.
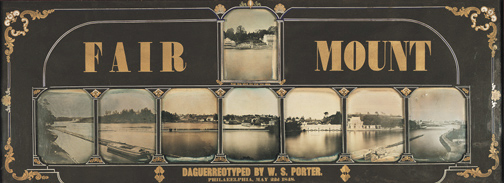
Fairmount Water Works Daguerreotype Panorama by W.S. Porter, 1848
The detail of this image, however, is not as impressive as the Cincinnati Panorama. What can be gleaned from this fact, according to Wiegandt, is that the Philadelphia capture was a successful learning experience for Porter, and that his skills and techniques were able to improve dramatically by the time he attempted the Cincinnati Panorama with C. Fontayne.
At the time of the Cincinnati Panorama, daguerreotype photography had only existed for 9 years. Equally as remarkable as the detail these images were able to capture is the inception of this technology. Wiegandt explained how Louis-Jacques-Mande Daguerre experimented with plates of silver sensitized with iodine fumes. The idea was that the sensitized silver would be reduced as it was exposed to light (i.e., the shutters on a camera opening and allowing light from the image field to hit the plates), thus creating latent images in the silver. Although this proved to be successful, a viewable image was not detectable until a chance happening, which Wiegandt describes as “a miracle.” Legend has it that one of Daguerre’s exposed plates was stored in a cabinet, sharing this space with one other singular item: a broken instrument that utilizes mercury (such as a thermometer, barometer, etc.). Upon examining this plate, Daguerre realized the latent image was now detectable, correctly deducing that the mercury fumes had developed the film. The fumes had caused the light-exposed areas on the silver plate to form small bumps, roughly 1 micron in size, creating an instant high-resolution image. The microscopic size of these bumps means that, according to Wiegandt, daguerreotype images are an early example of what we would today call nano technology. (Ralph also notes the actual circumstances of its discovery are unclear since any notes from Daguerre’s studio would have been lost during a fire shortly afterwards.)
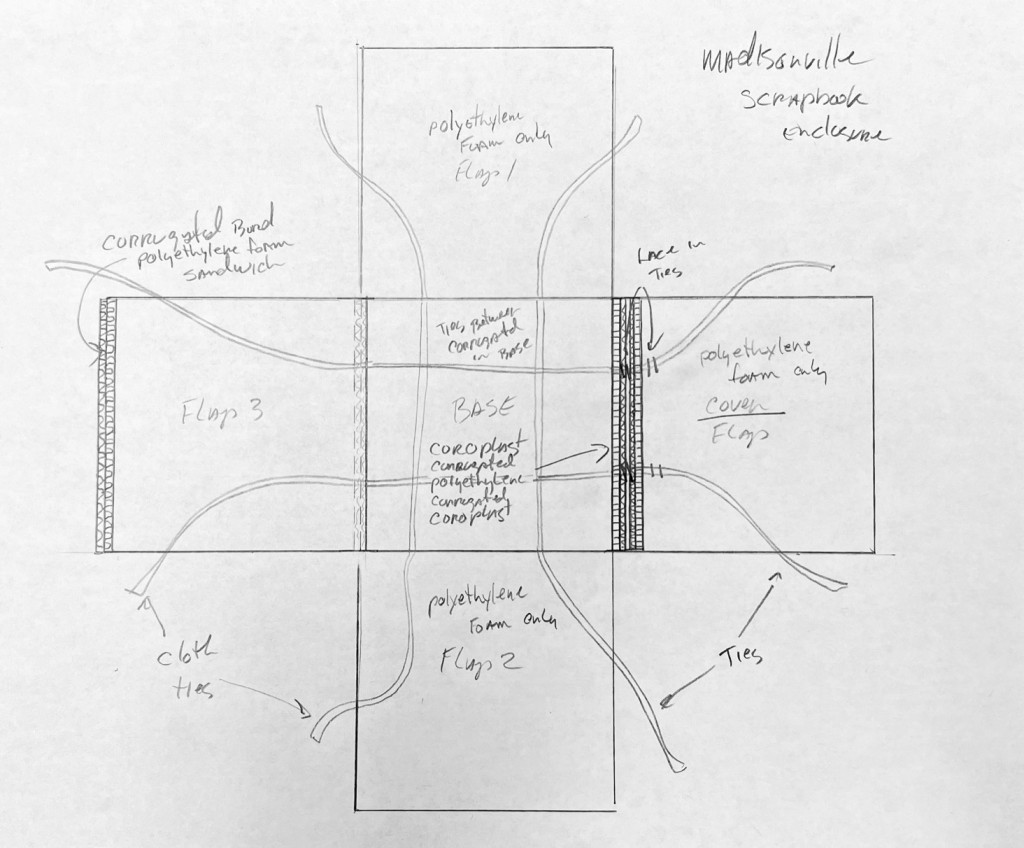
Much like the Fontayne and Porter Cincinnati Daguerreotype, the current display case is quite unique as well. As mentioned before, daguerreotypes are incredibly delicate. To successfully prevent further degradation and preserve this object for generations to come, its exposure to oxygen and other reactive gases must be severely limited. The solution that Wiegandt produced was a specialized inert gas case, similar in concept to how the Declaration of Independence is housed. The goal of this case is “to maintain a slightly elevated pressure of a non-reactive gas such that it will not put excessive strain on the seals yet will be above the potentially highest barometric pressure” (Wiegandt, 2006), thus preventing any atmospheric air from coming in contact with the sensitive daguerreotype plates.
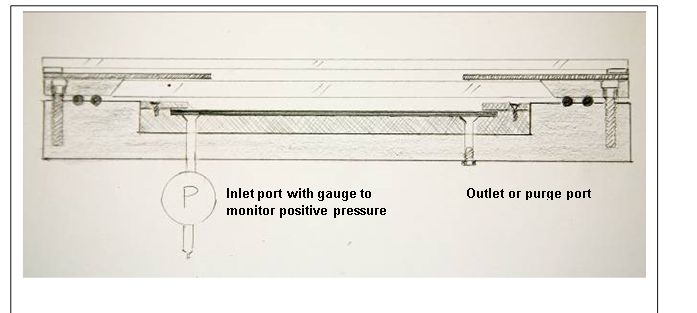
Wiegandt’s sealed encasement design sketch provided in treatment documentation
Wiegandt chose argon to pressurize the case with as it has a better diffusion rate and is more inert than other gases such as nitrogen, all while being cost effective.
Wiegandt informed us on his most recent visit that the case is doing its job: the panorama has experienced no detectable degradation since its installation. However, this was likely his final visit to the Cincinnati Library, as he is retiring from the field. I should add that a further and perhaps more important purpose for this visit was to advise and inform CHPL (and Preservation Lab) staff to be successful in monitoring and caring for the object in his absence. Fortunately, Wiegandt was able to leave us with a wealth of information and resources that will aid in the continued preservation of this amazing artifact. With an updated preservation plan, knowledgeable staff in both the Genealogy & Local History and Preservation Lab departments, and a commitment to preserving cultural property, we can be confident the Cincinnati daguerreotype panorama will be enjoyed by library visitors for many generations to come.
Matthew McCoy [CHPL] – Conservation Specialist
Sources:
http://photographyhistory.blogspot.com/2010/10/daguerreotype-panorama.html (Fairmount Water Works Photo)