Monthly Archives: June 2026

Grooved Disc Media Storage Solutions

Record album in front of vertical sleeved albums.

Grooved Disc Media

Although The Preservation Lab is primarily a book and paper lab, we often receive items that fall outside this realm and are required to do a little research and get creative. I was recently assigned a small collection of various grooved disc media that required archival storage solutions. “Grooved disc media” is an umbrella term that encompasses any type of sound recording that features small grooves cut into its surface that a stylus then passes over to produce an audio signal. Think vinyl records, shellac discs, 45s and more. Another term I like that covers multiple varieties of grooved discs is the term “records”, which I will use interchangeably with “grooved discs” for the remainder of this post.

Considerations

Until this point, we had not received any grooved disc media requiring new housing at the Lab. In situations like this, I like to do a bit of research and figure out what is required of the housing to determine what is required for safe storage. We found several trustworthy sources that provided tips for what to do as well as what not to do. The most important ones are as follows:

  • First and foremost, any grooved disc should be stored upright. When multiple discs are placed on top of each other, their collective weight can compound quickly. This weight can then slowly compress the grooves on the discs and result in loss of media.
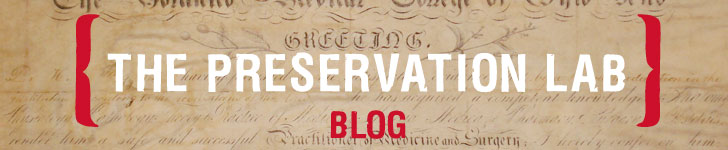
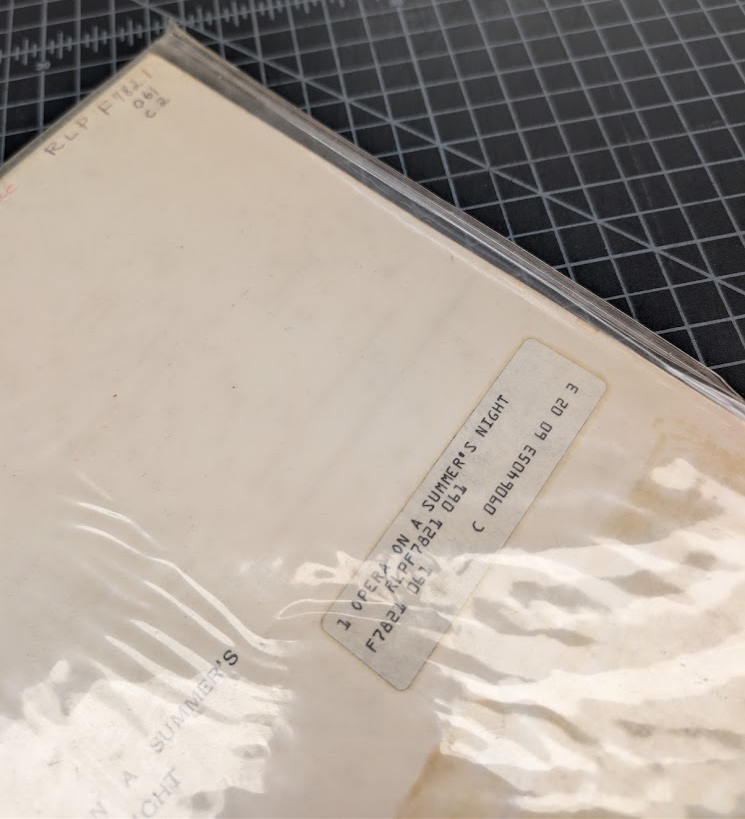
  • Grooved discs should have their old plastic sleeves, both inner and outer, replaced with archival plastic sleeves. Older records often have non-archival plastic outer sleeves that are susceptible to warping over time. This can lead to the discs themselves warping, affecting playback speeds which can lead to further degradation. We ended up purchasing these Original Master Sleeves and Archival Record Sleeves, both made by Mofi Mobile Fidelity Sound Lab.
A plastic album sleeve that is curling around the edges.
A non-archival plastic outer sleeve. Notice how the plastic is starting to curl along the edge.
Two new archival sleeves, the outer sleeve is on the left and the inner sleeve is on the right.
A new archival plastic outer sleeve (left) next to a new archival plastic inner sleeve (right).
  • The original cardboard sleeves should be retained if desired and if they contain any information or artwork related to the recording. However, it is advisable to store these separate from the sleeved records, or at least with the record inside a protective archival inner sleeve before placing it inside the cardboard. These cardboard sleeves can sometimes foster mold growth in high humidity environments.
  • Ideal relative humidity for the storage environment is between 30-50% with fluctuations not exceeding +/- 5% in a 24-hour period.

Solutions

After learning all these considerations, assistant conservator Catarina Figueirinhas came up with the following solution.

The finished sleeving system for each albums with numbers indicating to various parts of the system.
The tray and its various components that was designed to hold the records in their new archival sleeves.
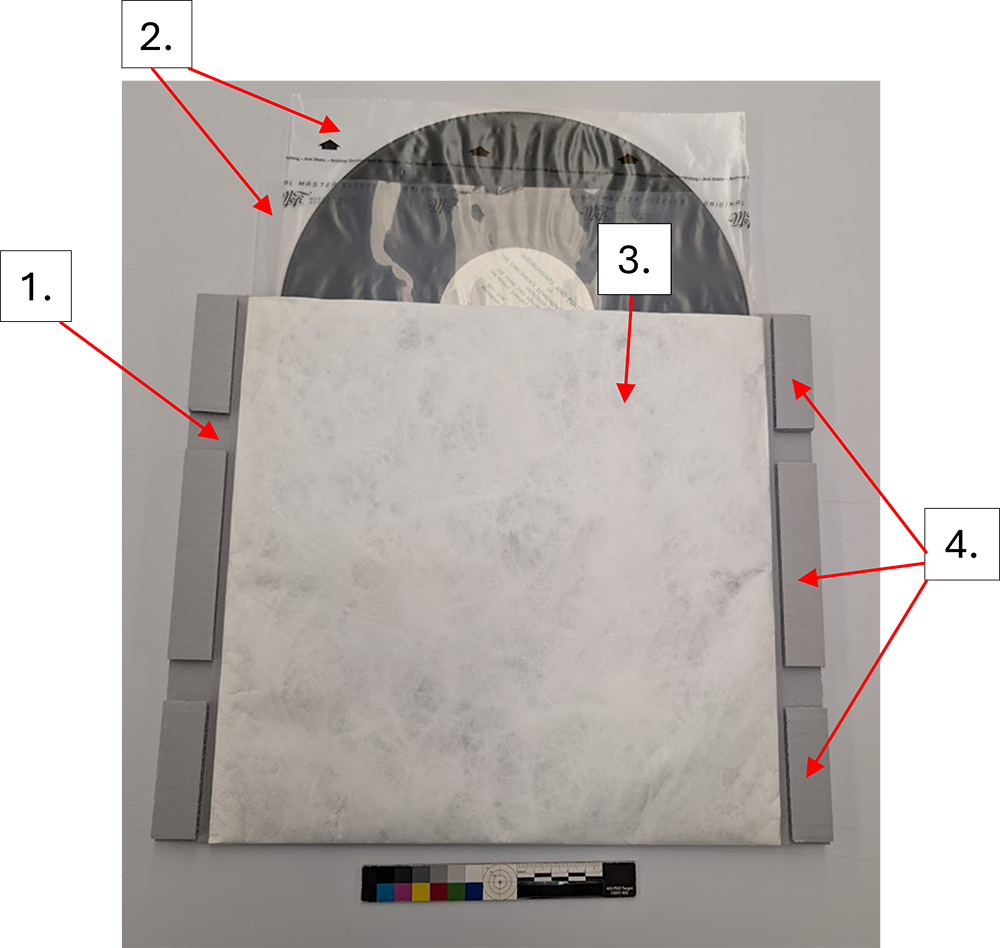
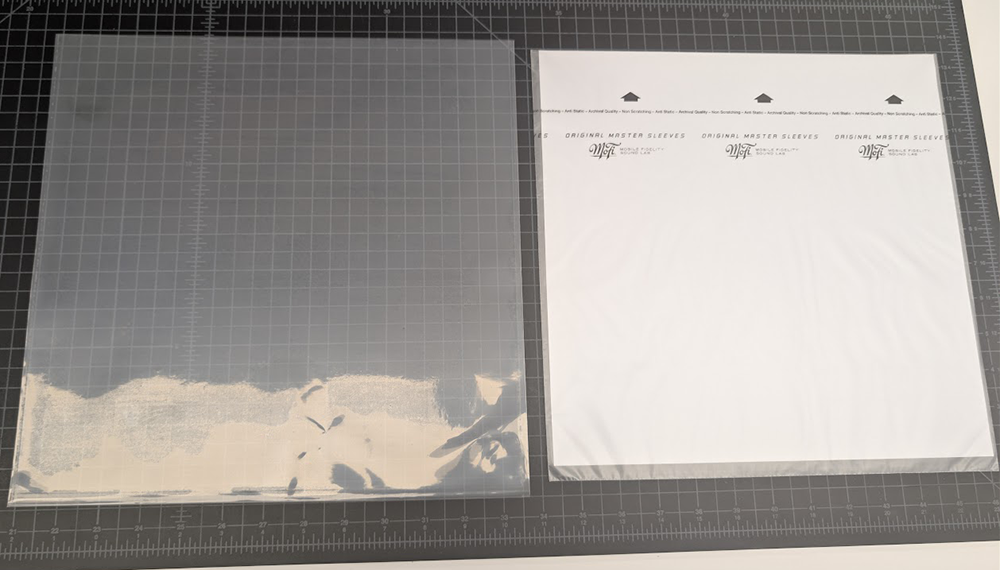
  1. Individual corrugated board trays were constructed for each disc. Corrugated board was chosen because it is lightweight, inexpensive, and relatively strong. They were cut slightly oversized to provide room for protective bumpers to the left and right of where the sleeves will be attached.
  2. Each disc was placed inside its own archival inner sleeve. These are the sleeves that Mofi refers to as “Original Master Sleeves”. Each disc inside its inner sleeve was then placed inside the archival outer sleeves, which Mofi refers to as “Archival Record Sleeves”. In cases where a cardboard sleeve was present, they would also be placed inside these plastic outer sleeves. The disc’s inner sleeve should protect it from coming into contact with the non-archival cardboard, and the plastic outer sleeve will also help protect the cardboard from damage.
  3. A final pocket was constructed of Tyvek to store each disc inside its sleeves, which was then adhered to the corrugated board trays using PVA.
  4. To prevent any potential abrasion to the discs while sliding them in and out of their final enclosure, several small, corrugated board bumpers were added to the left and right of each attached Tyvek pocket that were thicker than the pocket and all its contents.
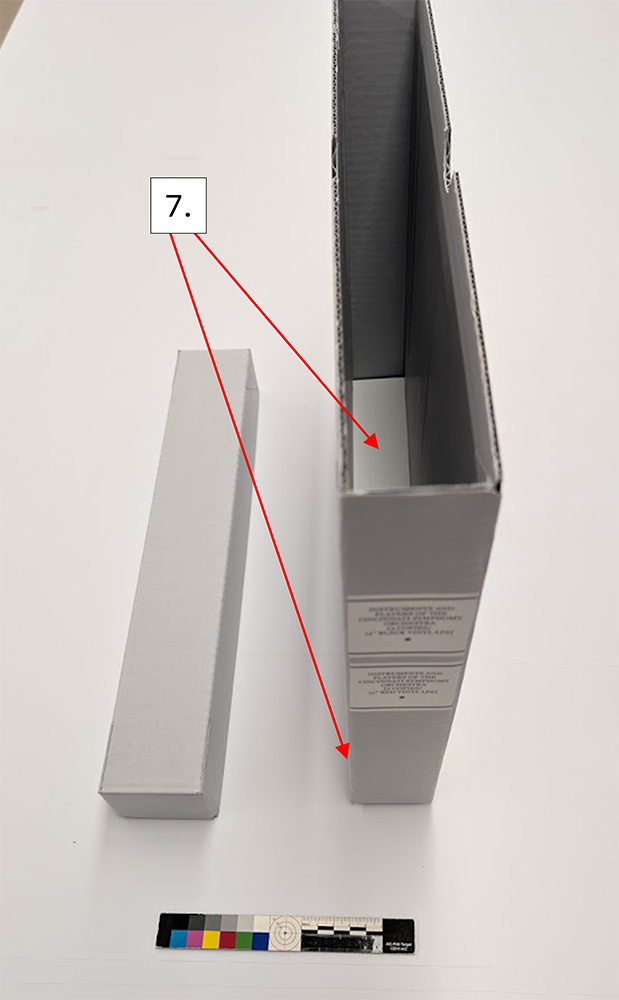
  5. A single corrugated board banker’s style box was constructed to house each disc/tray in the series.
  6. To help with removal, Tyvek tape pull tabs were added to each individual tray.
  7. After adding all the trays and their discs to the banker’s box, it was discovered that the box was quite top-heavy and prone to tipping over. To combat this, I added a strip of Dibond (a composite material consisting of a polyethylene core sandwiched between two pieces of aluminum sheeting) to both the bottom of the inside of the box and to the underside of it as well. This provided extra weight to the bottom and added some nice stability. For future enclosures of this nature, I will make the box thicker, adding fill if necessary. This make it more stable without the need to weight the bottom of the box.
Assembly of the box with various trays with tabs which allow for easy removal from the enclosure. Components are numbered in the photo.
The banker’s box style enclosure with its lid removed to reveal the contents.
Inside of the enclosure to show the Dibond on the bottom of the enclosure, labeled 7.
The banker’s style box with its trays removed revealing a piece of Dibond lining the bottom. An additional piece of Dibond has been added to the underside of the box for added stability.

Final Thoughts

Although this storage solution will almost certainly continue to evolve as I make more of them, I was very happy with how the first batch turned out. Part of the fun of creating new storage solutions is figuring out what works and what doesn’t and adjusting accordingly.

On a side note, I realize that some readers of this post may be concerned for their record collections as they do not have a conservation lab at their disposal to construct an enclosure like this. To that I would say that any of the storage considerations mentioned that are achievable, such as storing discs upright and in new archival sleeves will go a long way in ensuring the longevity of your collections.

A huge thank you is deserved to both conservator Ashleigh Ferguson-Schieszer and assistant conservator Catarina Figueirinhas, who helped me brainstorm on this project.

Sources

Image References

Unfolding the Challenge: Conserving Folded Parchment Deeds with Wax Seals

When a group of four folded parchment deeds arrived at the Preservation Lab, I was immediately excited about the project. It is not often that we work with parchment, particularly on “flat” items such as parchment deeds. I use “flat” in quotation marks because these were anything but flat once unfolded.

Four folded parchment documents stacked on top of one another for documentation.
Before treatment photography – four folded parchment documents.

At first glance, they looked deceptively simple: compact, neatly folded, and quite small. Once opened, however, they revealed large, creased, and cockled sheets of animal skin, some with fragile wax seals and one composed of multiple leaves stitched together along the bottom edge. (Prior to treatment, each document was photographed as they were received in the Lab):

These 18th-century documents, part of the Archives and Rare Books Library, include three indentures consisting of single parchment leaves, and one composed of three parchment leaves secured with wax seals and parchment stays along the lower edge. They record land leases and property transactions.

The documents were brought to the lab for stabilization and improved access for teaching and research. In their folded state, they were difficult to handle, especially the multi-leaf example, which could not be fully examined as stored. Centuries of folded storage had clearly left their mark.

So how do we safely unfold and stabilize these items for handling, teaching, and research?

Parchment is highly responsive to humidity. It expands, contracts, cockles, and stiffens depending on environmental conditions. Long-term folded storage had left deep set creases, and exposed areas showed noticeable darkening. These distortions became even more apparent under raking light photography.

Treatment Approach

Flattening parchment is never as simple as adding moisture and pressing. Too much humidity risks gelatinization, while too little leaves folds unchanged. Wax seals add another layer of complexity since they are brittle, protruding, and highly sensitive to pressure. To begin conservation treatment, each document was first surface cleaned using a hydrophilic sponge to remove surface grime. Ink testing followed to ensure stability before any humidification. All inks tested were stable, and no iron gall ink was detected. With testing complete, humidification could begin.

Parchment document under suction on a suction table.
Drying on the suction table.

The single-leaf documents were humidified in short cycles within a cold humidity chamber. After each cycle, they were dried gradually under felts, with pressure slowly increased and carefully kept away from seal areas. Drying methods were adapted depending on structure and condition. One single-leaf document without seals was dried under tension on the suction table, while the others were dried under felts and weights, again avoiding direct pressure on wax seals.

The Multi-Leaf Document

The multi-leaf deed required a more complex and iterative approach. It consists of three parchment leaves attached together, each responding differently to moisture. Initial humidification was carried out using an ultrasonic dome with a Gore-Tex barrier supporting the lower leaf. The upper leaf responded well, but the middle leaf remained resistant. To improve moisture distribution, unbuffered interleaving paper was placed between the leaves. Even so, the middle sheet required additional targeted treatment.

The most effective approach combined localized humidification with staged flattening. Each leaf was treated individually while the others were protected with polyester film and weighted mat board to prevent unwanted moisture transfer or movement. Stubborn folds were gently humidified using a localized ultrasonic humidifier and immediately set under pressing stacks of blotter and Hollytex, followed by gradual weighting. This allowed controlled relaxation of specific areas without over-treating the entire object.

Conservator holding humidifier nozzle to locally humidify parchment document as it's being flattened on the suction table.
During treatment – localized humidification for the multi-leaf document.

The process was highly collaborative, often requiring two or three people working at once. One person applied moisture and guided the parchment while another adjusted weights and pressing materials in real time. Throughout treatment, wax seals were carefully protected using mat board barriers and spacing systems to ensure they remained free from pressure. Once fully relaxed, the document was dried under felts with weights in place, while polyester sheeting remained between the leaves to prevent adhesion or distortion.

Wax seals

Three of the four documents retain wax seals along their lower edges. These seals were structurally fragile and were consolidated using fish gelatin applied with a fine brush. During treatment and flattening, they were carefully isolated so that no direct pressure was applied.

Parchment document under holly-tex, blotter and weights.
During treatment – multi-leaf document after humidification and flattening.

Housing for Support and Access

Following treatment, each document was rehoused in a custom sink mat system. Before constructing the full-sized enclosures, I made a small working model using a scrap piece of parchment to ensure that what I had in mind would actually function for these large documents in practice.

Small matting system, opened, with ethafoam on lid, mylar and mat board supports and small piece of a parchment document.
Small scaled model of the enclosure for each parchment document with the different components, including sink mat and polyester film sling.
Small sink mat model with a parchment document fragment inside.
Small scaled model created for the parchment documents.

The documents rest on polyester slings secured within sink mats and are held in place with cloth ties. The interior lids are lined with Ethafoam, providing gentle compression and helping to minimize movement caused by environmental fluctuations. The multi-leaf document required additional structural support through reinforced mat board construction. The three smaller documents were housed together in a corrugated clamshell enclosure. This housing balances long-term preservation with accessibility, allowing the documents to be safely handled for teaching and research.

All four matting systems stacked on top of one another.
Each document housed in a custom matting system.

Final results

Raking light photography after treatment shows a clear reduction in creasing, along with a noticeable shift in how the documents behave physically. The parchment still carries evidence of its long folded history, as these materials tend to do, but it is no longer locked into those distortions. While not perfectly flat, the material is now stable, supported, and significantly less stressed along its former fold lines. Under raking light, what once appeared as sharp ridges and tension lines now reads as a softer, more coherent surface. It feels as though the parchment has settled back into itself after a long period of compression.

Perhaps the most satisfying change, though, is in handling. What began as awkward, resistant objects that required constant caution are now stable enough to be lifted, viewed, and studied with far more confidence. They remain delicate, but they are no longer unpredictable in the same way. There is a clear sense that they can finally move between storage, teaching, and research without the same level of hesitation at every step.

Overhead view of the multi-leaf parchment document after treatment in the matting system with a sink mat and polyester sling.
After Treatment – parchment document housed in a matting system with a polyester sling.

Catarina Figueirinhas – Assistant Conservator

Digging into a Family Bible

I picked this tattered Bible up off the shelf where it had been waiting for an enclosure thinking it would be a quick and easy project. All it seemed to need was a corrugated clamshell and a pocket for some ephemera – easy enough. What I wasn’t expecting was for the ephemera inside of this book to be human hair. Multiple locks of it.

A card that accompanied the bible from Kenton County Public Library said that the family listed in this Bible (last name of Gegner) seemed to be more Cincinnati-based than Northern Kentucky-based, and it ‘contained lots of interesting items within.’ And ‘interesting items’ was an understatement!

Along with the Bible was a folded handkerchief, which, when unfolded, contained a small lock of hair tied with a blue ribbon.

Unfolded handkerchief with a small lock of hair tied with a blue ribbon, sitting next to the cloth bound bible, tied with cloth string.

I thought this was the interesting items mentioned but decided to untie the Bible and peek through it as well. Imagine my surprise when I came across another lock of hair tucked within the pages! But it didn’t stop at one – I ended up uncovering three locks of hair, three pressed flowers, and one icon of Jesus and the Sacred Heart that seemed to be hand embroidered.

Another lock of hair pressed between the bible's pages.

After talking to some people about the Bible at our annual open house, it came to my attention that this Bible is probably a family Bible, used to keep family records. I also was made aware that typically in family Bibles, deaths, births and marriages are recorded on the pages between the Old Testament and the New Testament. Lo and behold, when I opened this Bible to the New Testament, sure enough there were birth and death dates!

Handwritten inscriptions of birth and death dates written in the bible.

As mentioned above, this Bible wasn’t in for any major treatment – it received a corrugated clamshell with some fill to make it 5” x 7” so it doesn’t get lost on the shelves, and a pocket was made and attached to corrugated board to keep the handkerchief and the card from Kenton County Public Library. Additionally, the newly discovered items inside the Bible were also placed in polyester sleeves, in order to protect the pages, and then laid back in where they were found. These efforts will help to keep the Bible stabilized on the shelf, so it will be useable for longer.

While this Bible isn’t connected to any famous names, it’s still amazing to know that we are helping preserve local history. Hopefully, we can help future generations get a glimpse into their past relatives’ lives by preserving something like this Bible.

Nicole Browning – Conservation Specialist

Paper & Book Intensive 2026: A First-timers Recap

Four Ethiopian book models: one in a leather satchel, one covered in a dark red leather and blind tooled, and two with wooden boards and exposed sewing.
View of the Kalamazoo River from the dock at OxBow.

I was fortunate enough to attend Paper and Book Intensive (PBI) for the first time this year as part of my annual staff development. If you are not familiar with PBI, it is a non-profit group that hosts an annual sabbatical-style work retreat that focuses on book arts, papermaking, and conservation. It takes place in Saugatuck, Michigan at the OxBow School of Art and is structured into two sessions, and each session lasts four days. Each attendee takes two classes during the first session and one class during the second session. The first session is broken up into a morning class and an afternoon class, while the second session classes are full day and more intensive.

When you apply to PBI you rate your preferences of classes. If you are accepted, you are then placed in classes based on availability and demand. Again, I was incredibly lucky and I was placed in all of my top choices for classes. For session one: American and English Boarded Bindings, 1780-1830 with Todd Pattison (AM session) and Marbling on Paper with Steve Pittelkow (PM session). For the second session: Madagos: The Living Tradition of Ethiopian Bookbinding with Bill Hanscom.

Boarded Bindings with Todd Pattison

Todd brought a host of historical examples for us to examine, including volumes printed in Britian and America, which was fantastic.

During the class we created two models: one cutaway and one paper-covered model. Both models were sewn on two recessed cords with an abbreviated, two-on sewing pattern. Once the text blocks were sewn, a layer of wheat starch paste was applied to the spine. Then the spines were rounded and backed. For the cutaway model, one board was attached by lacing the cords through the board, which is more commonly seen on the British boarded bindings, while the other board was attached by simply combing out the cords and adhered it down to the board, which is more commonly seen with American boarded bindings. For the paper-covered model we could attach the boards however we liked (I chose lacing them on). Todd was then kind enough to prepare additional materials for us, so that we could make an extra third models if we wanted. I chose to cut my third model (landscape oriented originally) into two small models. I then made a smaller cutaway model and small quarter binding model with marbled paper (an “extra” boarded binding) using marbled paper I had just created in my afternoon class.

Todd adding wheat starch paste to the ends of the cords in preparation for lacing.
Todd adding wheat starch paste to the ends of the cords in preparation for lacing

Finished Models

Four boarded binding models: grey paper-covered binding, quarter binding cutaway model, quarter binding "extra" boarded binding model with marbled paper and grey paper on the spine, and a small quarter binding cutaway model.

Marbling on Paper with Steve Pittelkow

A collection of marbled paper hanging to dry on large dowel rods between saw horses.
Instructor demoing at a marbling tray to a class full of students.
Steve demoing to the class

Though I have been paper marbling for years, I was super excited to take this class from Steve, because he is such an amazingly precise pattern-maker and his colors are so bright and vibrant. Little did I know before the class, we would be using acrylics, which is the one type of marbling media I really haven’t worked with too much, and definitely haven’t come close to mastering. My foundational experience with marbling has been in traditional Turkish marbling with watercolor pigments, and then I’ve also experimented with the dye-based pigments that are used in fabric marbling. But using acrylics was a whole new exciting world for me and I learned so much from the class. I also greatly improved my pattern making. I’ve always been someone who is very fond of a stone or a drawn stone pattern (a stone pattern that is manipulated with a stylus), but when it came to using combs and/or rakes to make intricate patterns I would shy away or be lazy in my pattern making practices. Steve’s focus on marbling best practices and following a rhythm in your movements as you are pulling more intricate patterns, working around the bath in a methodical, precise way, was so helpful and something I will carry with me going forward.

A Selection of My Papers

Ethiopian Bookbinding with Bill Hanscom

Following a wonderful Show & Tell where we got to see all of the amazing projects from all the classes during session one, we had a short break and then proceeded into session two, which for me meant Ethiopian Bookbinding. I was super excited about this class, partly because of the recent release of Bill Hanscom’s (the instructor) new book Ethiopian Bookbinding Tradition, and partly because I was sitting across from Bill throughout the Boarded Bindings class and they announced that they had over-prepared and brought a ton of extra models. Basically, the participants would have PLENTY to work on, and then some! I couldn’t wait. For book nerds, this was basically a declaration that we would be kids in a candy shop, and they weren’t joking. Here is proof that Bill was indeed not lying about their preparation, which was quite extensive and so well-organized:

Table with neat stacks of prepared materials for workshop, including boards, leather and textblocks.
Some of Bill’s preparation for the Ethiopian Bookbinding class…so organized!

Bill also had two exemplars of Ethiopian binding, both of which showed traits we would be replicating throughout the class; a smaller volume (pictured in the first gallery below, belonging to Todd Pattison) and a larger binding (pictured in the second gallery below, belonging to Bill).

The class was a true immersive experience in Ethiopian bookbinding, with Bill really aiming to give us a taste of as many aspects of the tradition as they possibly could. From thread making out of deer sinew and parchment to hand-drilling our tunnels in our wooden boards with a heated awl, though for practicality sake and the sake of our poor awls, we just did that as a practice on a sample board and we used a pin-vise and a gimlet to drill and bore the holes for the rest of our models. Bill even constructed their own parchment adze, an Ethiopian took used to remove the hair from the skin of the hide, from a branch found at OxBow (see below).

A series of deer sinew in various stages from simply dried on the left to pounded, white and stringy on the right.
Deer sinew in various processing stages.
Instructor demoing how to attach the textile board lining and leather patch attachment before covering with leather.
Bill demoing how to attach the textile board lining and leather patch attachment before covering with leather.

Throughout the workshop we made two primary wooden board models with paired station sewing (four sewing stations, using 4 needs and two lengths of thread) and the “typical lacing hole arrangement” which is the most commonly seen example of board attachment (and what is used on the two exemplars). Of the two primary models we were creating, one was to be covered in leather. Prior to covering we added textile board linings and leather patches. Once covered, we created leather endbands that were then attached to the inner joints and anchored along the head and tail. The model was then blind tooled. Naturally, Bill had a plethora of historical examples of tooling designs for the class to look at for inspiration.

In addition, we could also make a textile over-cover, which I opted to do for my second model, since the over-cover is sewn around the book and meant to stay on. And then on the final day we made leather satchels. I was one of the few who opted for the more strenuous double-walled satchel (for my second model), which meant punching through three layers of thick leather in multiples sections of the satchel, but I’m very happy with how the satchel turned out. It even has a pull string to allow you to remove the book more easily, as it is meant to be a snug fit (which mine is!).

Bill also prepared additional boards and text blocks for class participants, if they were interested, encouraging us to try three station sewing at our leisure. For those who were interested, we dyed some cotton thread red in order for us to better see the various three station sewing patterns. Of those, I tried the hook variation and the pick-up variation. I also split the board of one of these models so that I could repair it it with a common thread repair.

Finished Models

Beige leather satchel with strap that has been woven together with strips of leather to extend the length.
One piece, double-walled leather satchel.
Two additional models with 3 station sewing, using dark pink thread to show how the pattern works. One book has a broken board that has been mended with thread.
Left: Pick-up variation of three station sewing, Right: Hook variation of three station sewing with broken board repaired with thread.

Overall, it was a wonderful experience, and I walked away with so much knowledge and appreciation for the traditions, materials I worked with, and the new people I met.

If you haven’t checked out the two reels recapping my experience at PBI on the Preservation Lab Instagram, I highly recommend taking a couple minutes to watch them:

Session one recap:

Second session recap:

Jessica Ebert – Assistant Conservator

A huge thank you to my supervisor, Holly Prochaska, for her continuous support in my professional development and to my Associate Dean, Brian Gray, and UC Libraries for the financial support for this impactful experience. And also thank you to the Ohio Preservation Council for the development grant which help to subsidize some of the funding as well.